I love using Blot.im for this website. It’s the perfect combination of customization and simplicity. I’ve tried so many platforms (Wordpress, Squarespace, Tumblr, iWeb, Carbonmade, Jekyll, etc.) and I’m delighted by Blot. However, its best feature is a bit interruptive when I have an urge to write a post. Blot uses Dropbox to host files which means writing starts with making a new file, naming it, and then copying and pasting a few snippets of data (title, tags, and date). I tried using the macOS stationery pad feature, but it didn’t quite work as expected.
I was emailing with Blot’s founder and he recommended I use Shortscuts.app to automate this process and reduce the number of clicks required to post. My goal is to click on an item in the macOS dock and automatically create a text file, name it, save it in the Blot folder on Dropbox, populate it with the required snippets of data, reveal the file in Finder, open Blot’s images folder, and open the file in Sublime Text (or whatever editor I feel like using this month). One click and start writing. The last step will be manually dragging and dropping the file from the Drafts folder to the Posts folder to actually publish it. Perhaps I’ll think of a clever way to automate that step as well.
Let’s begin.
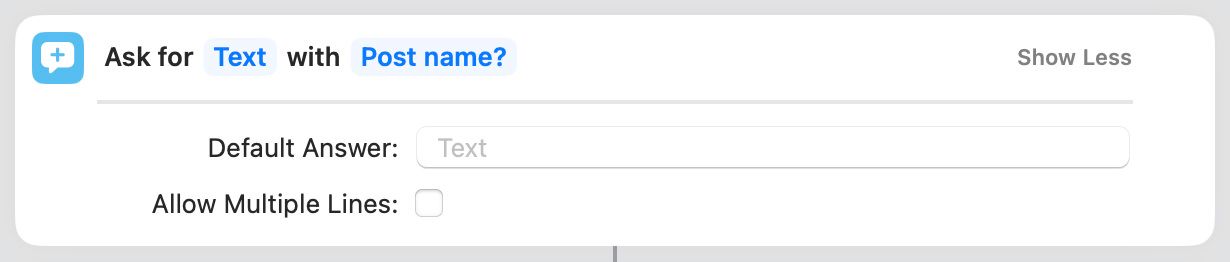
Prompt for a Title
First, open the Shortcuts app and make a new shortcut. Search for the “Ask for Input” action, and drag it into your shortcut. Set the “Ask for” area to “Text” and the area after “with” is what you will see in the prompt. I chose something simple: “Post name?”
Make sure you deselect “Allow Multiple Lines” because if enabled you are unable to use the return key to proceed. Instead you will see a new line appear in the text field.
Populate the Text File with Common Data
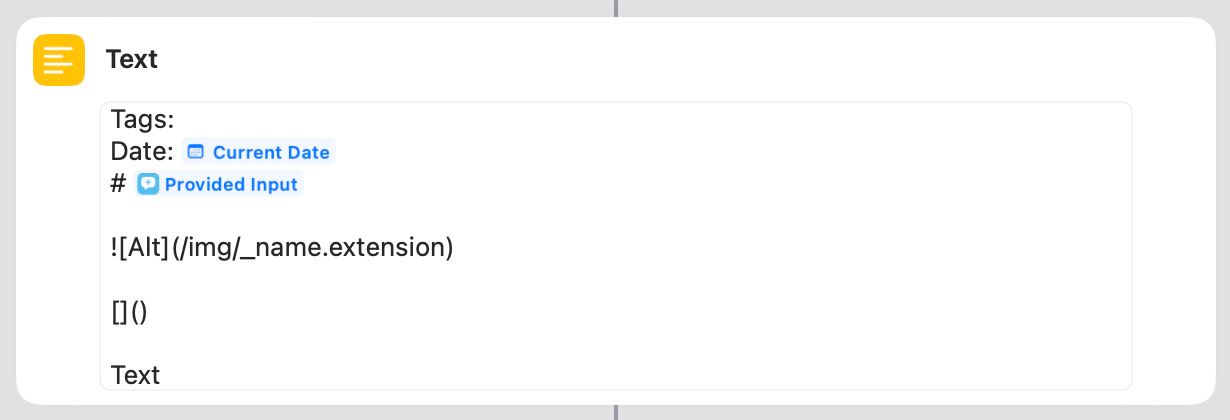
Every time I start a new post I manually type out the date, title, and the markdown needed to produce an image (I usually include an image in posts). This is tedious considering the computer knows the date, and I already entered a title.
Start with: Tags: and Date:.
To automatically insert the date:
Right click next to “Date:”
Click “Insert Variable”
Click “Current Date”
Set “Date Format” to “Long”
Set “Time Format” to “None”
The next line will automatically populate the title that you entered in the prompt above. Start with “#” (an h1) followed by a variable you must set:
Right click next to “#”
Hover on “Insert Variable”
Click “Provided Input”
Then I have a few snippets of Markdown to help me get started including:
 for an image I want to share
[]() for a link (I always swap the brackets and parentheses accidentally)
Text to remind me to include a thought
Now you’ll be ready to start writing instead of first setting up a post.
Name the New Document
Let’s take the post name you entered in the first step and apply to the new text file. This step is a bit finnicky so be careful.
Search for the “Set Name” action
Drag the action into your shortcut
Right click on “Name”
Hover on “Insert Variable”
Click “Provided Input”
Immediately type “.md”
Click “Show More:
Deselect “Don’t include File Extension”
Step 6 is important. A blinking cursor appears next to “Provided input” and you need to add the Markdown extension (.md) before clicking elsewhere. Achieving a blinking cursor in this exact spot is difficult to achieve again.
Steps 7 and 8 are also important because the goal is to manually set the file extension as “.md” vs. the default “.txt” which works in Blot but ideally posts use Markdown.
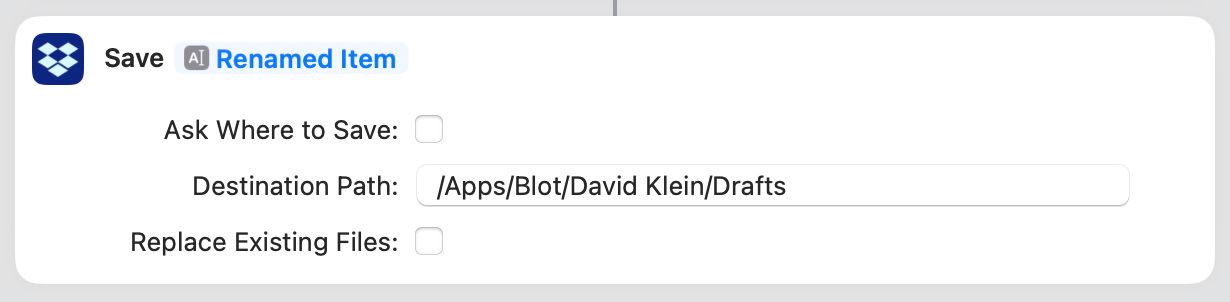
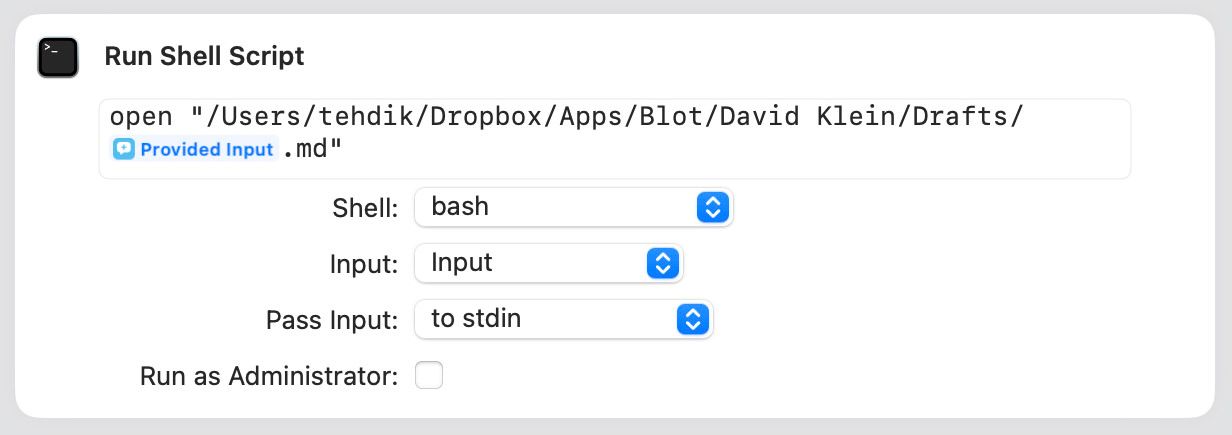
Save the File in Dropbox
Note: I recently updated Dropbox which uses the new macOS File Provider API. I am not sure how this update impacts the Shortcuts and its Dropbox actions.
For “Destination Path” enter the location of your Blot Drafts folder. Mine is /Apps/Blot/David Klein/Drafts. Make sure “Ask Where to Save” and “Replace Existing Files” are deselected.
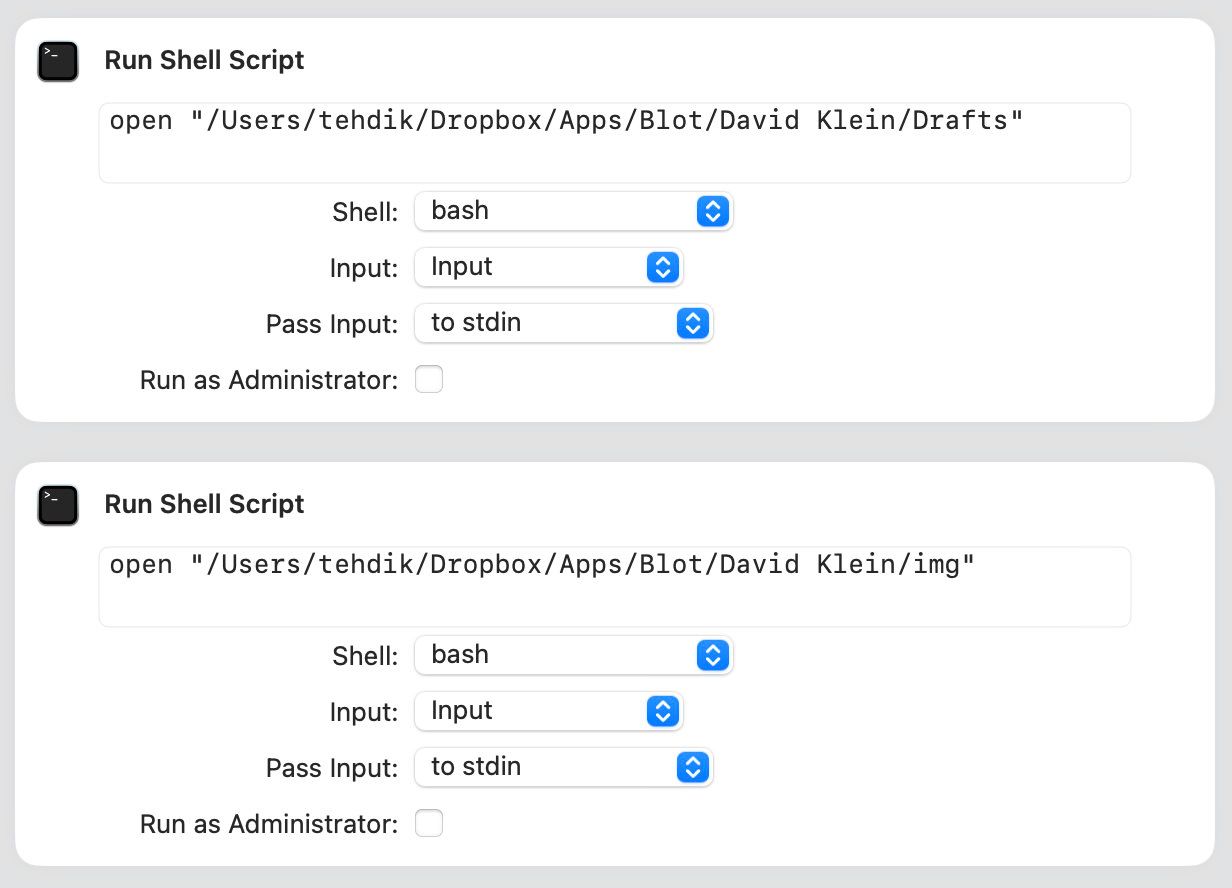
Open Important Folders
As mentioned above, the last step will be dragging and dropping the draft file from the “Drafts” folder into the “Posts” folder when you’re ready to publish. If your post includes an image then you will also need quick access to Blot’s images folder. You can skip this step if you don’t need folders to automatically open.
Search for the “Run Shell Script” action
Drag the action into your shortcut
Enter open along with the paths for folders that are important to your writing workflow
For “Input” right click on “Saved File” and click “Clear.”
The scripts that I use are:
open "/Users/tehdik/Dropbox/Apps/Blot/David Klein/Drafts"
open "/Users/tehdik/Dropbox/Apps/Blot/David Klein/img"
Pause for a Moment
Let’s revisit our original goal here: writing! The text file that was created, populated with helpful text, and saved to Dropbox should automatically open so you can quickly begin writing. It took a lot of experimentation, but I finally discovered that you can’t open this file yet. For some reason the file system doesn’t see it! As a result you need to pause the script for 1 second. Yes, 1 whole second.
Search for the “Wait” action
Drag the action into your shortcut
Set the value to “1”
Note: The screenshot shows 3 seconds, but I continued to experiment after taking the screenshot and discovered that 1 second also works!
Open Your File
Now it’s time to automatically open your new file.
Search for the “Run Shell Script” action
Drag the action into your shortcut
Enter open along with the path for your Drafts folder
Add a /
Right click after the slash
Hover on “Insert Variable”
Click “Provided Input”
Add .md
For “Input” right click on “Saved File” and click “Clear.”
And there you go! Your new file will automatically open. If it opens in an unexpected text editor you can quickly fix that by setting the default application for Markdown files.
Right click on a Markdown file in the Finder
Click “Get Info”
Find the “Open with:” dropdown
Select the desired text editor
Click “Change All…”
Click “Continue” in the popup
Now all of your Markdown files will open the application you selected.
Summary
Shortcuts is unpredictable. If you use Keynote or Things you know what it means for clicks and keystrokes to perform actions that you expect to occur. Shortcuts is different and, as a result, frustrating to use. Several times I had to start over because I got into a state that I did not understand and could not escape. I also spent time trying to use actions to open folders automatically and failed. It seems funny to use shell scripts for a few steps, but that was the most straightforward way to open folders.
The research needed to figure out Shortcuts was mostly done using ChatGPT. It was helpful even when I was unclear about what to click on. I asked clarifying questions nad ChatGPT answered (and apologized)! All of a sudden searching on Google, scrolling results, clicking on a result, interpreting the unique page design, and scanning text for an answer feels antiquated.
Good luck making a shortcut. Let me know how it goes on Twitter𝕏MastodonThreads!
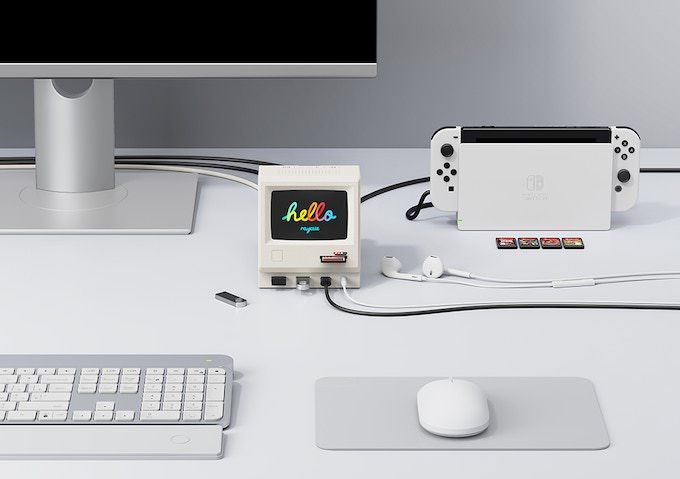
Nothing combines fun, functionality and just the right amount of nostalgia like the RayCue 128K. It looks like a miniature version of the iconic Apple Macintosh yet delivers modern features. A most versatile addition to your workspace, the RayCue 128K Pro boasts 14 docking ports, bluetooth speaker, and a cool display ready to show your favorite photos, time, date or any image you desire! Utilizing DisplayLink® technology, it also allows your computer to support 3 external displays. Plus, the RayCue 128K comes with a 7-port portable hub that looks just like a keyboard. It makes the perfect gift, office conversation piece or productivity splurge for anyone who remembers Apple’s early good old days!
Backed on Kickstarter! Can’t wait for this to arrive.
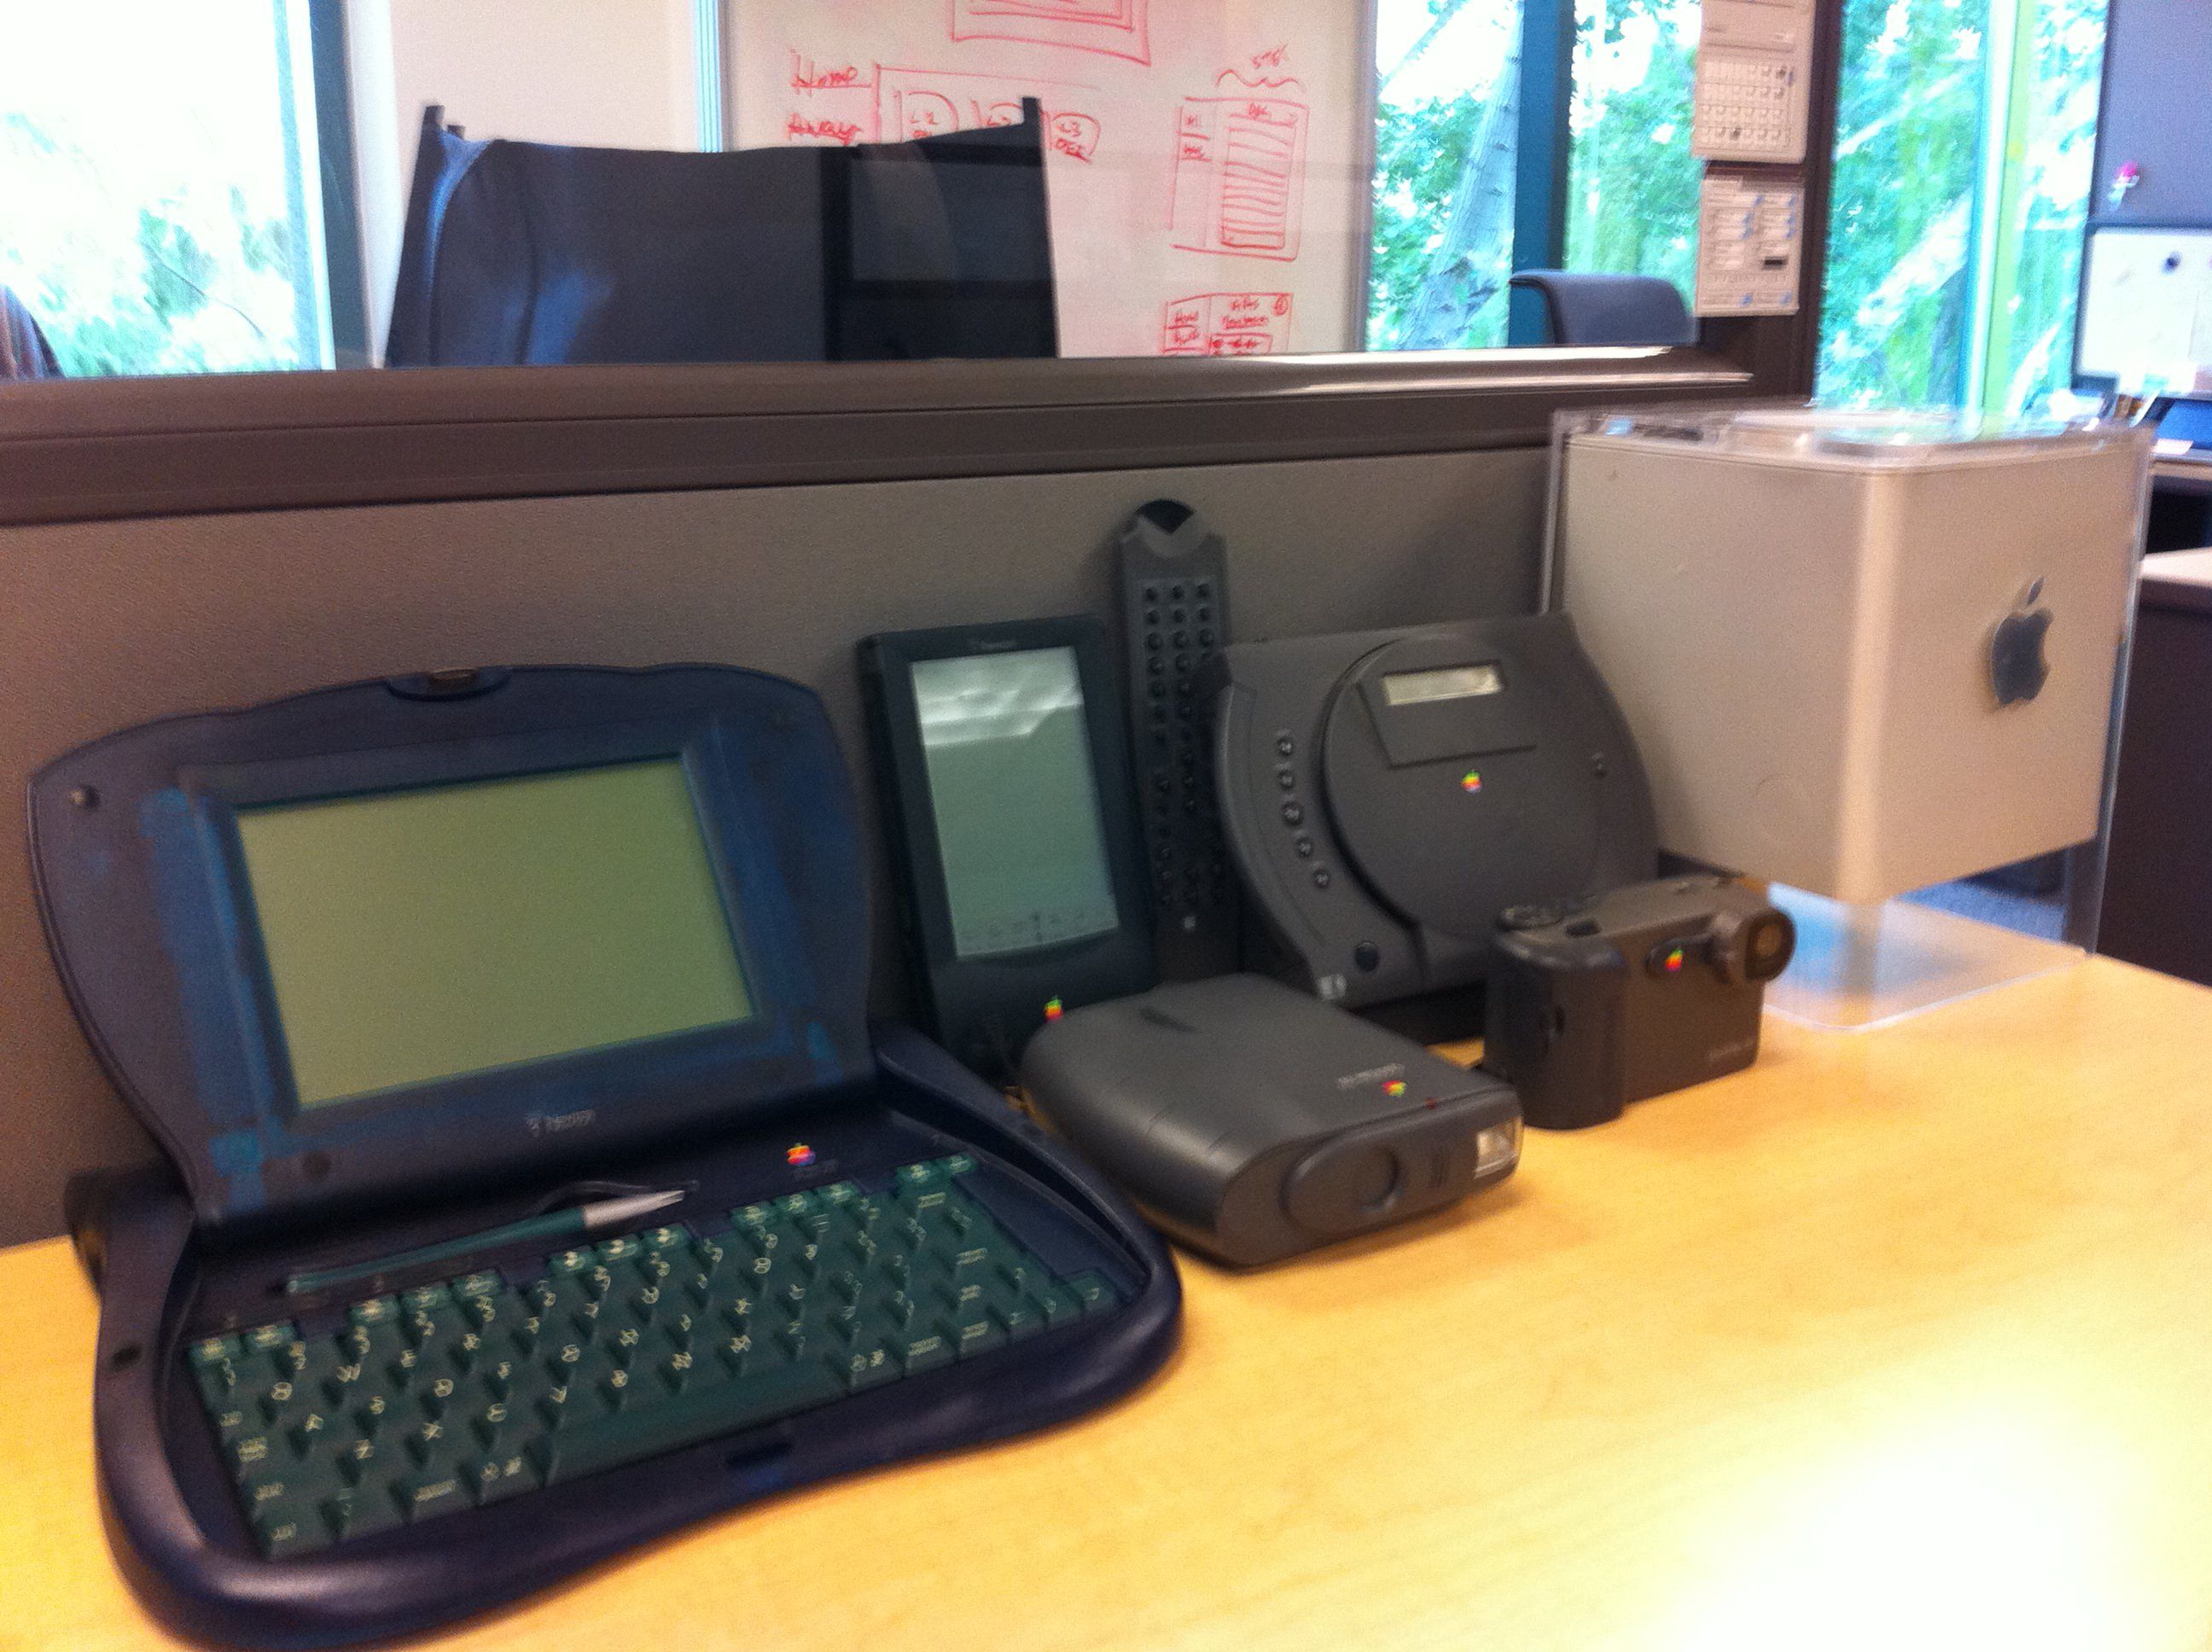
In 2011 I started collecting a few Apple products when a coworker who once worked at Apple gave me his QuickTake 150 and 200. I proudly displayed these on my desk and slowly added to the collection with an eMate, Newton, PowerCD Player, and a Cube.
My desk at iControl Networks. Shot on an iPhone 4 in 2011.
Over the past thirteen years the collection has grown through eBay purchases, Craigslist purchases, and friends/family who discover old products in a basement. Apple has made many products since 1976, and I certainly do not intend to own all of them. (Remember the Performa line? Yikes.) When considering adding something to the collection I run through the following questions:
Did I use one at home, school, or a friend’s house?
Is this product aesthetically pleasing?
Is this product important in Apple’s history?
I promise this makes sense in my head.
Recently I realized that I had never documented what I owned and what I hope to acquire in the future. Well, my Apple Collection is ready to share. Let me know if I’m missing anything. Soon I will clean everything throughly and take a few photos of the museum in the garage (the only place I’m allowed to display everything naturally).
Last month I received a DM on Twitter asking if I would like to be interviewed for Lovers Magazine. Naturally I was thrilled and delighted. After many revisions, a few photo shoots of my desk, and some taste input from Remy, I was finally ready to publish. Enjoy!
My relationship with music has evolved throughout my life as a result of new formats, devices, and services. My taste, however, has largely remained the same thanks to a few select rappers and groups. There’s a reason no one asks me to select the music during a dinner party.
I started with cassette tapes. I recall receiving an MC Hammer tape as a gift and not really understanding the point of listening to music. It was fun for a few minutes, but then I would get bored and go back to Legos. Eventually I discovered that one could record songs onto blank cassette tapes from the radio to create custom mixes although that introduced ads and babbling from DJs.
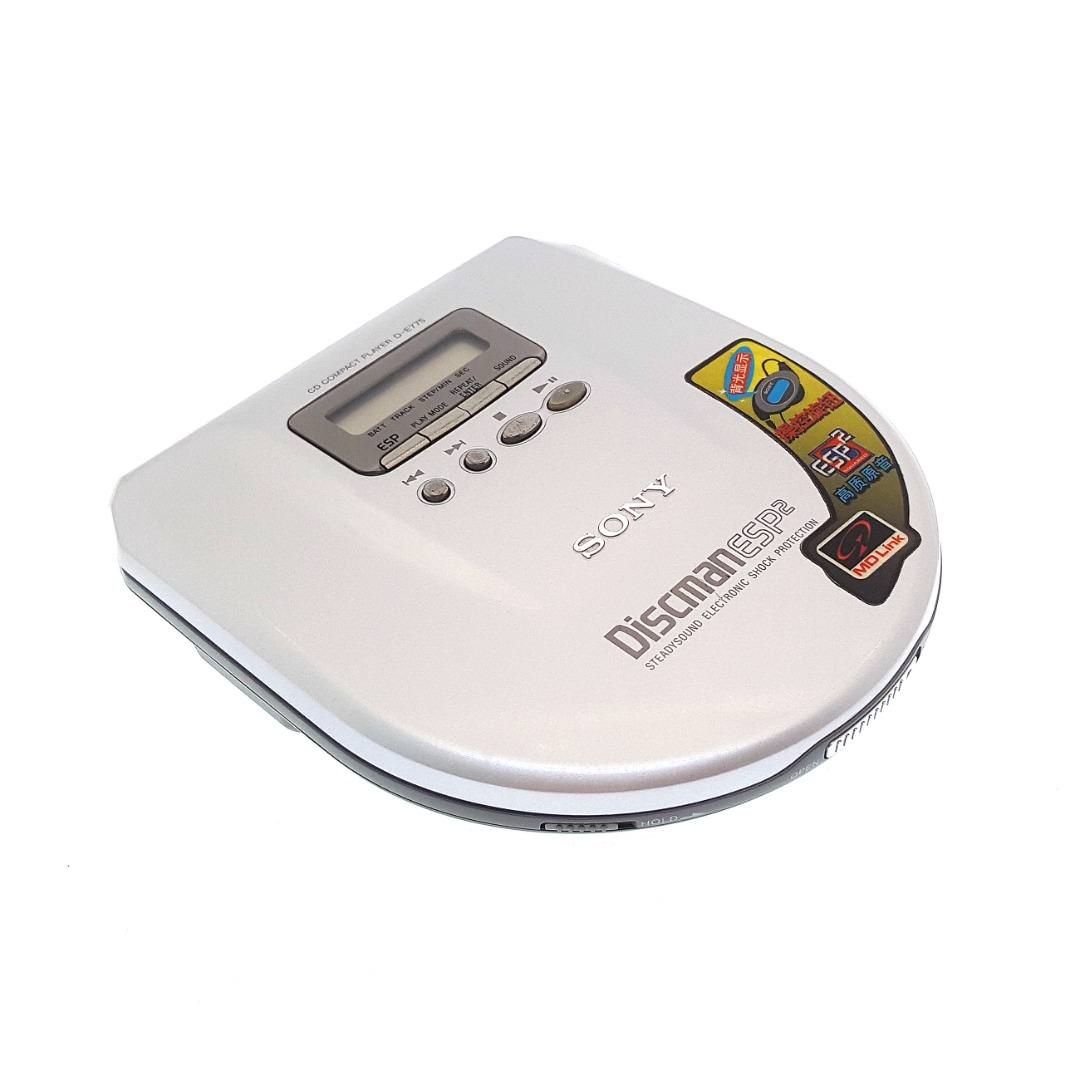
Then came CDs. I received a Green Day album as a gift and encountered the same problem: fun for just a few minutes. The first change that impacted by my listening habits came in the form of a device: the Discman. Now I could listen to music without being tied to my little stereo. Music became a little more fun but I’d still get bored with an artist after a few songs. I would constantly swap CDs to satisfy a mood.
Crucial for getting pumped up for cross country races
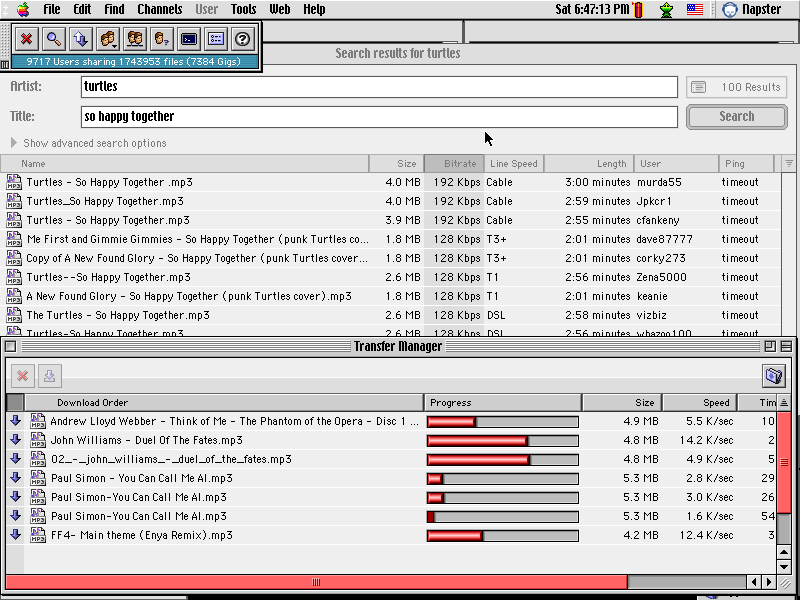
One day it all changed thanks to the MP3 format and Napster application. Now I could download any song I wanted at approximately 2-5 kilobits per second. Sometimes I would leave a few downloads running all night and hope that by the time I woke up for school a few had completed. The problem was storage. My Performa 6300’s 1.2 gigabyte hard drive was close to being full, so I stored my MP3 collection on a 100 megabyte Zip disk. This forced me to constantly delete and reprioritize my collection.
Napster running on Mac OS 9 in 2001
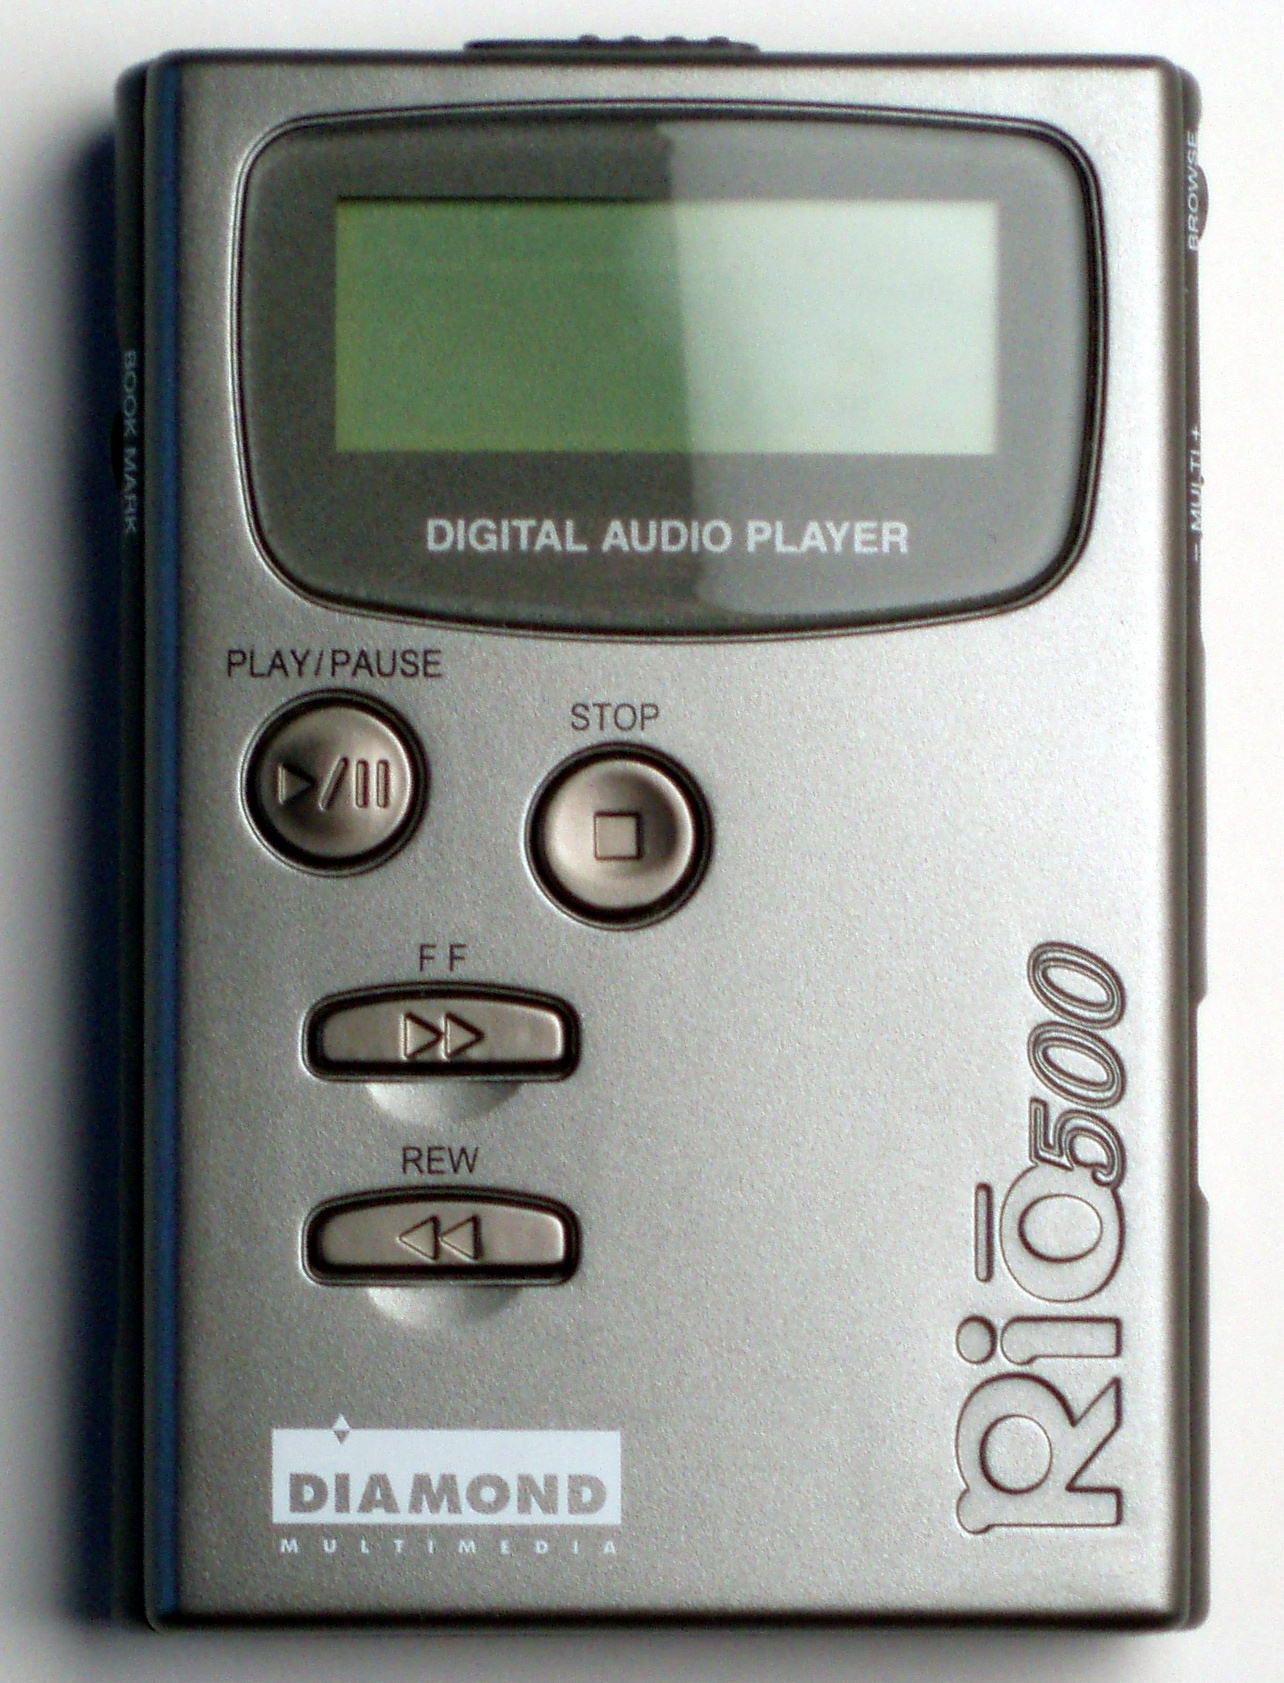
MP3s were awesome, but I was tied to my computer to enjoy my music. A device was needed. Around this time I got my first job as an intern at a startup in Palo Alto, CA named gig.com. Their goal was to build an “internet locker” for storing and streaming a music collection. Great idea, but way too early. Since it was a music company every employee was given a Rio 500 which had a whopping 64 megabytes of storage (approximately 14 songs). The fun was back, but one had to constantly manage the device and swap songs slowly using iTunes over a USB 1.0 connection.
The beginning of the future
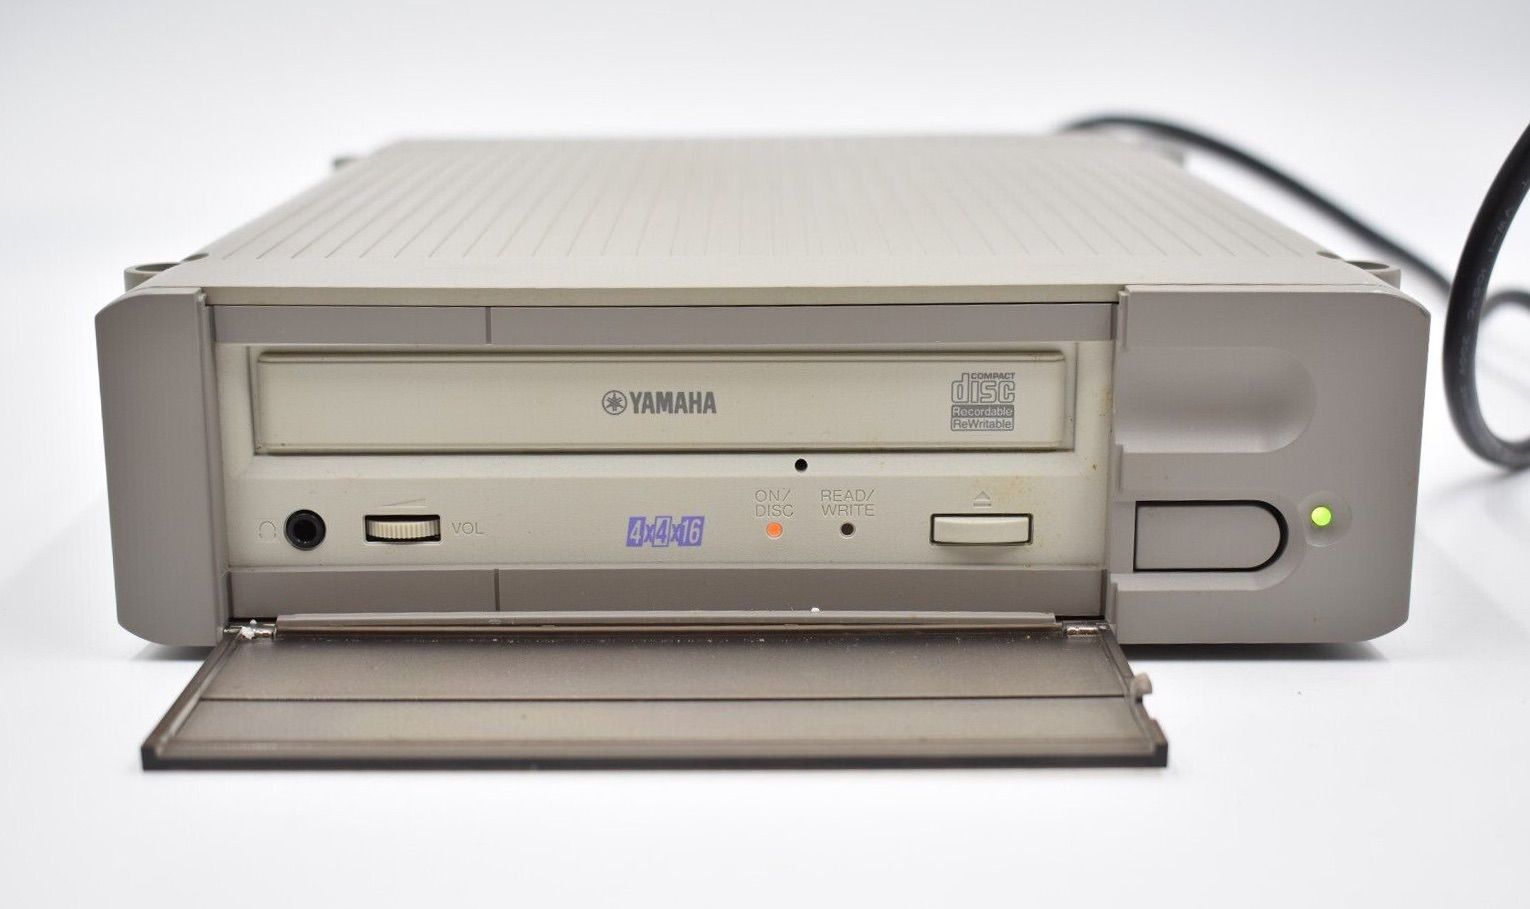
My neighbor purchased a CD burner which represented another step change. 650 megabytes per CD! Now I could travel with a packet of CDs each ready to play approximately 14 songs. Most importantly: these were my mixes. I made mixes for genres, moods, and occasions. Fun and variety were achieved, but now I had the inconvenience of carrying around a packet of CDs. At some point I got my own CD burner and CD burning software finally allowed one to burn CDs without frist converting to WAV files. Yes, for some time you needed 650 megabytes of hard drive space just to burn the data to a CD.
Burn an entire CD in 18 minutes!
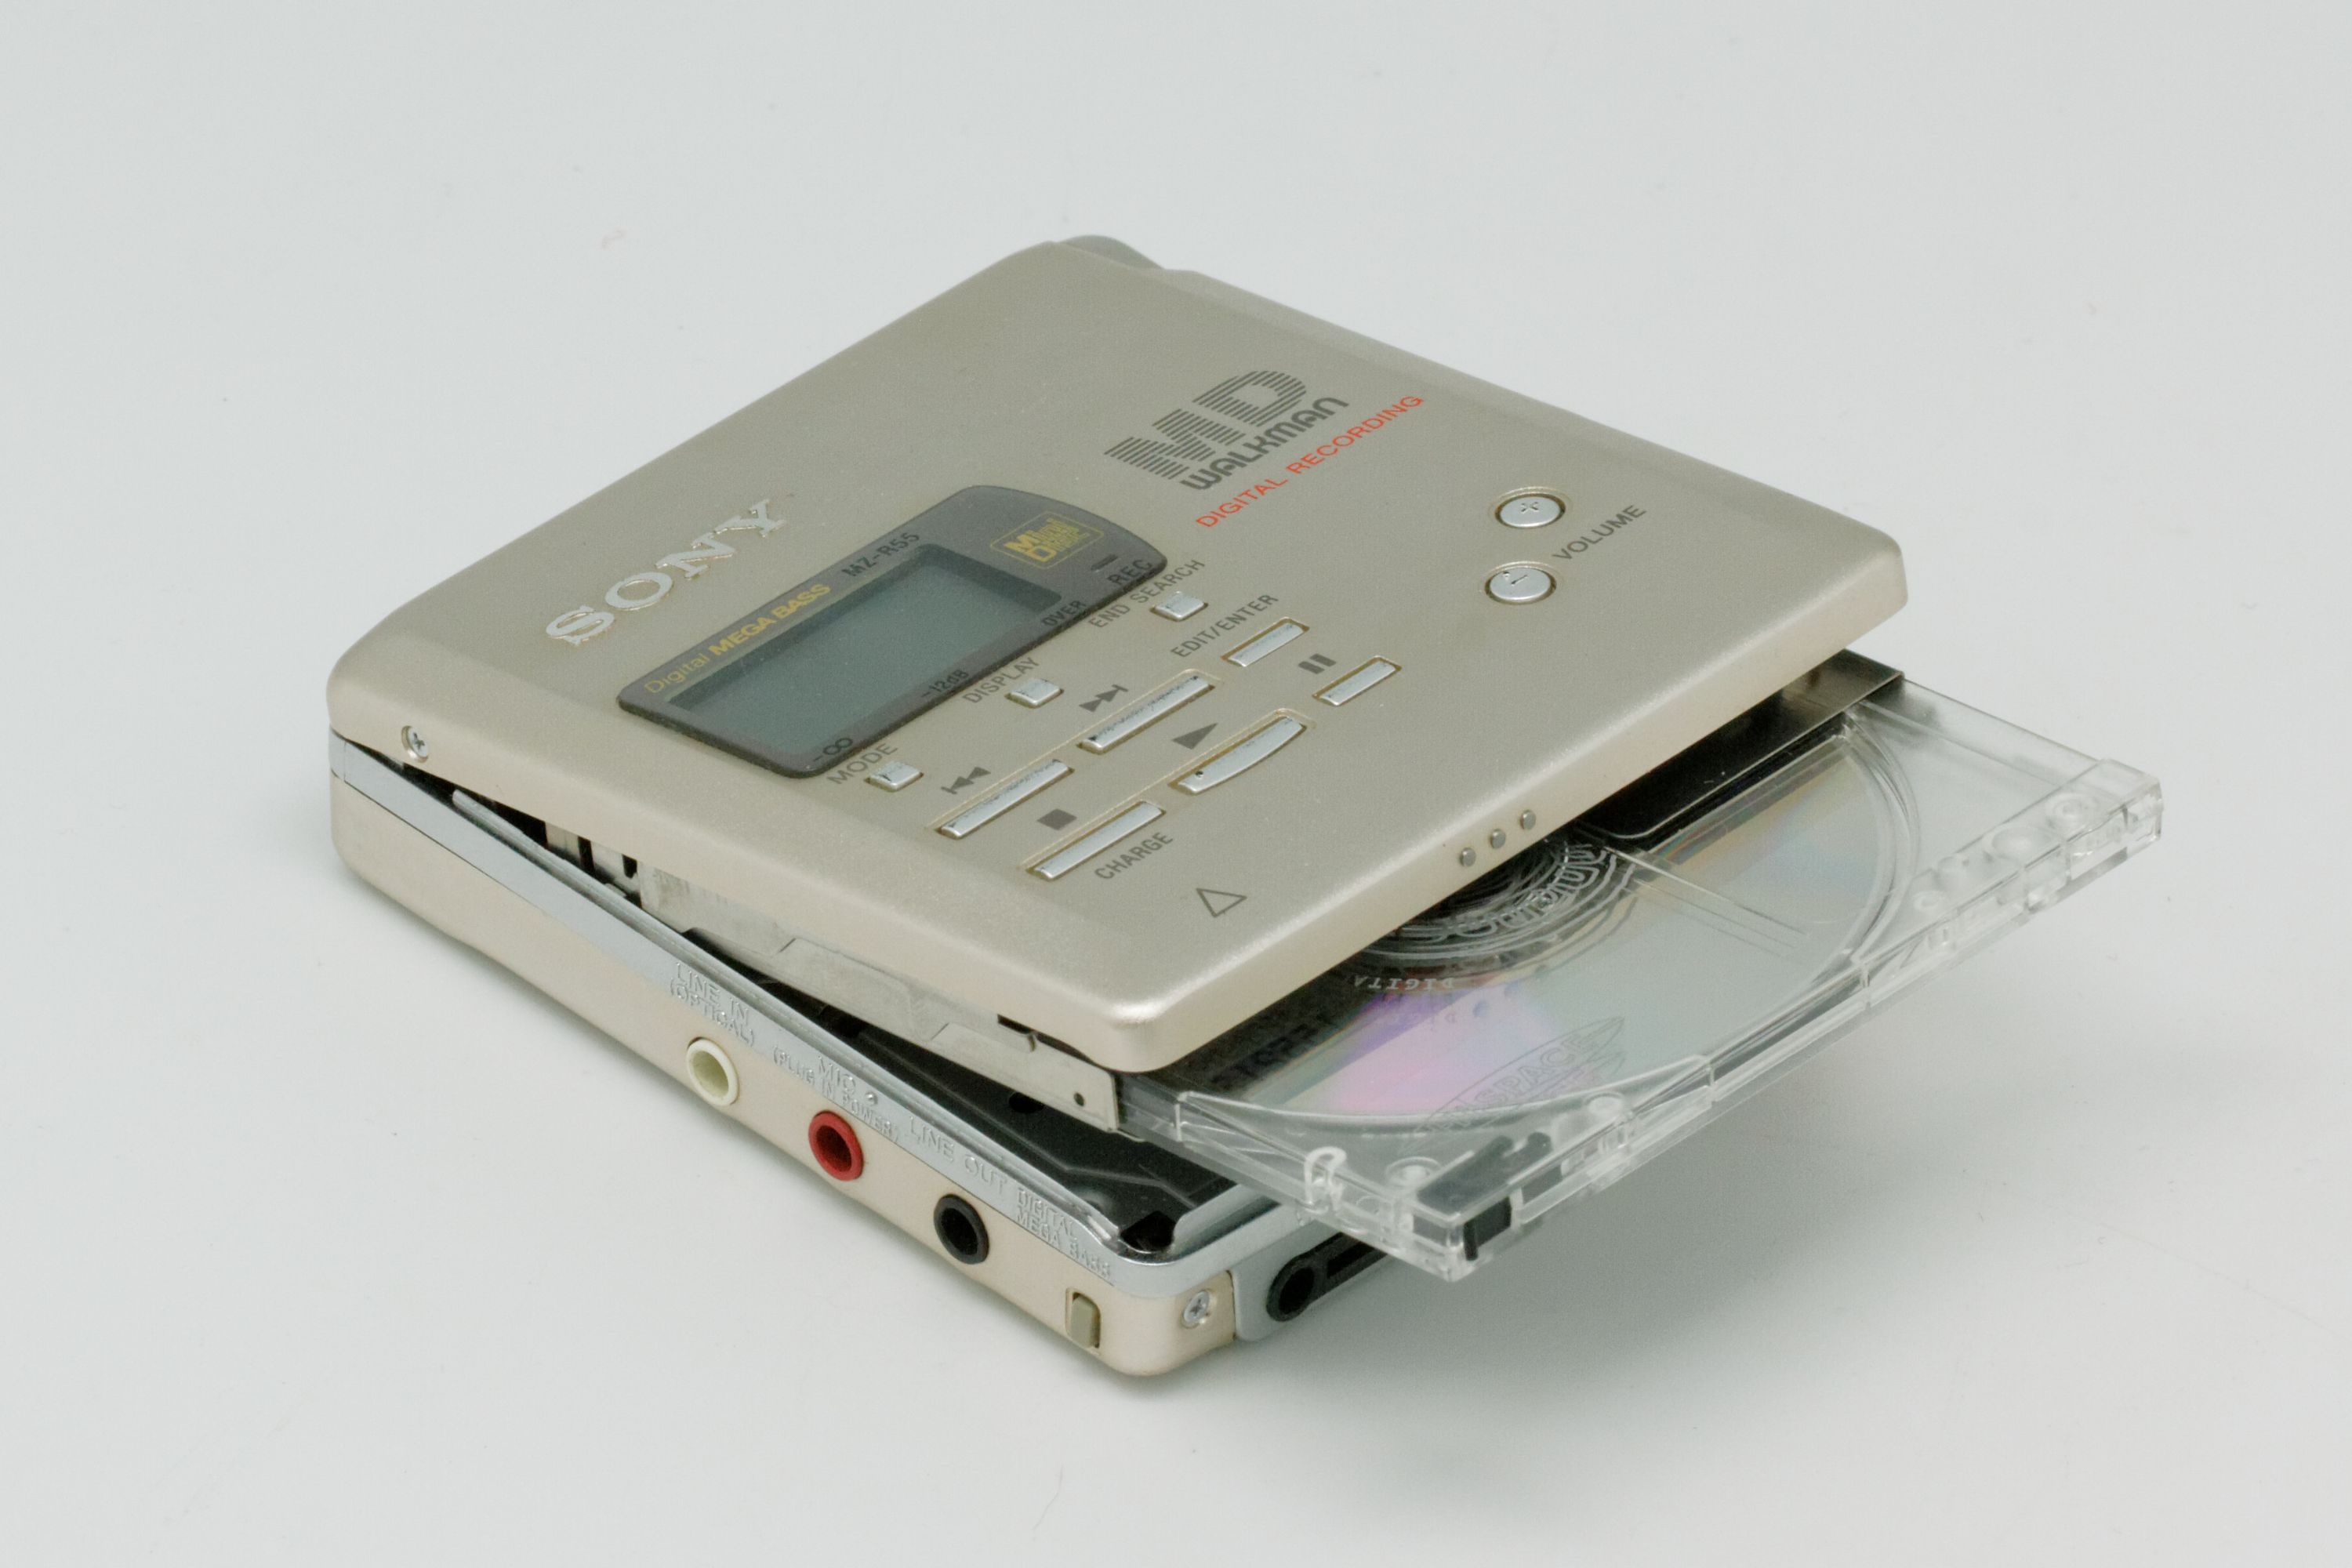
Time for an unfortunate, nerdy misstep. I purchased a MiniDisc player (specifically the Sony MZ-R55). It was so cool looking, and popping those little discs in and out of the player felt futuristic. Each disc held 74 minutes of music, but it took literally 74 minutes fo transfer the data. One of the benefits to MiniDiscs was the ID3 tag data could appear on the little remote you held (or clipped to your clothes) while playing music. The remote had a tiny screen that would display the artist and song name. This sounds insignificant but at the time it was helpful to browse songs by name before hitting play.
When I showed up to college with the MiniDisc player, listening to MP3s on the go was arguably still niche and difficult to navigate. People were amassing large collections on their computers and listening using applications like iTunes and Winamp. Something was missing.
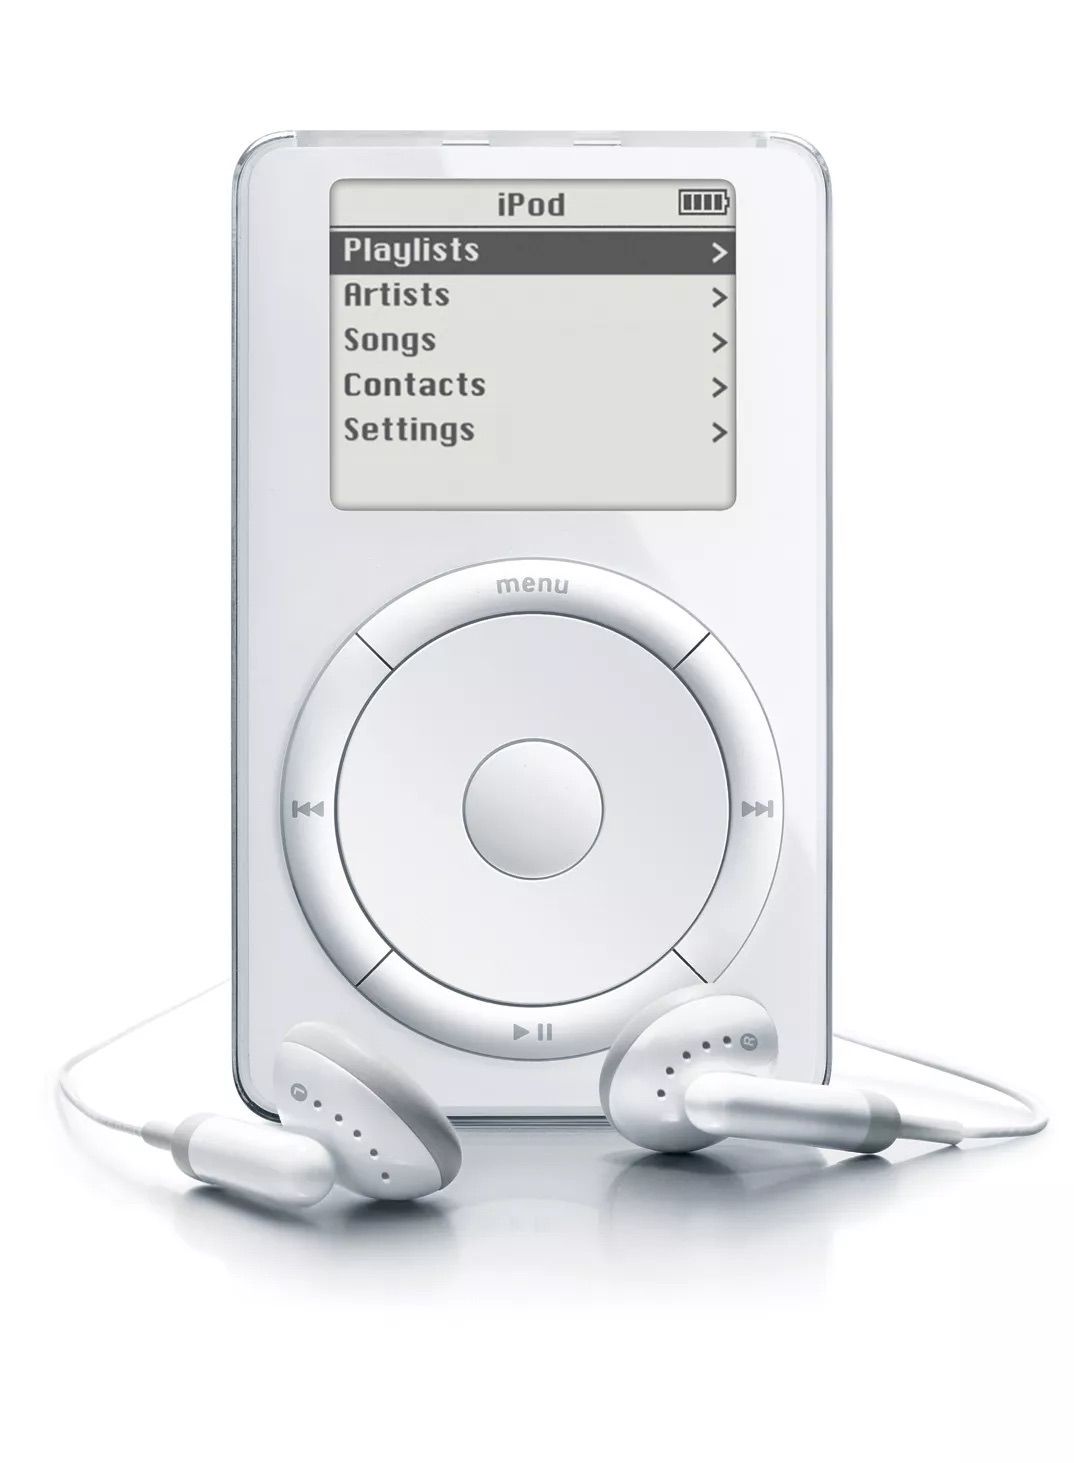
So small, so cool, and so silly
The iPod. At $399 it was a tough sell so I continued recording and swapping Minidiscs for a year while I saved money. I recall initial reactions focused on existing products that had more storage for less money. But, as I’ve repeated to anyone who will listen since first using a Mac, they were ugly, unintuitive, and slow. Instead of up, down, left, right, the iPod allowed you to scroll quickly using a simple, circular motion. Scrolling had acceleration which somehow felt both magical and natural. One could navigate playlists and long lists of songs, and transfer them quickly from a computer. Slow downloads and slow CD burning all of a sudden felt archaic when one watched the speed of file transfers onto an iPod using a FireWire connection. Songs transferred in seconds! My first iPod was the 10 gigabyte second generation model purchased in 2002. The moving scroll wheel was replaced
with a capacitive wheel that didn’t physically move. This was tricky in cold Ithaca winters when one constantly wore gloves outside.
Now we had fun, elegance, beauty, convenience, and speed. The last piece for Apple to fix was the source of MP3 files. We were stuck using LimeWire on the Mac which meant the occasional corrupt file, inconsistent ID3 tags, no album artwork, and breaking the law.
1000 songs in your pocket. But also a Firewire connection.
One more detour is necessary. In 2002 I joined Apple as a summer intern in the Hardware Engineering department. I worked in the Build to Order lab ensuring that new third party hardware worked as expected with current and soon to be shipping Apple software and hardware. This was a dream come true.
Interns were fortunate to meet with and hear directly from executives including Jon Rubinstein, Tony Fadell, and… Steve Jobs. I remember receiving an email saying that the next executive’s name would not be shared. This was it. We gathered in building 4 and in he walked. He talked about many subjects including his personal life when someone asked what his biggest mistake was.
Music came up. He discussed the experience of downloading and ripping music and how it wasn’t good enough. Less than a year later the iTunes Music Store launched. During the announcement I recalled sitting in that room as an intern listening to him talk about owning music in the digital age. He was telling us Apple’s plans almost a year in advance. Incredible.
Buy, transfer, unplug, listen
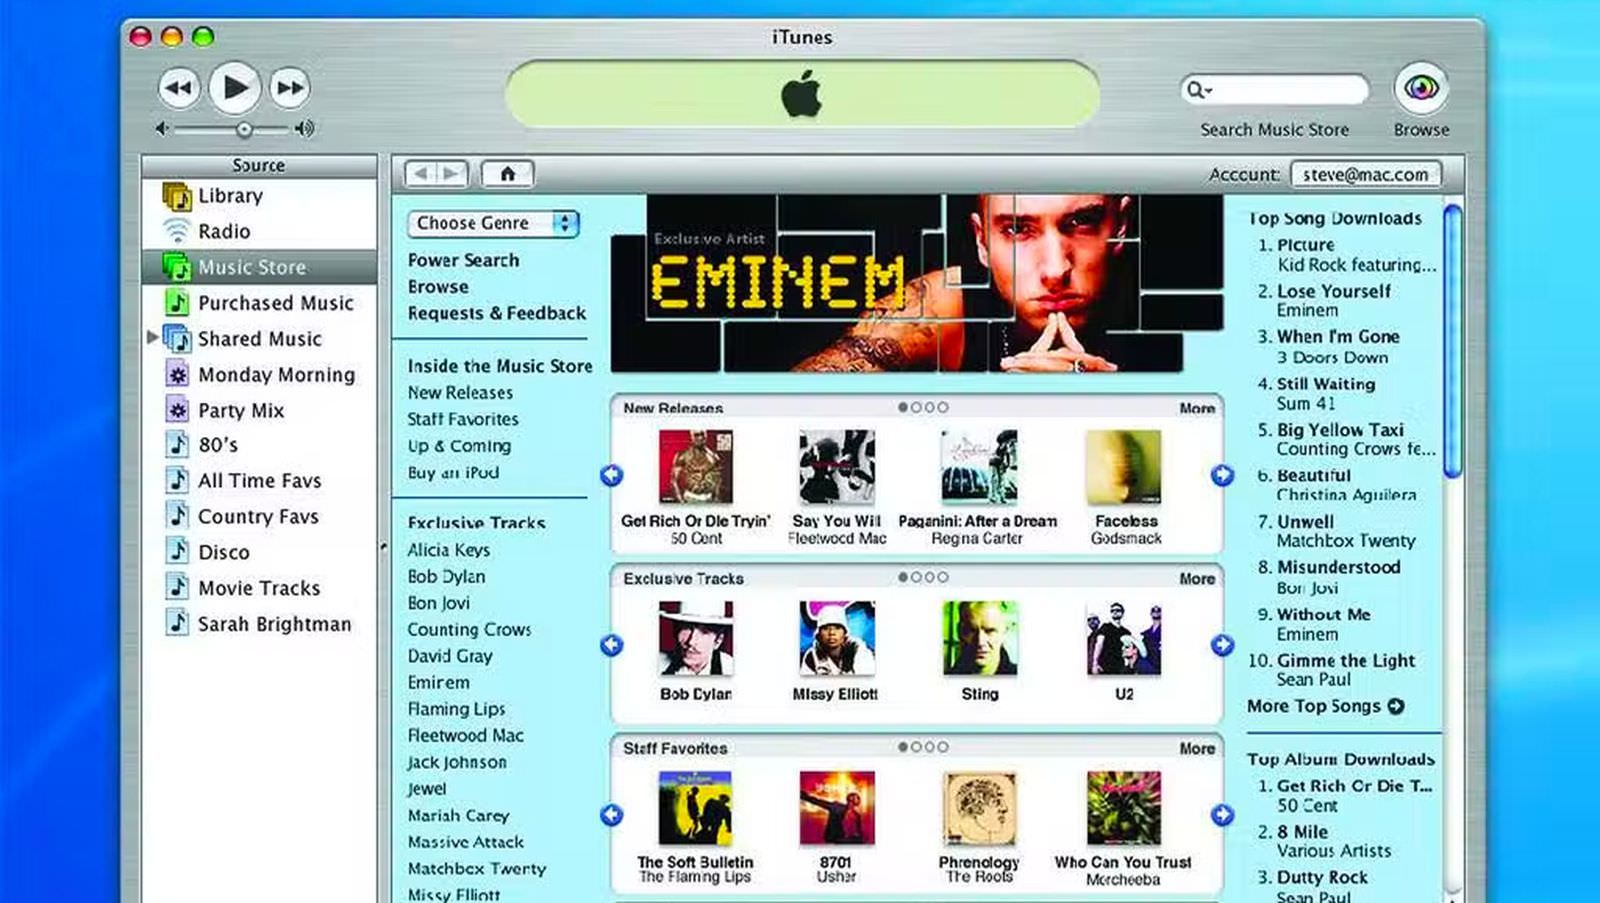
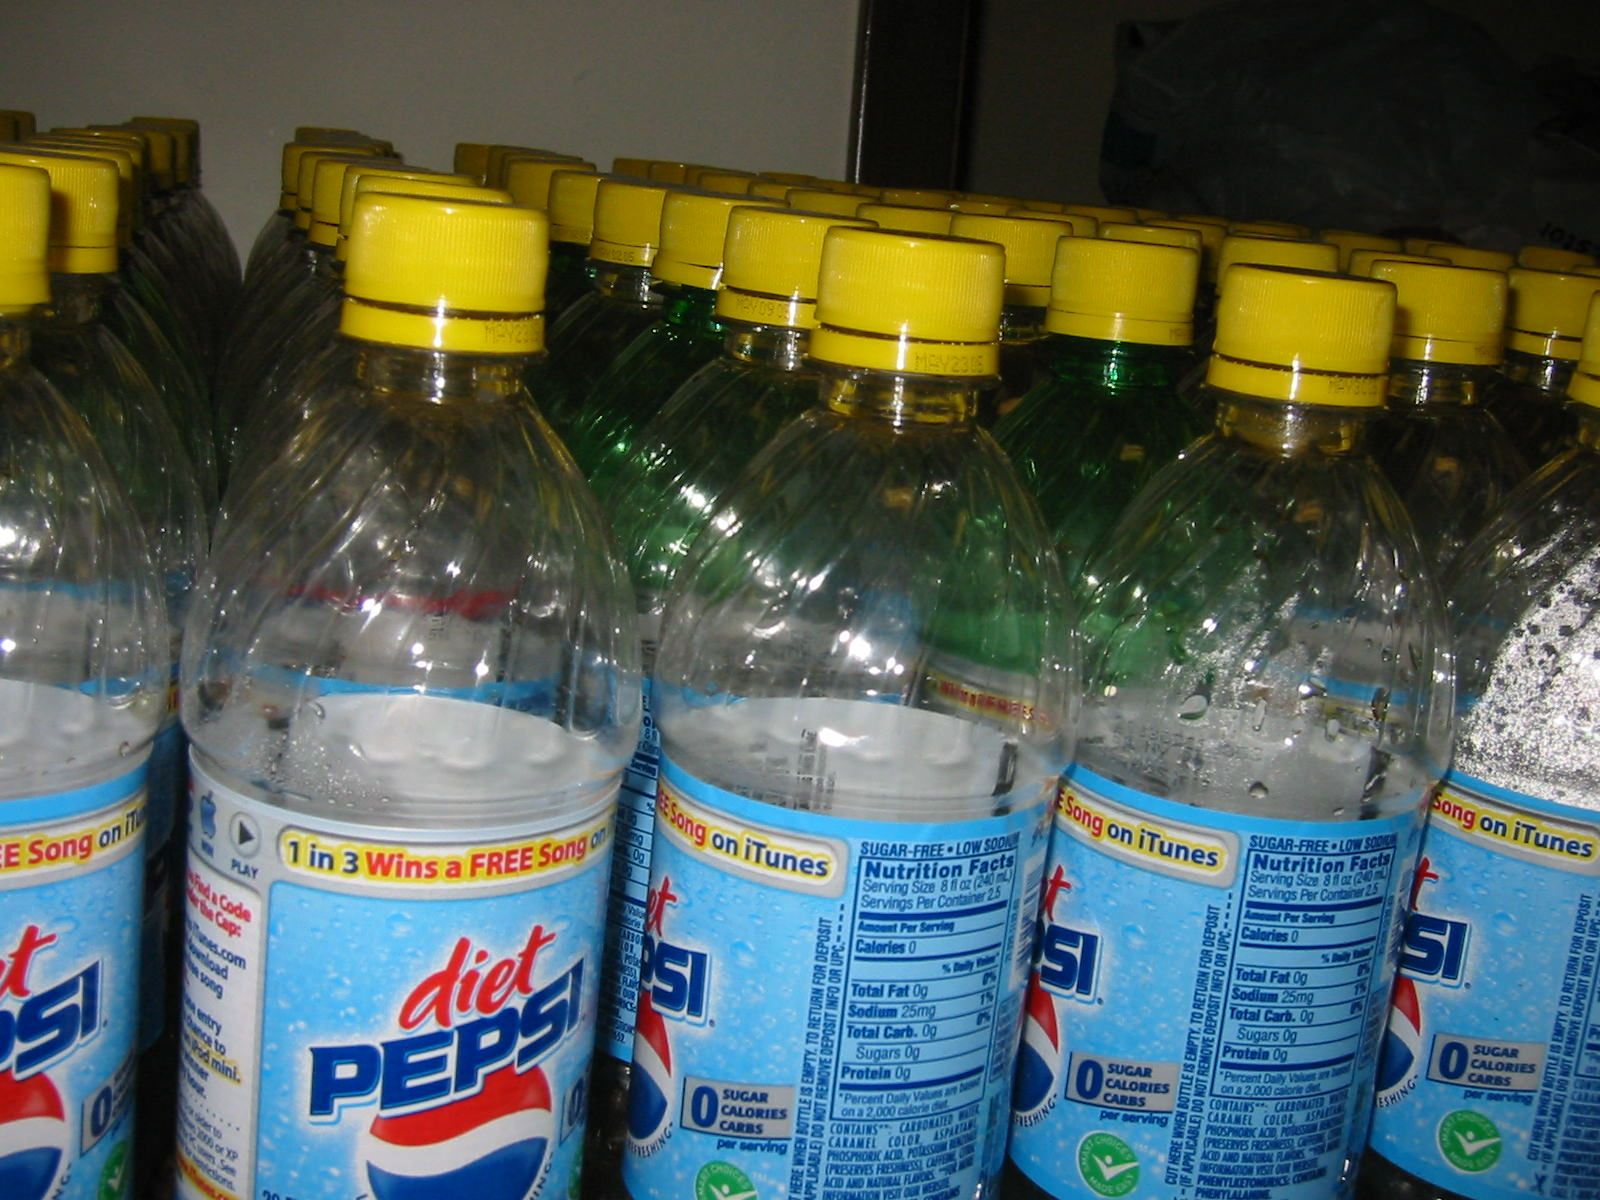
The iTunes Music Store launched on April 28, 2003. Somehow 20 years have passed. I remember updating to the new version of iTunes, searching for a song, and clicking “Buy.” The song downloaded in seconds. Finally. No more LimeWire. It was now easy to get MP3 files that had high quality album artwork, correct labels, and no random blip or scratch sounds.
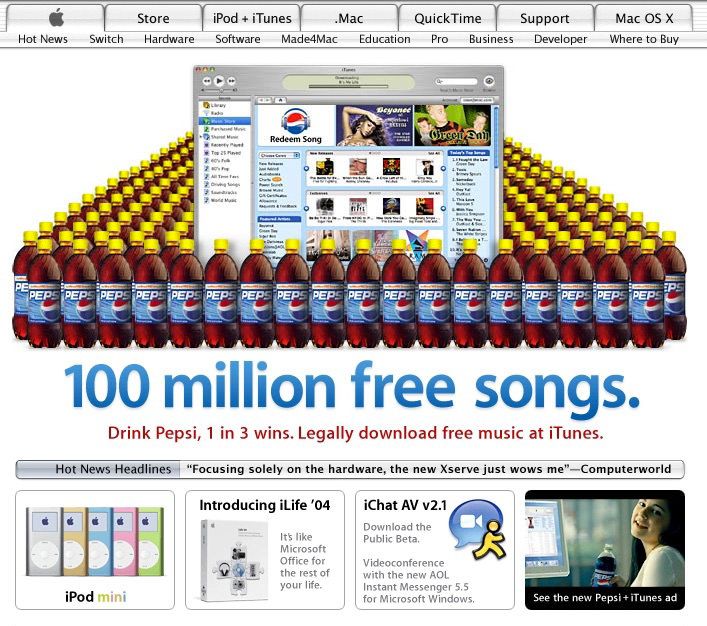
I didn’t have a lot of money in college so my collection grew slowly at first. A few months after the launch, Apple announced that 100 million songs were going to be given away as codes in Pepsi bottles. I was more of a Diet Coke with Lime kind of guy at the time, but I knew it was time to make the switch. As a part of my college meal plan I could purchase bottles of Pepsi with lunch, dinner, and maybe a snack or two throughout the day. Not every bottle included a code though which meant a wasted opportunity.
I love when digital meets tangible
People quickly discovered that if you tilted the bottle at a precise angle, you could see if the cap had a sufficient number of characters to represent a code. Boom. My collection exploded. I started buying multiple bottles at a time. I also looked insane standing by refrigerators for several seconds at a time while tilting bottles and carefully looking at them.
For some reason I thought it was fun to save the bottles and organize them into a grid even as the collection grew to over 100 bottles. Eventually it was time to grow up… and just save the caps. I found them in a little box in 2017 when I moved in with my girlfriend (now wife and mother of the cutest kid in the world). She (rightfully) made me throw them away. Fortunately there is photographic evidence.
Taken in my senior year apartment in Ithaca, NY
Now… I no longer feel connected to music. The playlists I so carefully organized disappeared during Apple’s journey from iTunes to Apple Music. My purchased songs are gone too. Perhaps I need to pay $20 per year for iTunes Match? I no longer feel compelled to organize music in Apple Music or Spotify (the Kleins have a family account which is primarily used to play Raffi nowadays). Because music is infinite it feels cheap. Easily discarded. Boring. I assume my feelings towards music are also a result of never being in an environment where music is playing. I also don’t feel I have time to truly listen to music. If I want background noise or if I’m driving/commuting I prefer listening to podcasts. I find them both more entertaining and educational. There are also podcasts to match moods similar to how I used music in college.
Thank you for joining me on this tale of my life through music. Hearing that it was the iTunes Music Store’s 20th anniversary got me thinking about all of these devices, formats, and naturally my bottle collection.
All of my work stems from the simplest of ideas that go back to the earliest civilisations: making clothing from one piece of cloth. It is my touchstone. I believe that all forms of creativity are related.
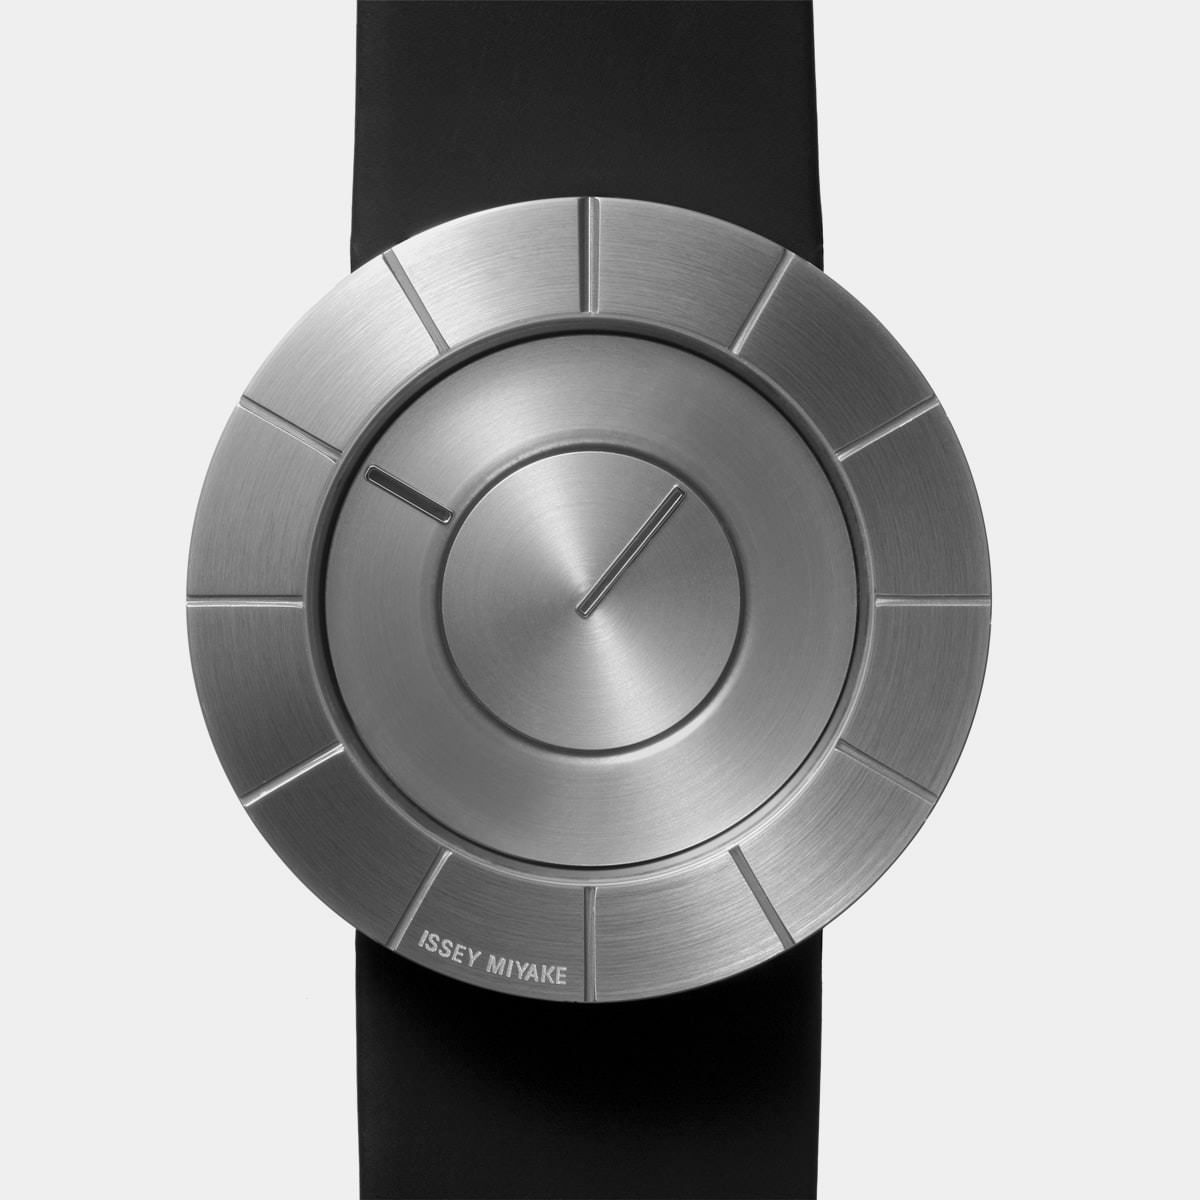
Issey Miyake passed away this month. My preferred watch between 2013–2015 was a Miyake piece called the TO Watch, and I recently learned it was designed by Tokujin Yoshioka while perusing one of my favorite websites, Minimalissimo.
Although strikingly simple, it was difficult to ascertain the time because the hour and minute hands are reversed. Friends would chuckle when it would take me a few seconds to become confident I knew the correct time after looking down.
Perhaps it’s time to purchase a new model. It’s gorgeous.
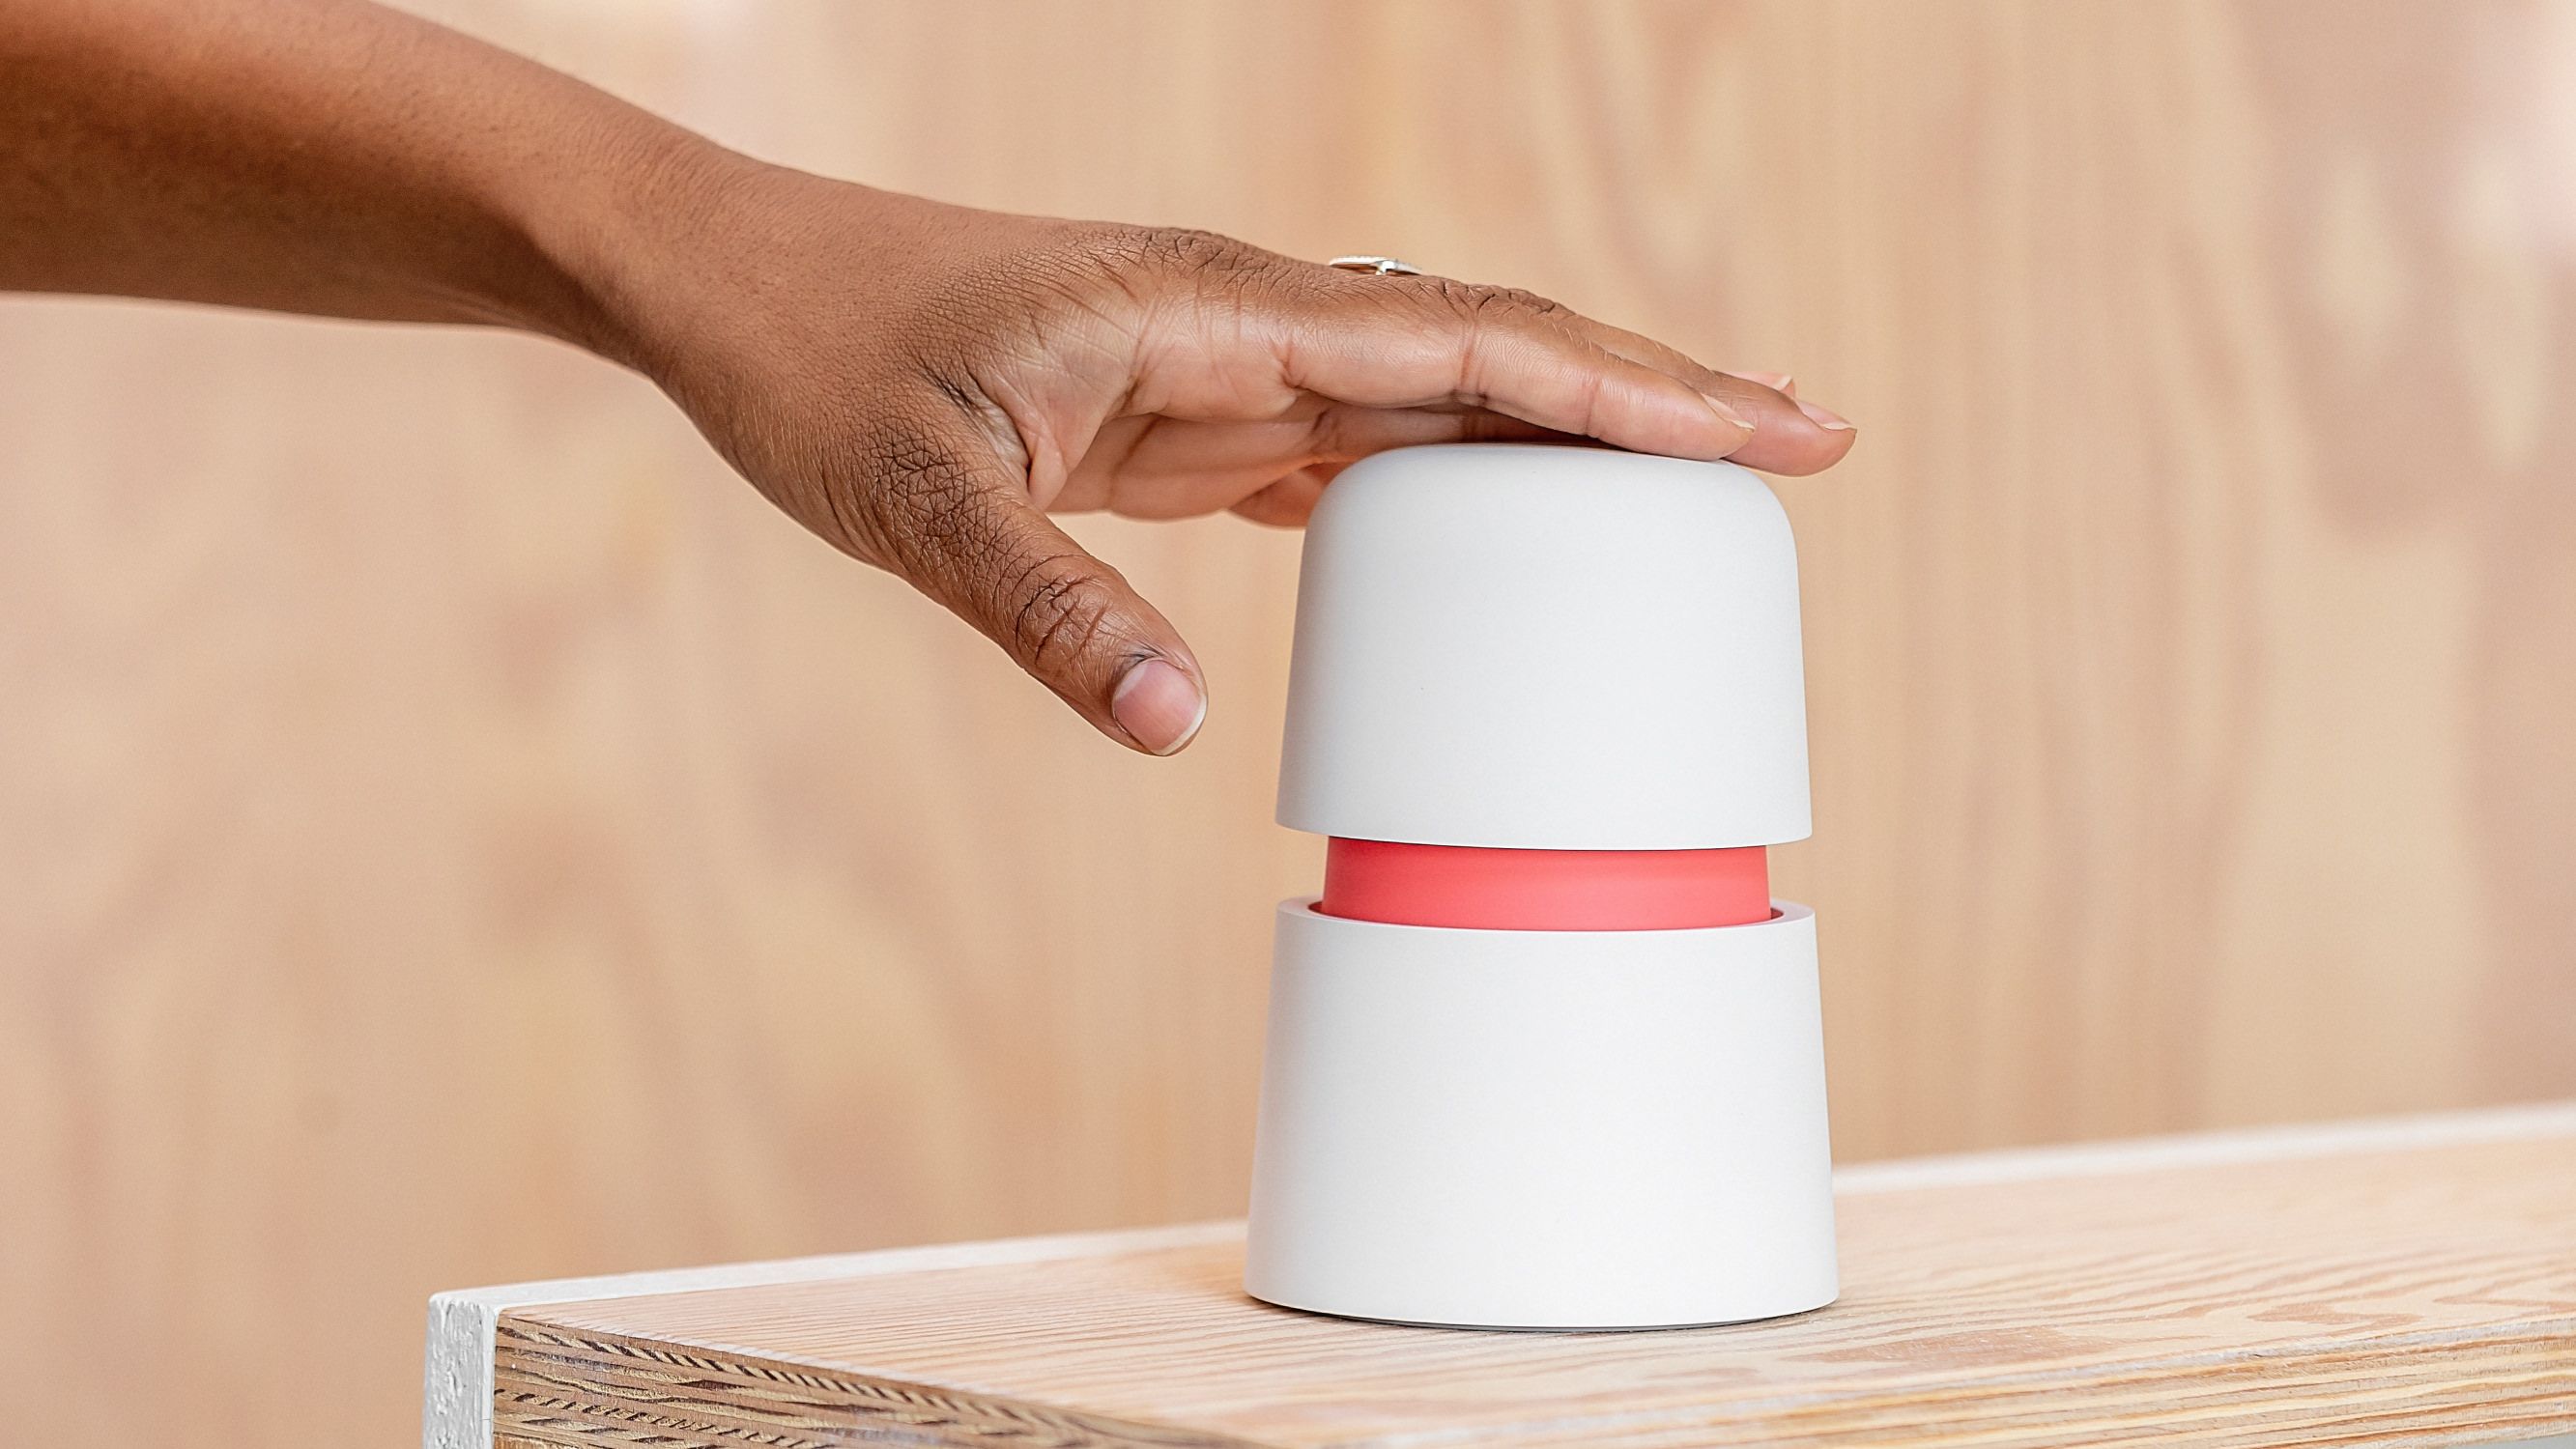
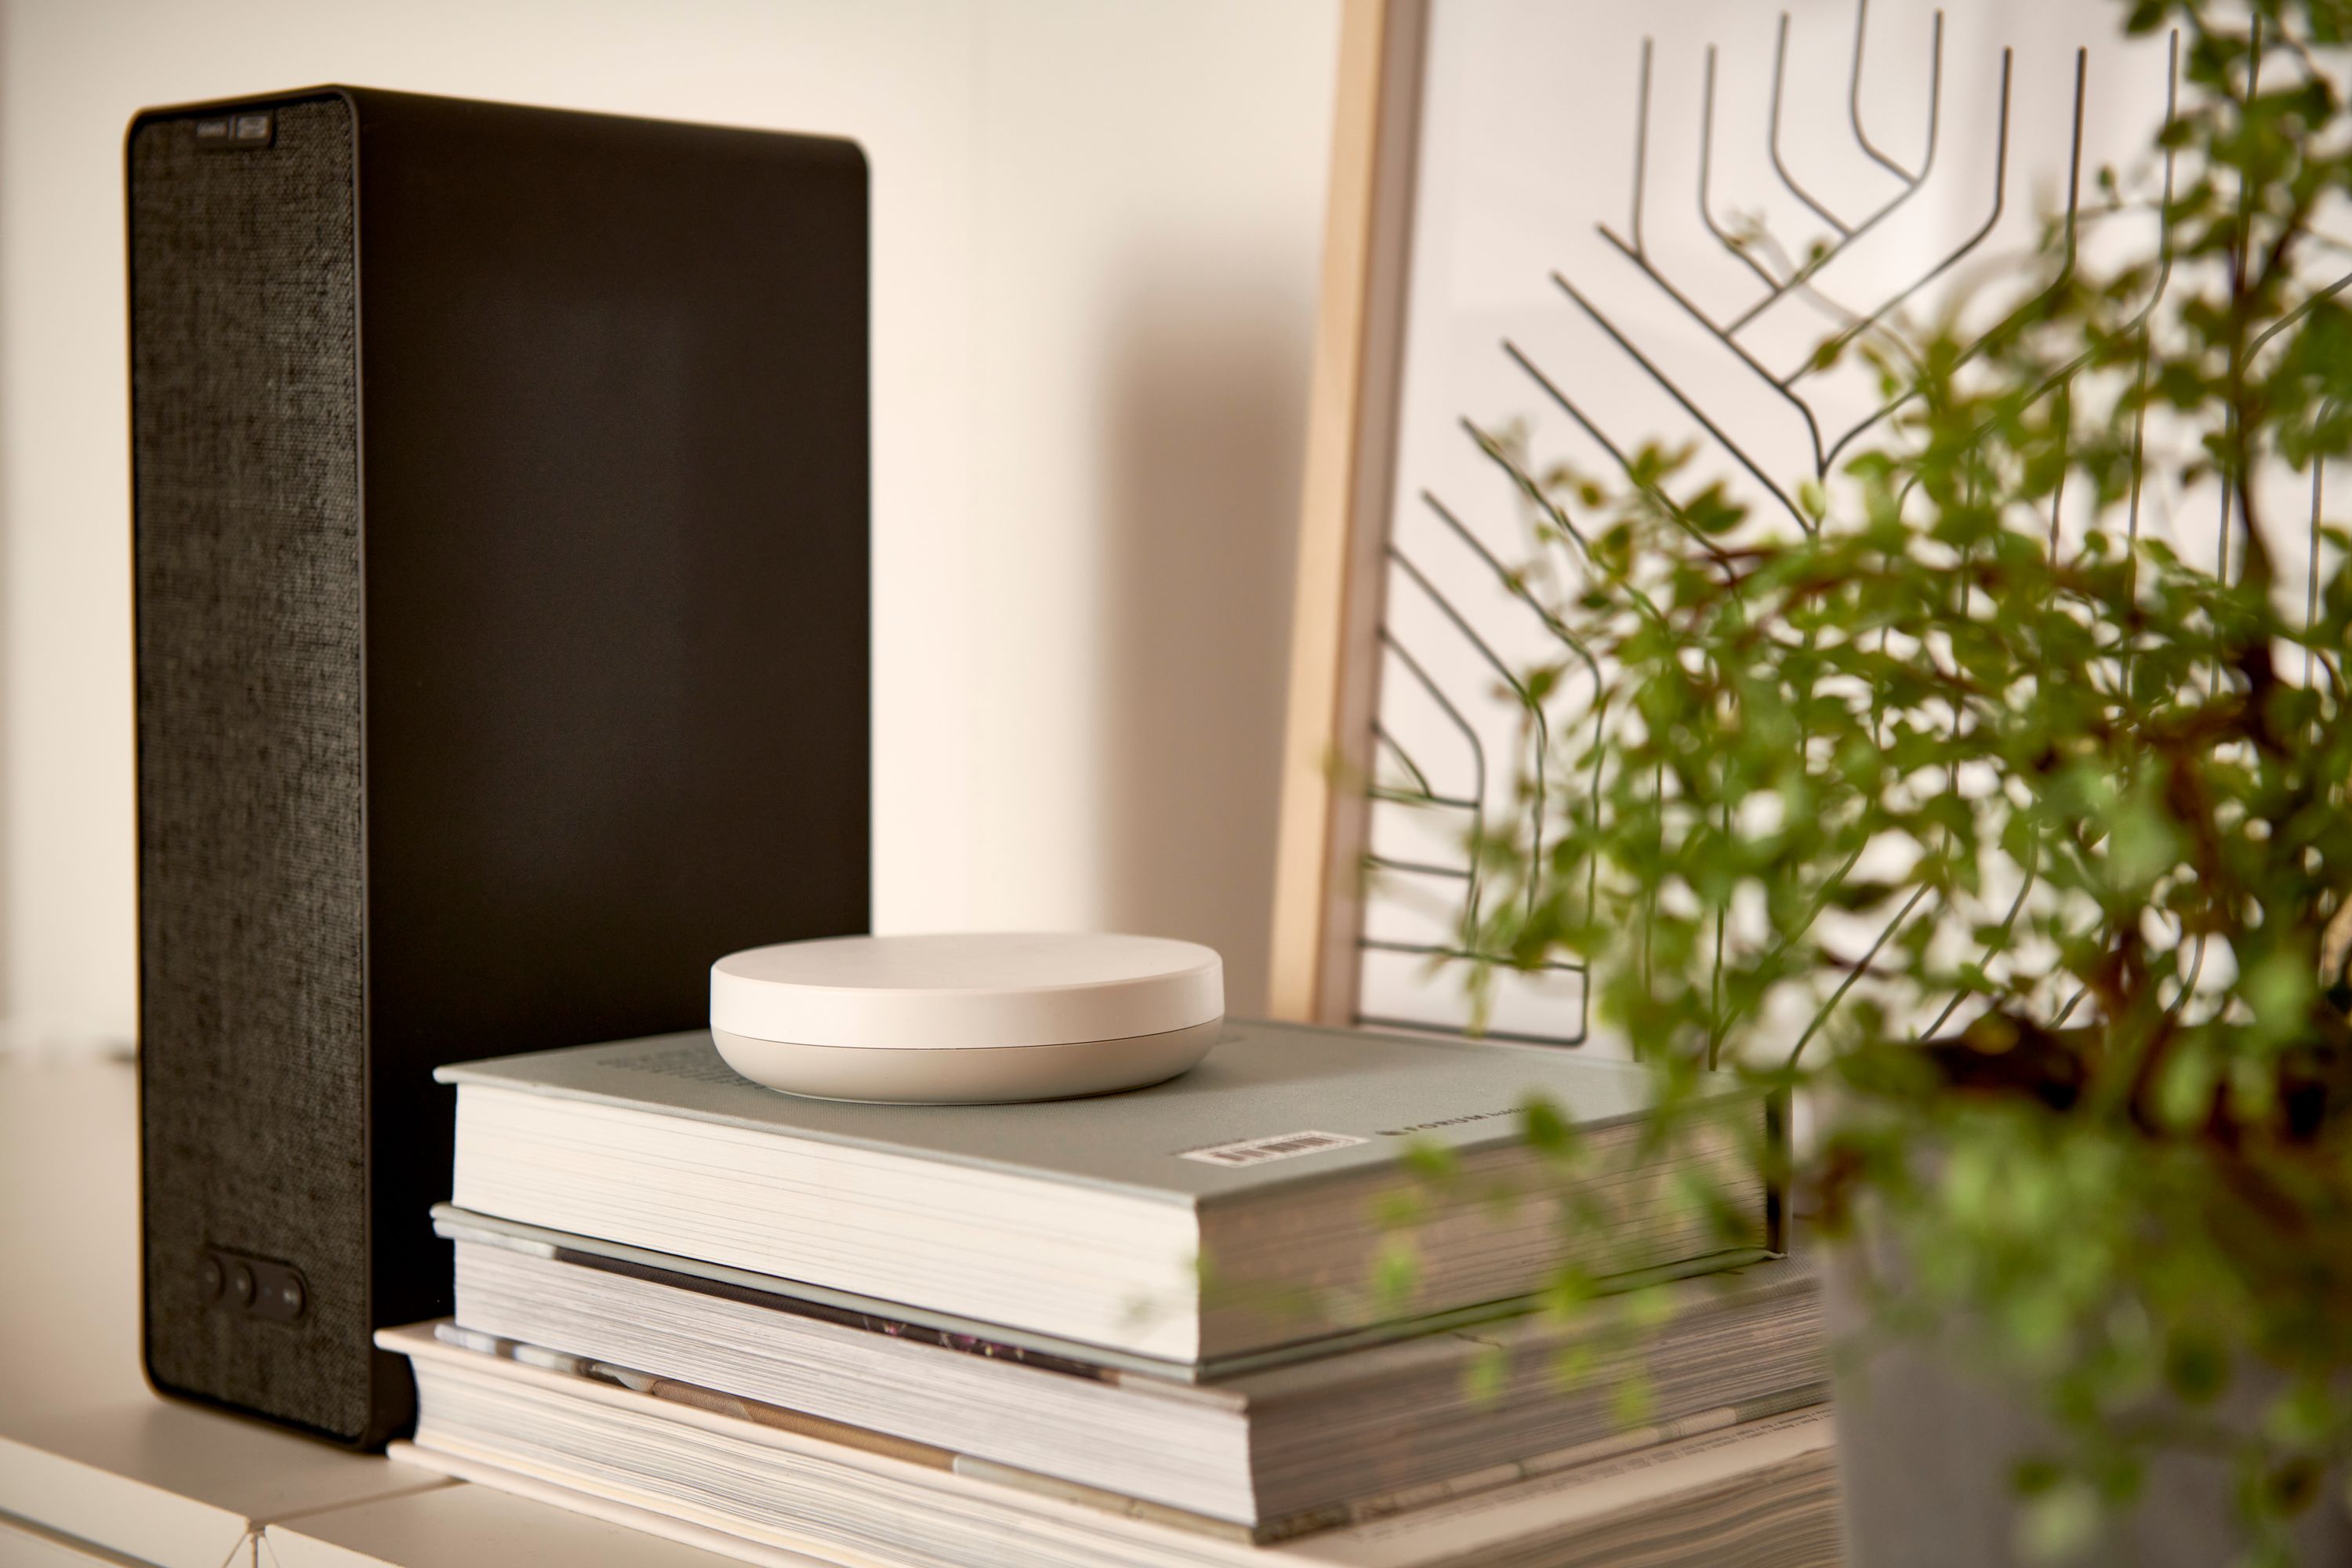
When I envision the future of the smart home I see a gradual transition away from cold, hard, and clunky hardware towards a more playful, soft, and delightful aesthetic. A great example is a recent Google experiment called Little Signals:
Little Signals explores new patterns for technology in our daily lives. The six objects in this design study make use of different sensorial cues to subtly signal for attention. They keep us in the loop, but softly, moving from the background to the foreground as needed.
Take a slow walk around your home and notice how you have arranged each area. Your desk, shelf, table, bedside, entryway. You chose objects that feel personal and come together to create a feeling. Why can’t computers, big, small, and tiny, similarly join your other belongings?
Today’s tech products stand out. They make aggressive sounds. They interrupt. They should remain on your periphery and gently draw focus when necessary before quickly fading away.
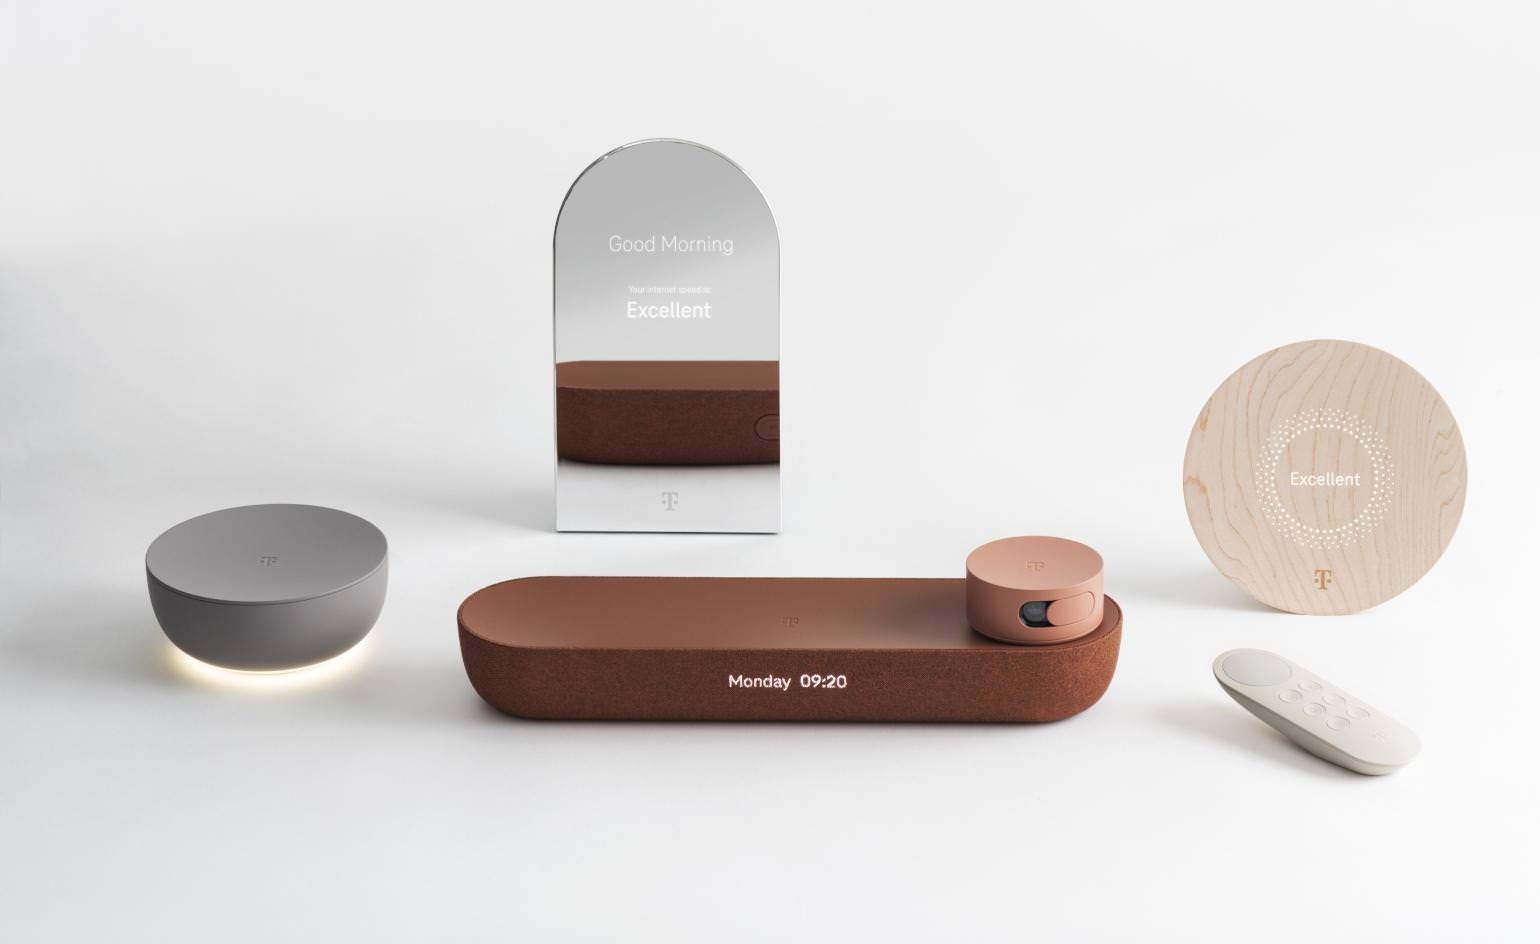
Connectivity Concept by Deutsche Telekom Design & Customer Experience and Layer
As the tools of domestic technology become increasingly linked together, in a flow that integrates digital and analogue devices, the designs in the Connectivity Concept collection make that connection harmonious and fluid — digitally and aesthetically.
Imagine a family of products throughout your home that feel connected digitally and aesthetically. Google’s latest Nest Cam, Nest WiFi, and Nest Thermostat are pursuing an elevated elegance through a new hardware visual language, and subtle yet fun color options like sand, fog, sage, sky, and coral. As a result I find myself turning to Nest for my smart home needs. Unfortunately the software has not caught up with the hardware’s softness and delightful presence.
DIRIGERA by Ikea
The last example is from Ikea, a company that my family still relies on for basic home necessities. The product photographed above looks pleasant atop a stack of books. No attennas; no flashing lights.
It will take time for Ikea to earn my technological trust, but I am excited to see them participating in this field. Perhaps someday I will venture into the new San Francisco Ikea and demo their WiFi speakers and smart air purifiers.
The most surprising part about this industry? Apple isn’t even mentioned.
The iPod was a groundbreaking piece of consumer electronics. With new generations introduced every year after its launch in 2001, the iPod product family reflected a period of rapid development in processing, storage, displays, and user interfaces, anticipating the iPhone’s blockbuster release in 2007.
This month we explore the evolution of the iPod from the inside out with our Lumafield Neptune CT scanner, guided by none other than Tony Fadell, the inventor of the iPod and the founder of Nest.
The scans of first generation iPod, sixth generation iPod, and the first generation iPod nano are fun to see, but the truly exciting part is the video with Tony Fadell talking about a few details from each iPod. For example iPods originally stored mp3s on tiny spinning harddrives, and simply dropping a harddrive on a table can easily cause damage to the harddrive’s head. I highly recommend watching the video.
When I was an intern at Apple in 2002, Tony told the interns the story of how the iPod came to be. The first iPod had recently launched, and during that summer the second geneartion model launched with 10 gigabytes of storage.
It’s hard to imagine how they designed, built, and launched the original iPod in just 8 months.
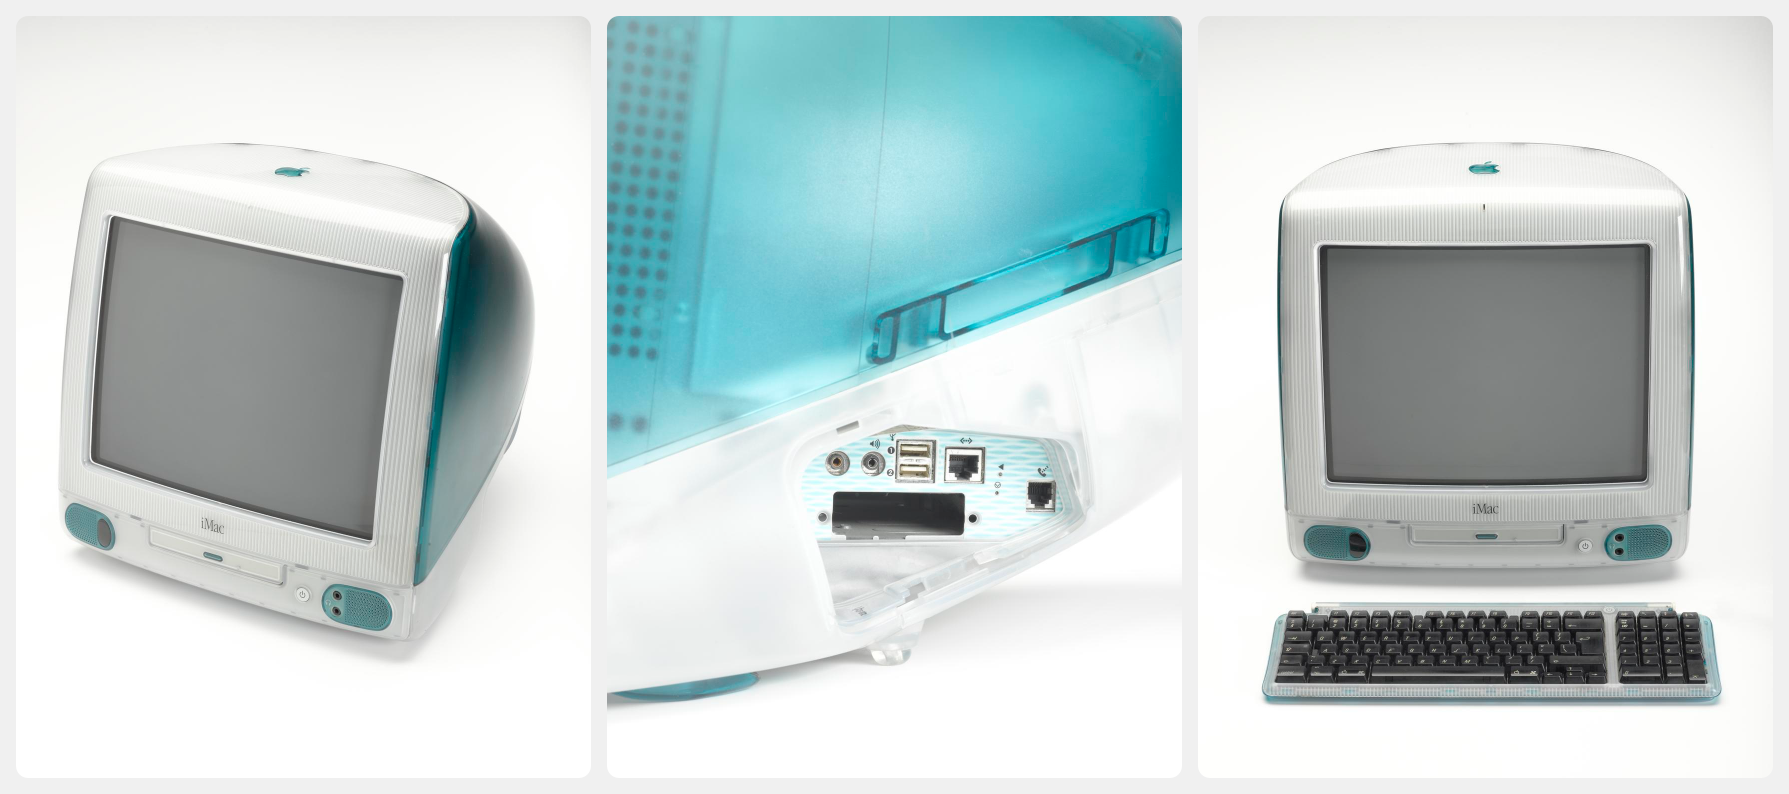
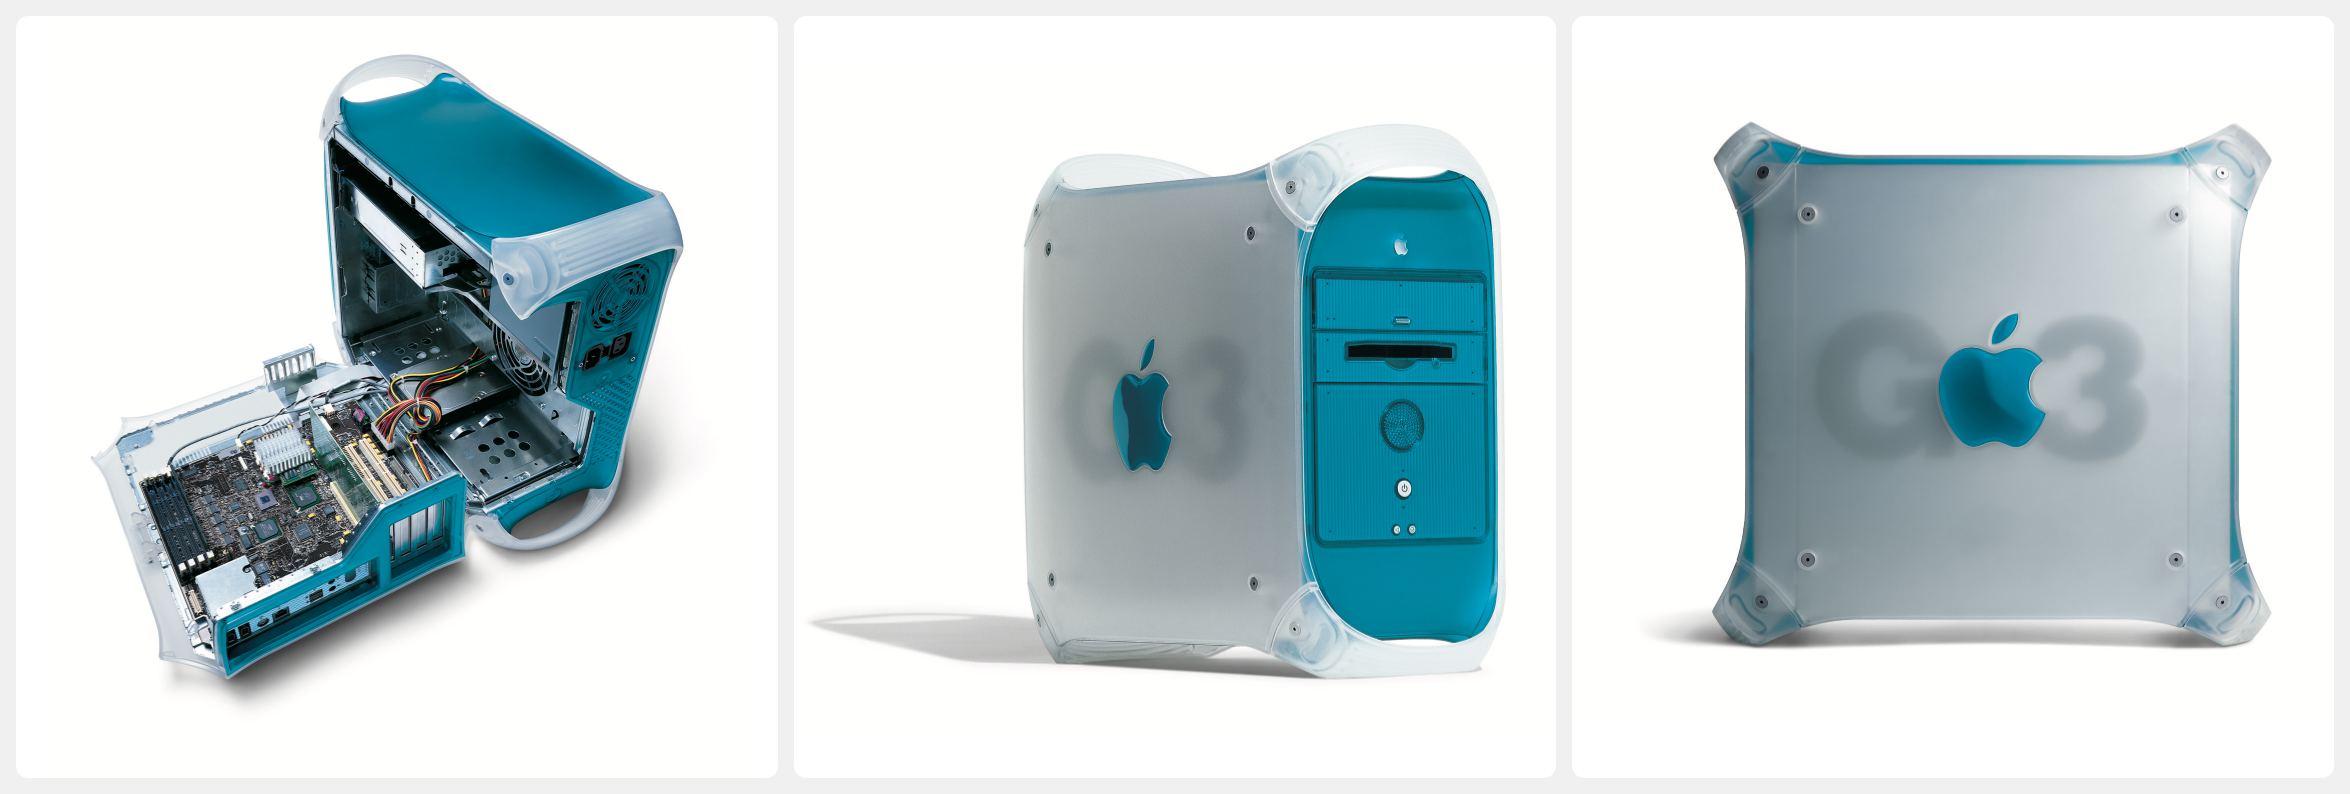
I have a long list of Apple products that I believe are unique, desirable, or just unusual waiting to be proudly displayed in my Apple museum. Recently I found myself endlessly browsing eBay (again) searching for something on the list and I came across an iMac in the original color: Bondi Blue. I have a fondness for blue and green Apple products like the iBook, Power Mac G3, and this iMac. I clicked Buy It Now not knowing that I would soon have a delightful email exchange with the owner.
The iMac belongs in the museum because it marks the beginning of Apple’s transition from a boring, confusing, beige 1990s into an artistic, colorful, opinionated 2000s. Steve Jobs had returned to Apple, eliminated most of the product line, elevated Jony Ive, and released the iMac.
I sold many iMacs when I worked at Computerware, a local Apple retail store before Apple had official stores. By the time I was employed there Apple was selling models with new colors (including Blue Dalmation and Flower Power) and FireWire ports for connecting digital video cameras.
The iMac was notable in the computer industry for many reasons:
Prominent Apple ports were removed breaking compatibility with old keyboards and mice. USB and the ability to plug and unplug peripherals without restarting was the future.
There was no disk drive. If you wanted to move a file to another computer you were expected to use the internet.
Plug in power, plug in the keyboard and mouse, and plug in the modem. Simplicity was part of the Jeff Goldblum ad campaign showing off how easy it was to set up an iMac.
Pick it up with a handle. Apple brought back the mentality that a computer should be approached not as a mysterious, heavy box, but as something you could simply pick up and move.
In 1998 computers were clunky and ugly. This is a work of art.
Below is the culmination of the email exchange I had with the iMac’s owner.
This iMac is pretty early in the build cycle. I think it’s an early Rev. B model. It was made early November 1998. I sold a bunch of Bondi iMacs when they came out. The most memorable aspect of being an Apple Reseller in the 1990s was frequently going to Macworld Keynotes (mostly in New York plus one in Boston). The best was in 1999 for the introduction of WiFi and the iBook. The single best computer theater I saw was when Phil Shiller jumped from a window above the stage to a waiting Steve Jobs to show the iBook was not connected to any wires.
He was at the event when Phil Schiller jumped to show that the iBook’s internet connection was wireless using Apple’s AirPort card. Incredible.
I am a computer industry living fossil. I began writing assembler language small subroutines in 1974 on punch cards. Short 10-15 lines of code subs to do a very specific individual task. Assembler was a very compact language. I worked as a Cobol programmer for about a dozen years. I ran large scale projects. My first encounter with Apple was 1983 testing the Lisa. I was invited to Apple in 1986 or 87 to take a look at a new technology they were working on. After being led deep inside a building we emerged into a lab and were shown what was to be called QuickTime. Exciting stuff. In my early corporate days around 1981 I sat in the back of the room for a demo conducted by Phil Estridge of IBM (he and his team died when a Delta jet went down in a storm on approach to Dallas. IBM never recovered from that loss). He was demonstrating what was to become the IBM PC. He had the team from Microsoft showing off DOS… Bill Gates and Paul Allen. Who knew then what was to be.
I’ve never even seen a Lisa and I had no idea QuickTime development started in the late 1980s!
We were at the introduction of the Newton. The wife was at the intro of Apple’s first laptop. We went to the intro of the IIfx. The list goes on.
I have a Newton Messagepad H1000and an eMate 300 in the museum. Clearly I must find more “fossils” out there to hear old Apple stories and purchase their relics.
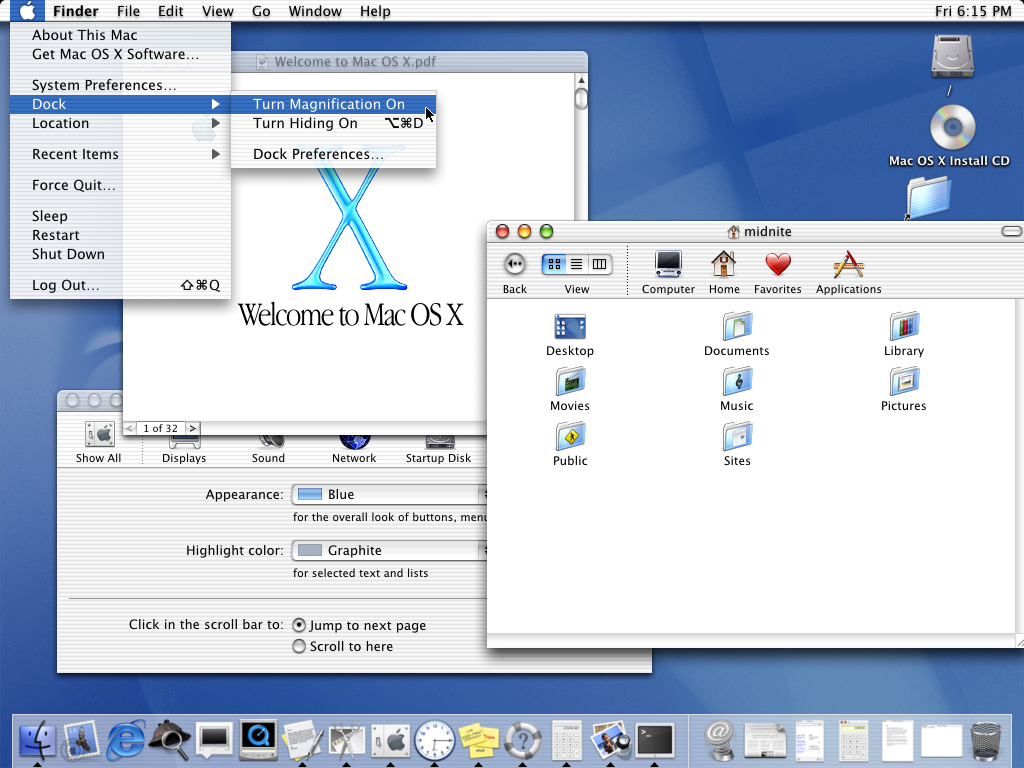
A couple weeks ago the blogosphere celebrated Mac OS X’s (now macOS) 20th anniversary. It’s comical to reflect on the early days of Mac OS X. I installed Mac OS 10.0 (the first version was 10.0 and each year incremented by .1) on my Power Mac G3 400 (Blue & White) and immediately lost access to my modem. This was before we had DSL so my only connection to the Internet was through America Online. (Napster was extremely slow with a maximum speed of 5 kilobytes per second.)
I found an incredible collection of Apple photos, videos, and promotional materials.
Fortunately I could still access my printer through Classic mode. I had the fast, quiet Apple LaserWriter 4/600 PS which could only connect to a modern Mac using a $100 Ethernet to LocalTalk adapter. I would write in Microsoft Word in Mac OS X, and then open the same document in Classic mode to print. (Eventually Mac OS 10.1 was released and I was forced to purchase a new HP printer that had proper driver support.)
I vividly remember the first time Mac OS 10.0 launched. I clicked and held down on the top of a window, and dragged the mouse to move the window to a new location on the screen. The entire window moved with my mouse! In Classic Mac OS (8, 8.5, 9, etc.) only an outline of a window moved when you dragged it around. Seeing the entire window move was exhilarating. I’m sure this is difficult to imagine after so many years of being accustomed to this behavior. Think of the first time you saw spinning rims on a car. You brain halted and said “Wait that’s possible?” For me it was similar to the moment Steve Jobs swiped to unlock an iPhone the first time.
Podcasters have discussed how slow Mac OS 10.0 and 10.1 were, and I honestly do not remember this. I’m not disputing their statements, but perhaps I was distracted by the lickable (Steve Jobs famously said “We made the buttons on the screen look so good you’ll want to lick them”) Aqua interface, and the anxiety from taking Introduction to Computer Science. (Remember CodeWarrior?) Apple and my G3 were still a big part of my personality, but I was just beginning my college career.
Here are some podcasts that I recommend listening to if you want to feel nostalgic about macOS:
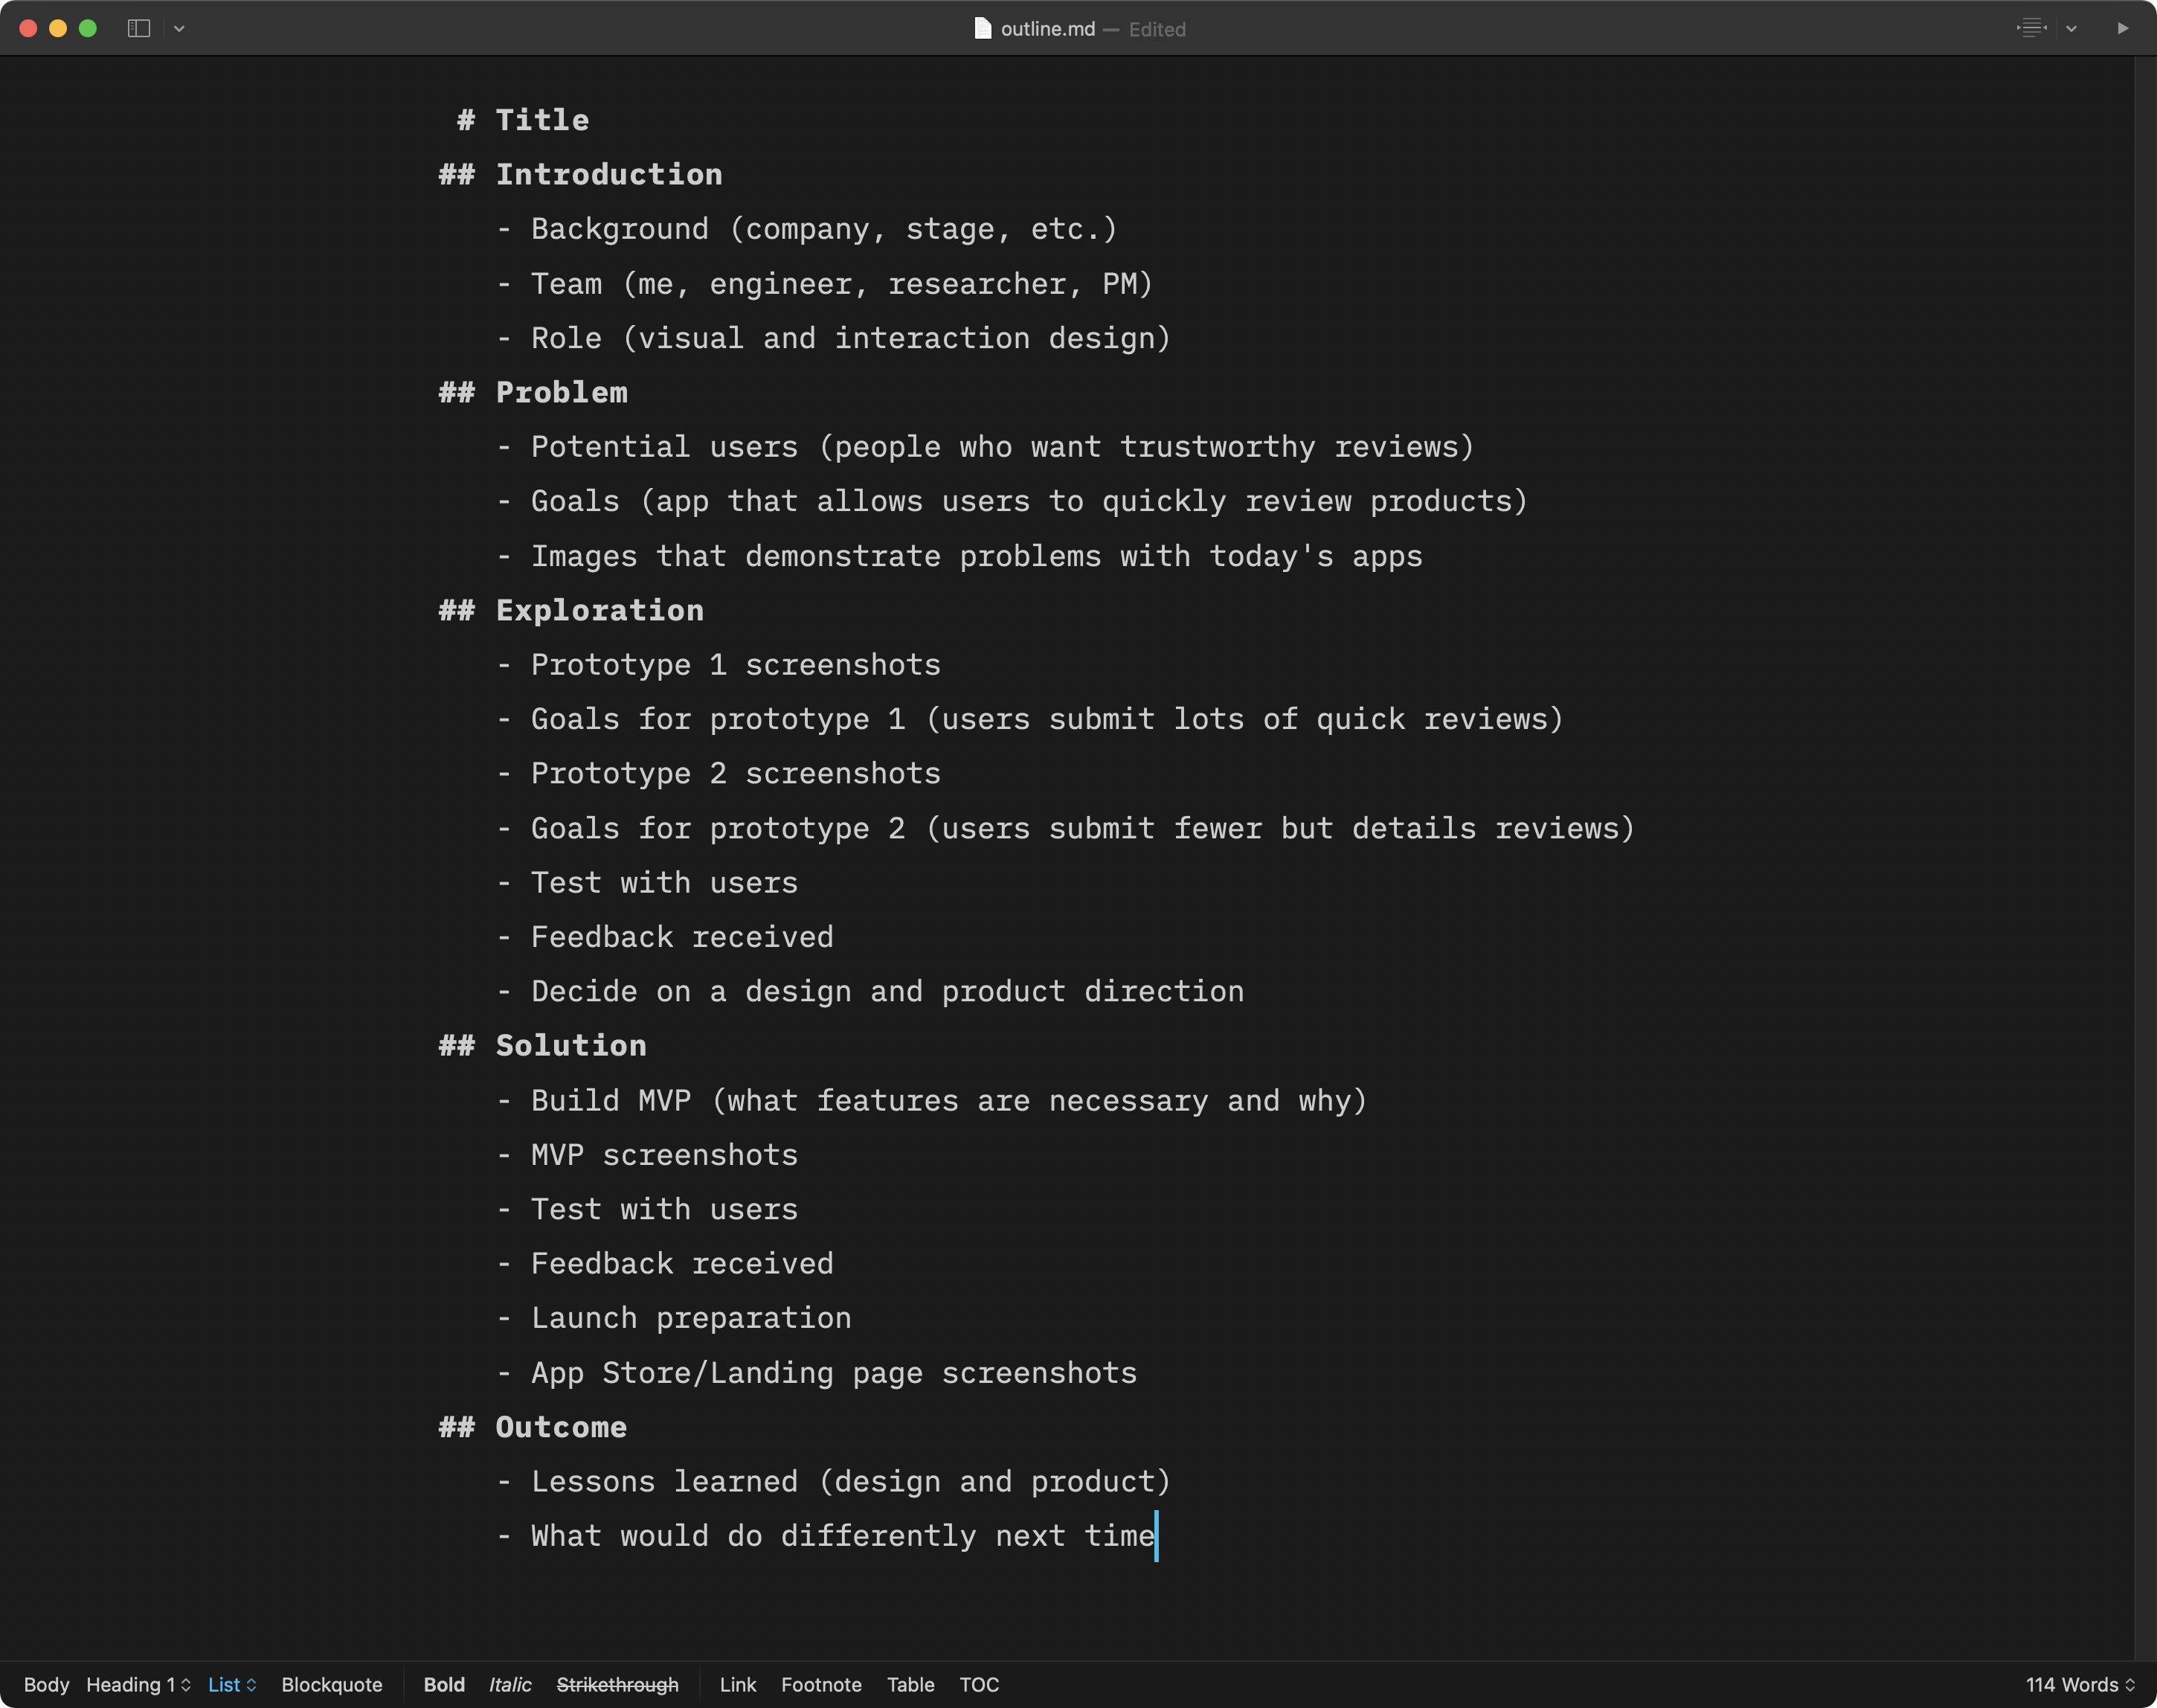
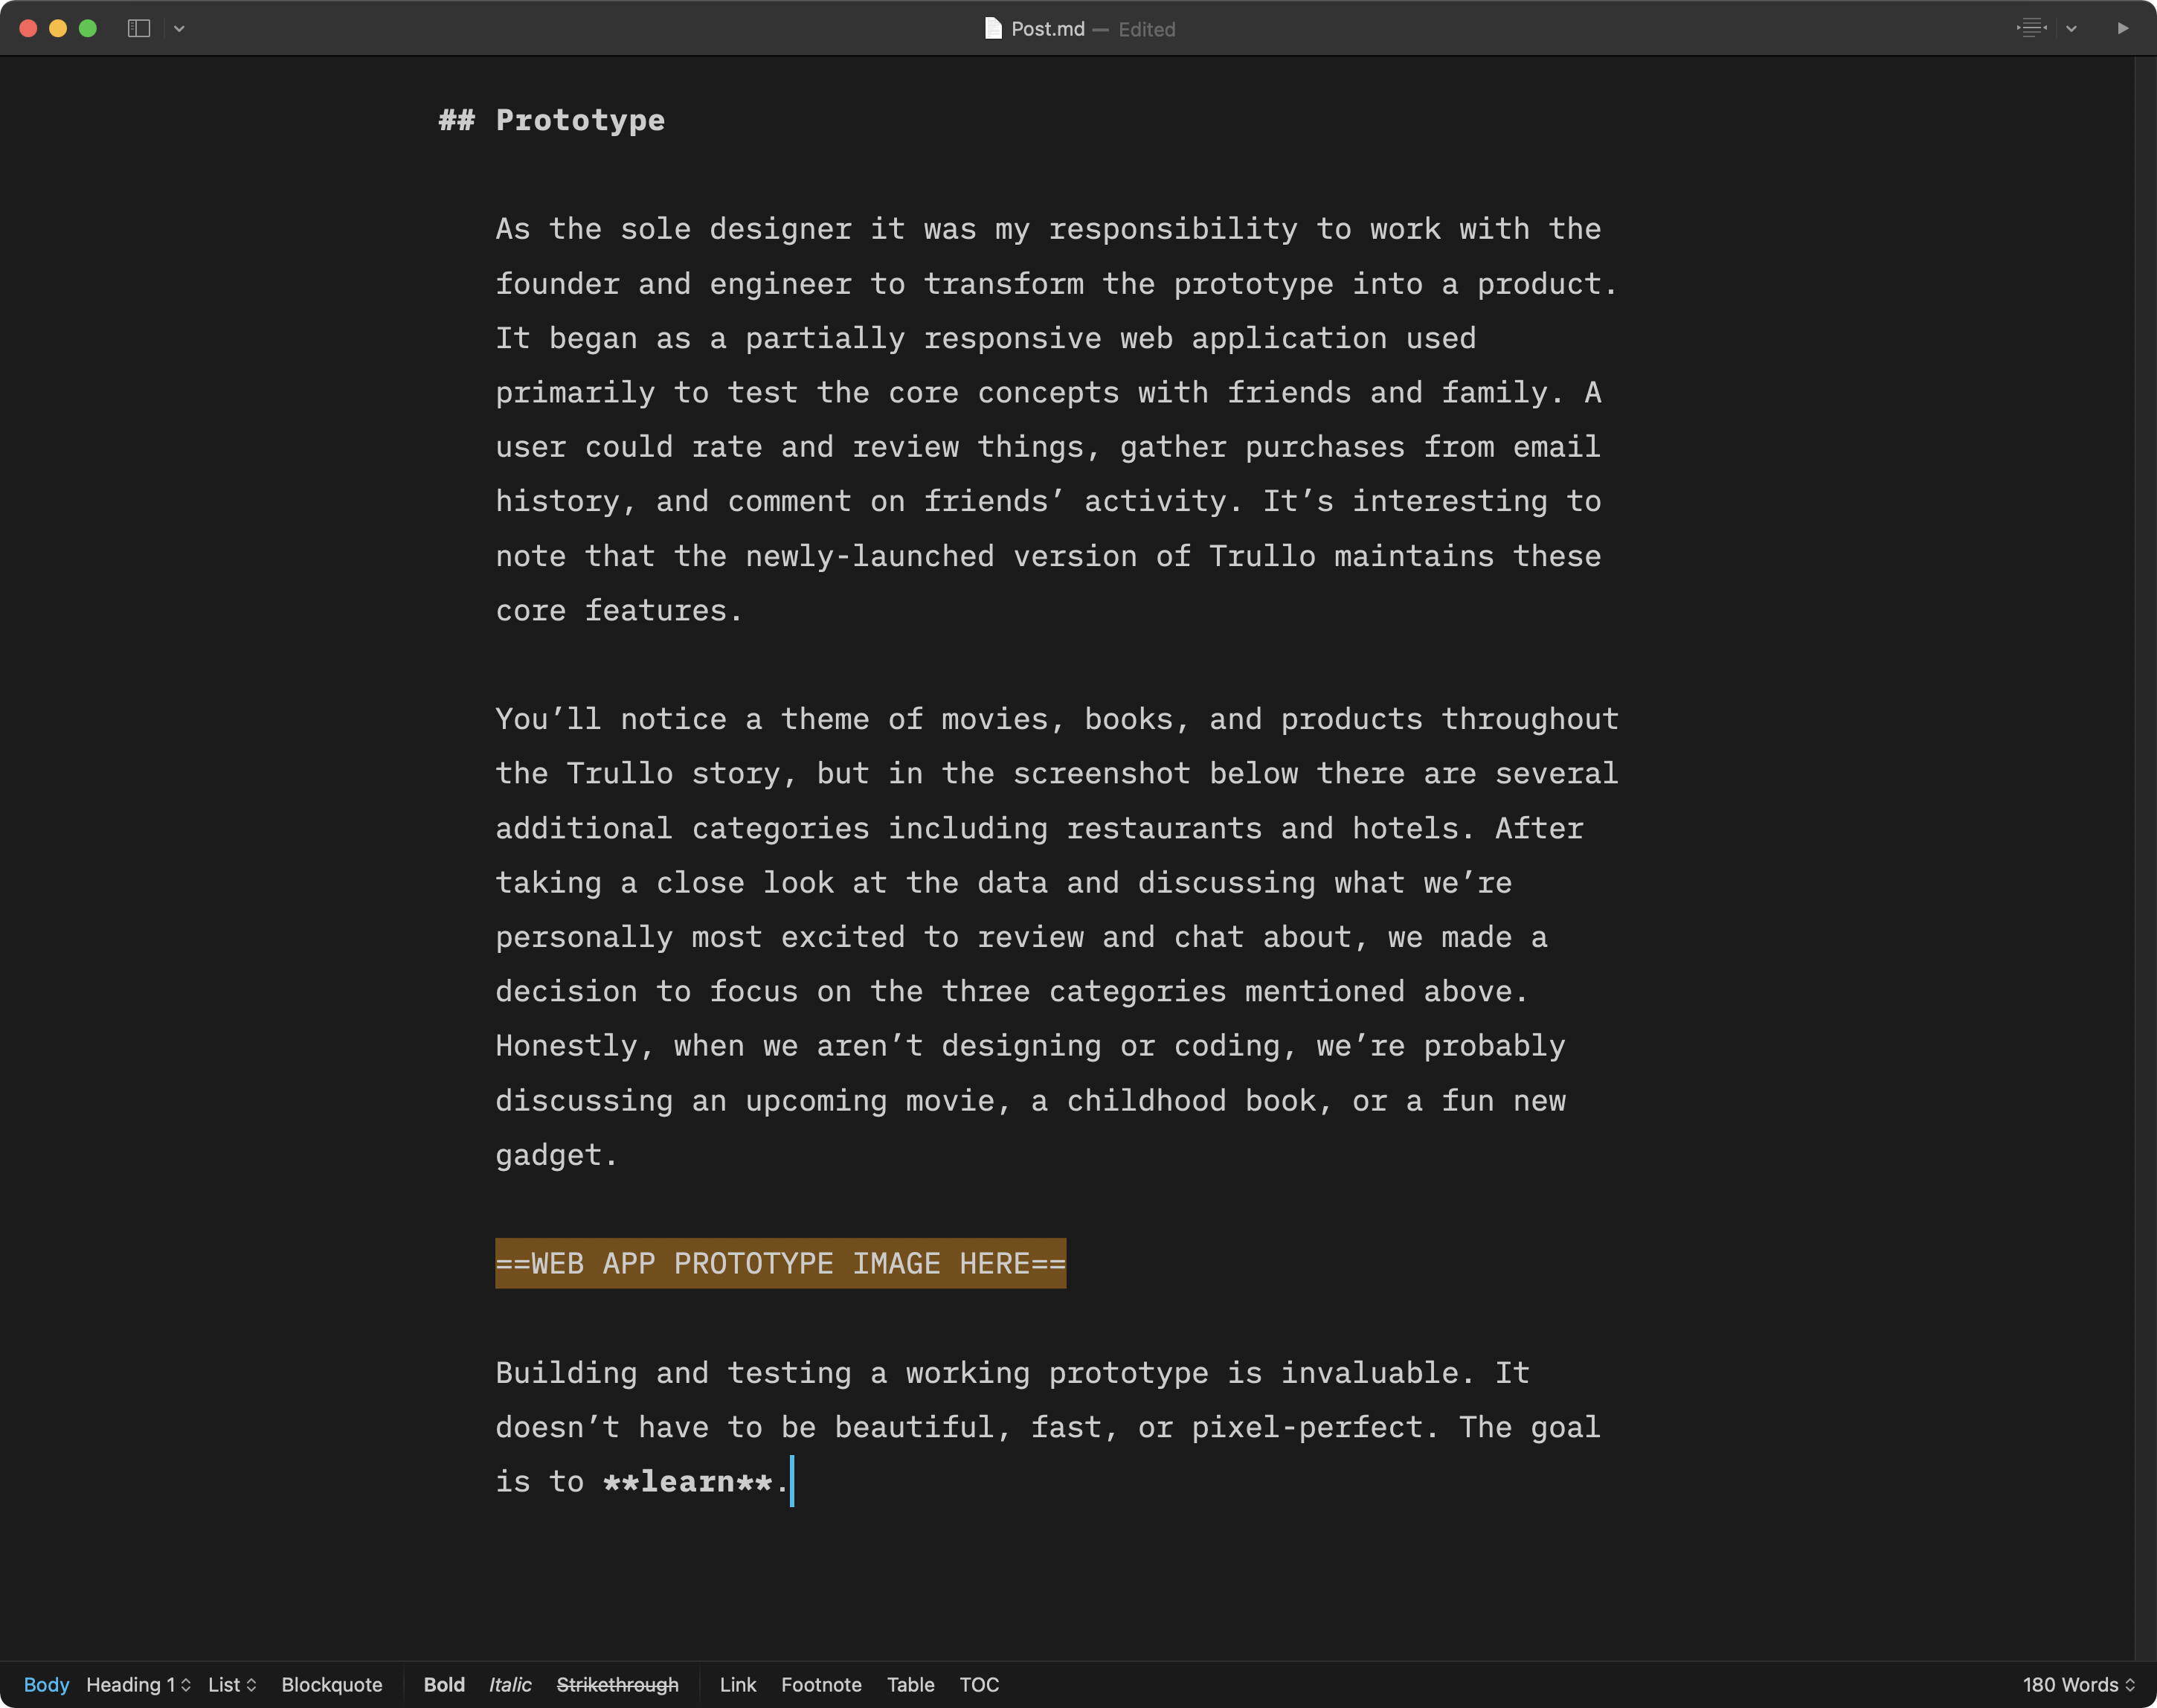
Designers beginning their careers or looking for their next gig often express similar frustrations when working on portfolio case studies: “Where do I begin?!” After writing a few paragraphs they become frustrated and unsure of their progress. The design must be beautiful! I’m a designer, right? My case study better be perfect! Fortunately there is a solution to this problem.
When working on your case study it is crucial that you separate the design from the content. Do not start with a blinking cursor. Do not jump right in to Wordpress or Squarespace or Tumblr (I once used Tumblr to build a portfolio). Look at the screenshot below. How can you possibly juggle how your portfolio should look while trying to write?
Just looking at this gives me anxiety.
Here is how I approach writing case studies. Remember high school or college English classes? Remember essays? Start with a pencil, Google Docs, Pages (I used Pages to write all of my essays at Cornell), or a basic text editor (I use iA Writer) and focus on the content at a high level. I quickly wrote an outline for an app I worked on in 2015. (Sadly it is gone forever because competing against Facebook in the social networking space is not ideal.) Here are some questions to consider:
What is the problem you and your team tried to solve? Perhaps it’s “There are no apps for me to look at my friends’ product reviews.”
What is the story you want to tell? Perhaps it’s “I worked with a small team to build a beautiful app but in the end we learned that we failed to find a real problem.”
What sections do you need? Perhaps it’s introduction, problem, exploration, solution, and outcome.
What images do you need to include? Perhaps you need screenshots of how product reviews look on typical social networking apps, prototypes, illustrations that convey the goals of a few prototypes, marketing materials, and final mockups.
Where will you put images? Avoid using so many images that they get in the way of telling a story.
Write a thorough outline. Getting more information out of your head at this stage will help you efficiently write the details later.
Just fill out each section and prepare your screenshots!
Now convert each line of text into a few sentences or paragraph. Fill in the details. Get into a writing flow. Again: you are not thinking about design. You are focusing on content. Typography and colors come later. Tell your story!
Yes, writing is crucial for a successful designer. Deal with it.
Once you are confident that the content is ready (including images captions because they are a fun way to inject personality), you can select a content management system and browse templates. I’ve used so many (even Carbonmade!) and they all have pros and cons. If you want to discuss in detail please feel free to Tweet me. In my opinion it is wholly unnecessary to design and build a template from scratch now. Even Jekyll has templates (although most are pretty scrappy looking).
OK you’ve selected a template and you’re ready to write. Wait you already wrote everything in Pages (seriously give it a try)! Just simply copy and paste your text and upload your images. When your content is already written, building your portfolio is fast and easy. After inputting everything you can focus on the design. Tweak your typography. Mess with colors. Try different templates. You are free to experiment. You finished the hard part; now comes the fun.
As discussed last week in my post about portfolio presentations, designers inevitably have to share their work when applying for a job. What I witness often is the uninspiring real estate tour (or “harbor tour” if you are from the UK). Designers present a high fidelity mockup and talk about the navigation, content, buttons, personas, colors, etc. They are skipping the most important part: the problem.
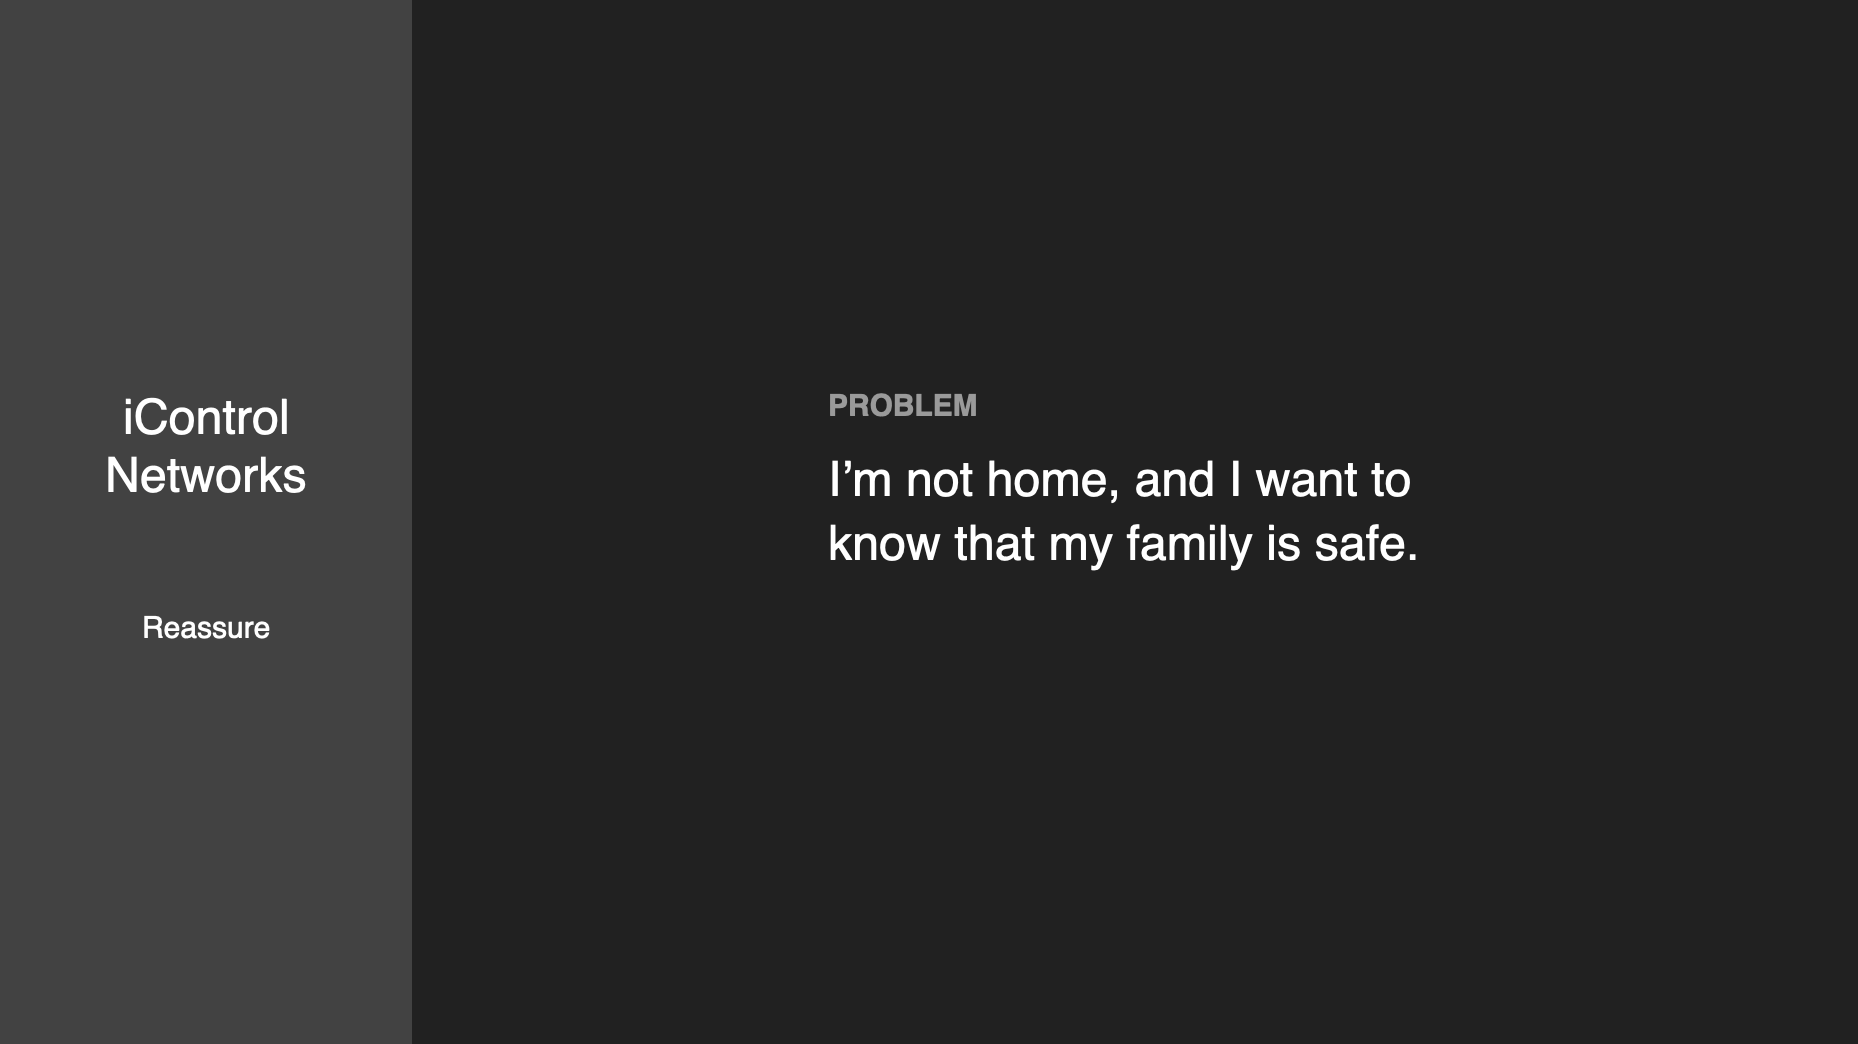
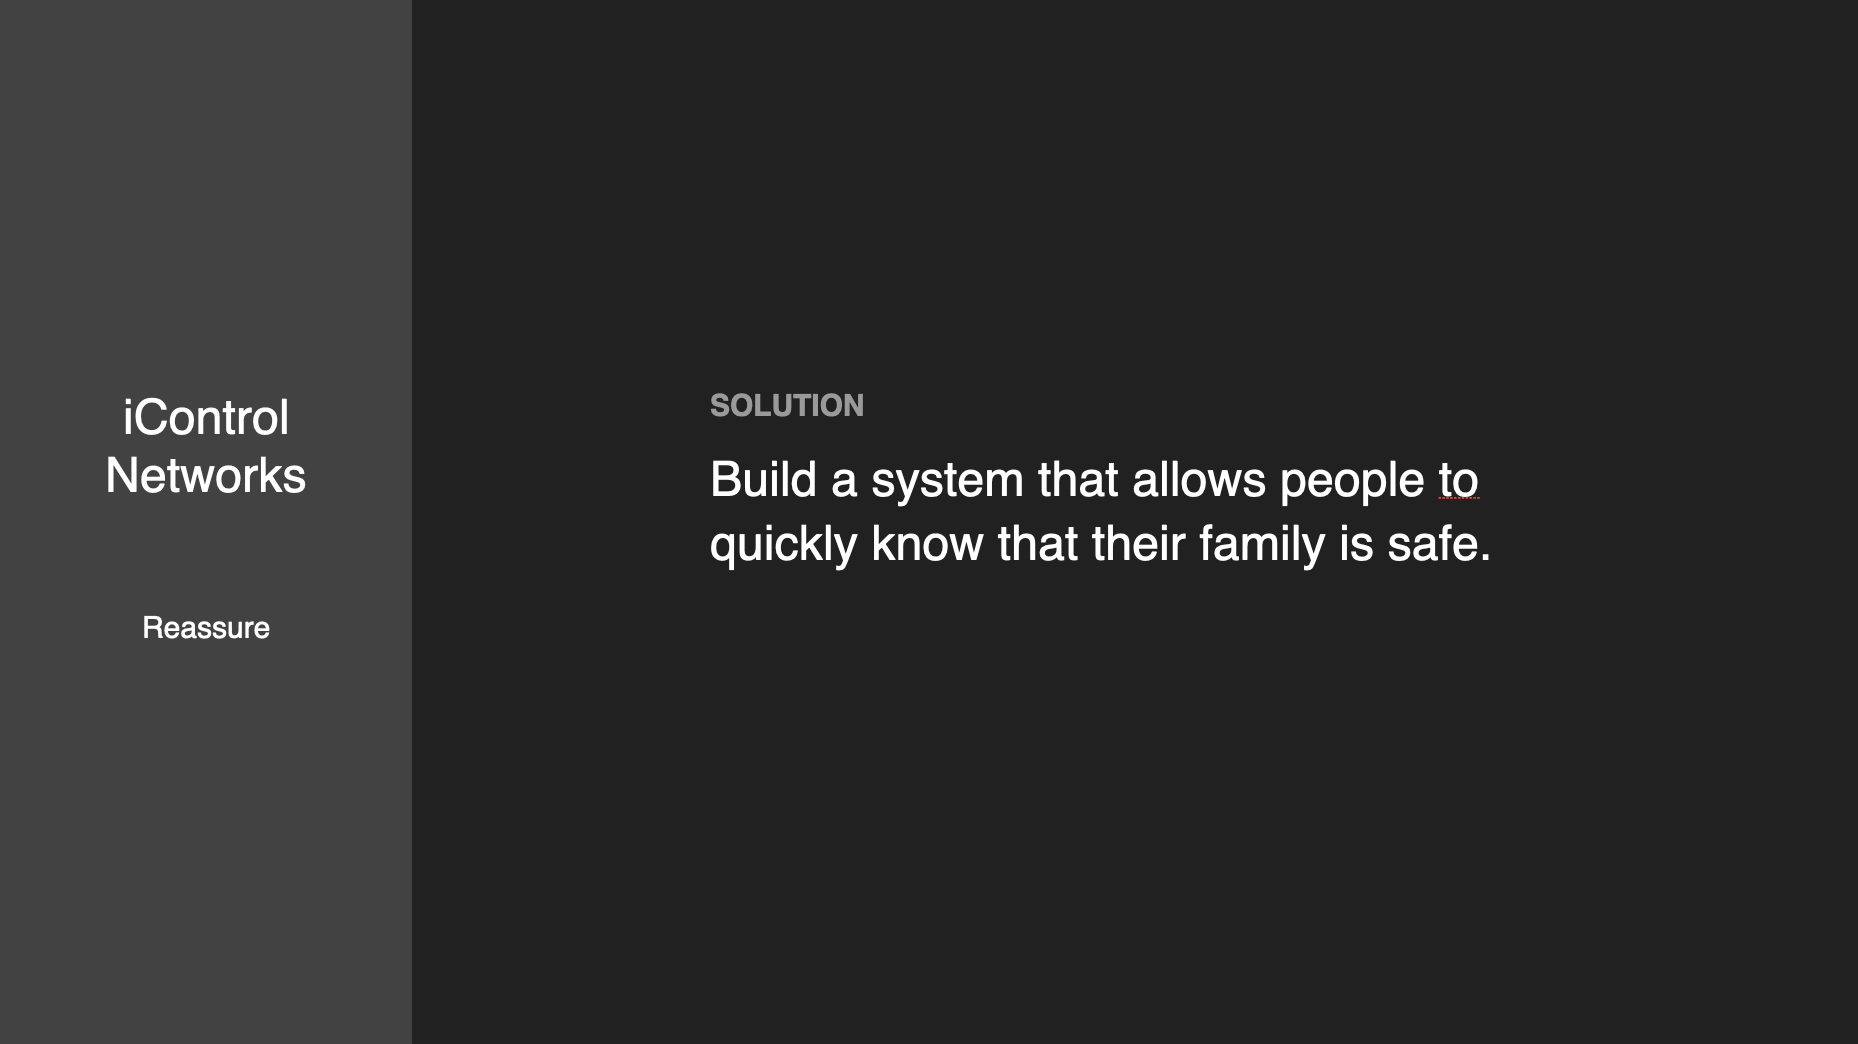
Every project, flow, and mockup must be presented as part of a problem/solution pair. What is the problem you are trying to solve, and why is this solution ideal? For example, when I applied to become a product designer at Salesforce, I presented my work at iControl Networks (now Alarm.com). I did not start with an interface; I started with a very high-level problem: security systems are old. They run on POTS, are not connected to broadband, do not support new technologies like Zigbee or Z-Wave, and, most importantly, are difficult to use.
Wait! Is this the right problem? No! This immediately jumps to the technology. Why should the hiring manager care that security systems are old? How can you connect the hiring manager to a real world problem? People purchase a security system because they want to protect their family. But what happens when you leave your home?
Problem: I’m not home, and I want to know that my family is safe.
Solution: Build a system that allows people to quickly know that their family is safe.
By the way, I’m not exaggerating; this is really how I presented my portfolio. One slide to talk about the problem, and another for the solution.
Keynote > PDF > PowerPoint > Google Slides
If you’re presenting at a high level immediately tell them the solution
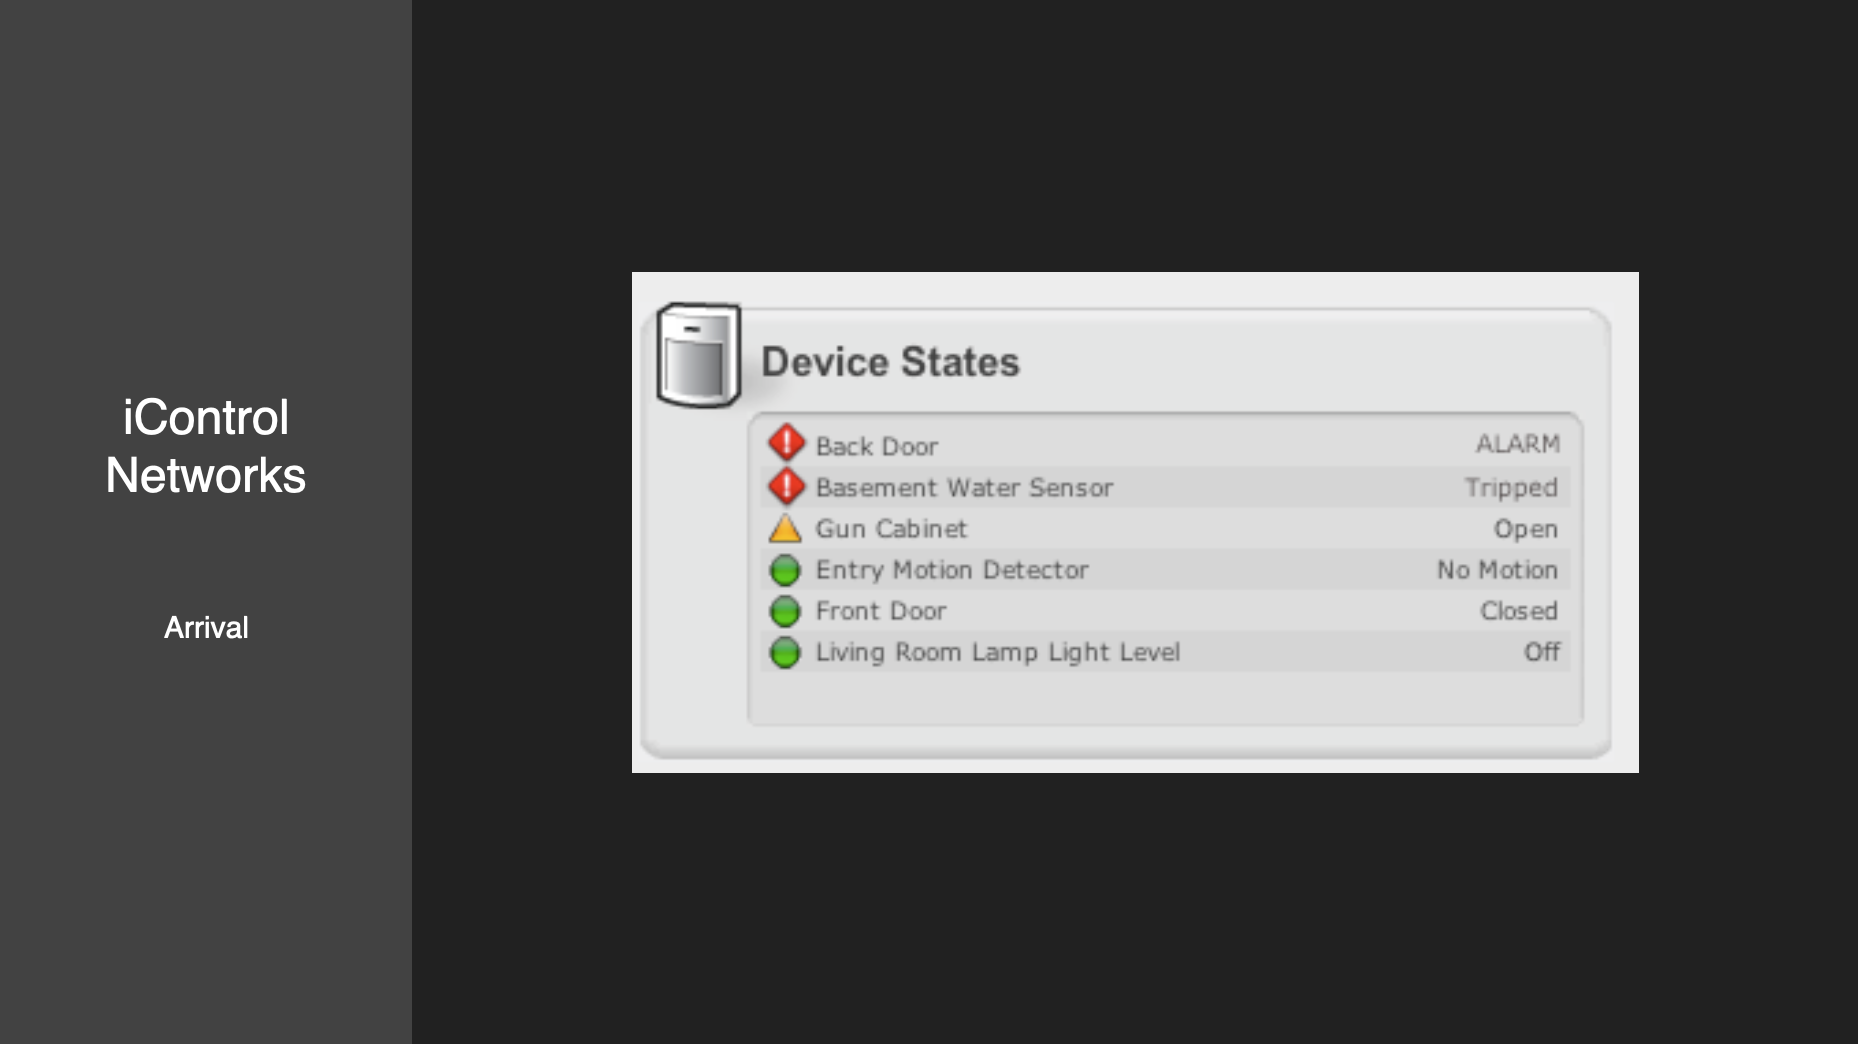
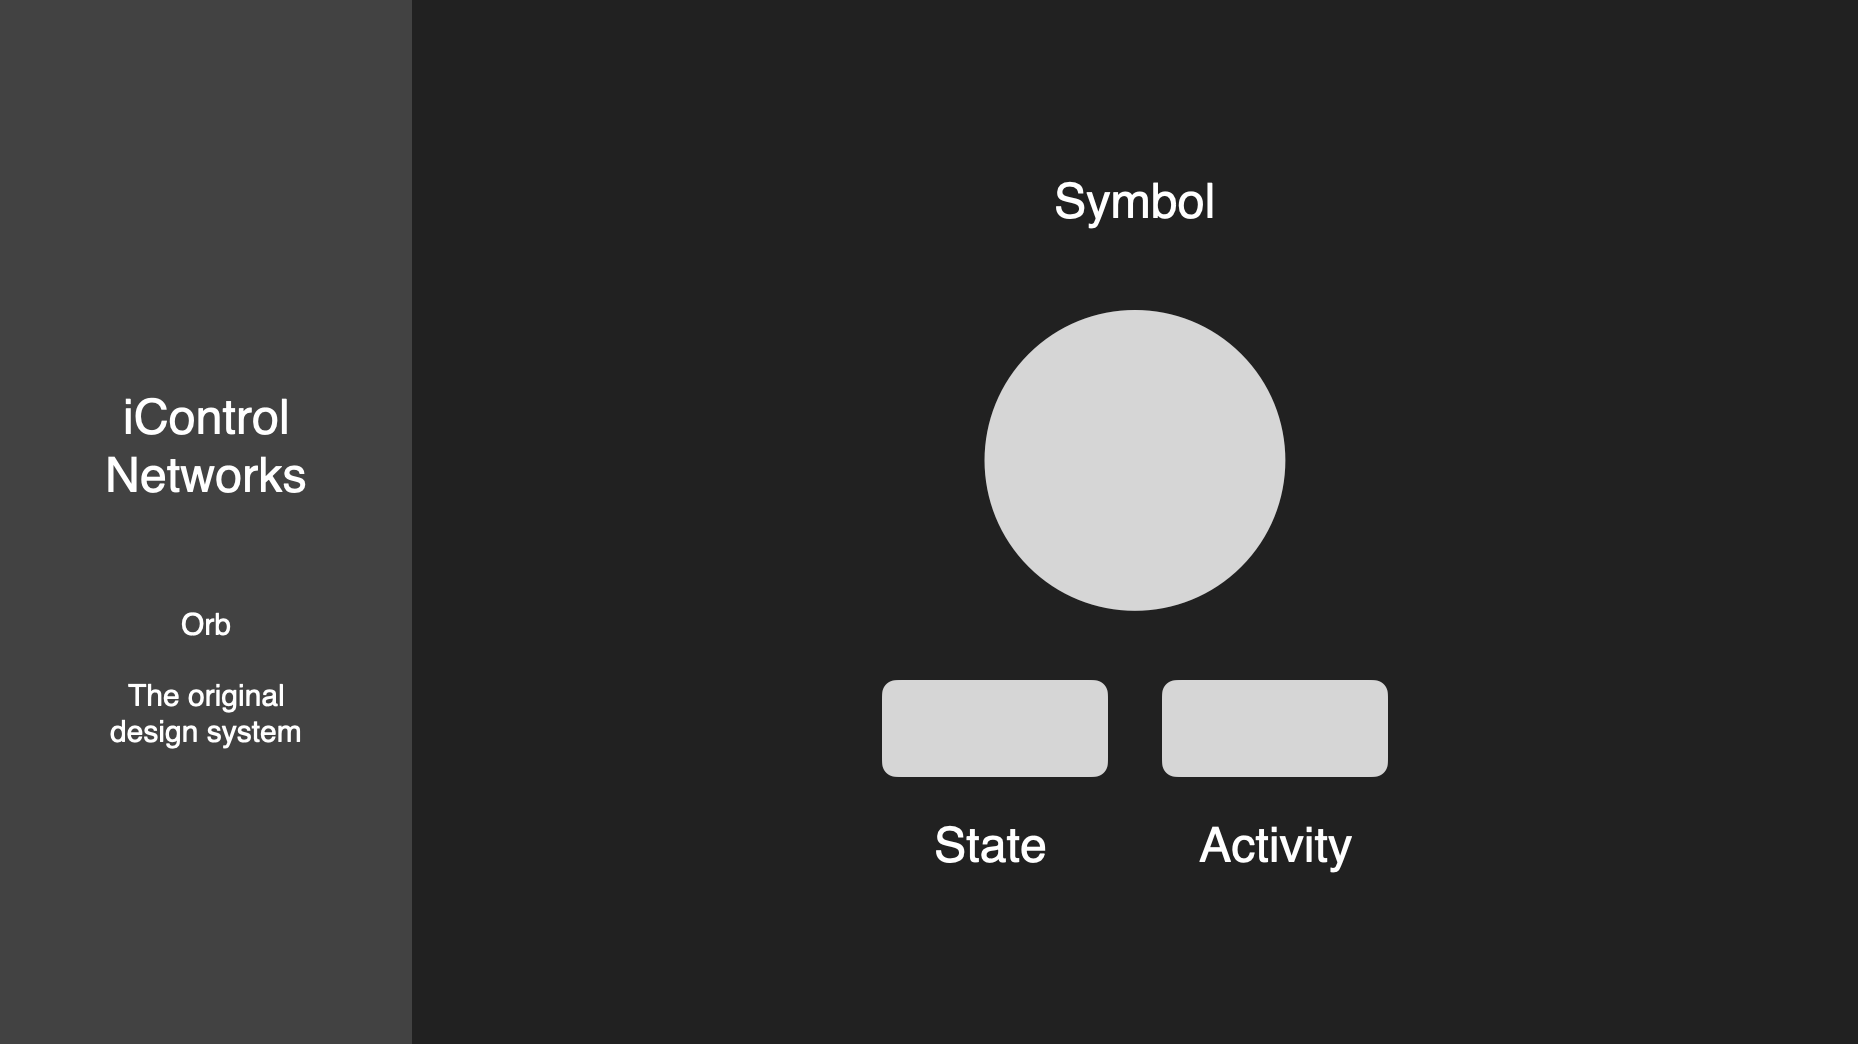
Family. Everyone can relate to that. After grounding the audience to the purpose of the company, it’s now time to discuss my team’s role. When you configure a home with a dozen sensors, a security panel, a few cameras, a couple thermostats, and a bunch of smart plugs, it becomes overwhelming trying to ascertain the state of your family and home. Instead of showing the final interface, demonstrate the design challenge.
2003 called…
Oh that’s not ideal. Should I jump to the main event here and show the final interface? No! First explain why a lot of data is overwhelming. The hiring manager can’t appreciate the awesome final mockup without first understanding why it’s awesome. In the image above the user is forced to scan a list of devices’ icons and states, and then make an interpretation about the state of their home. That’s time-consuming and frustrating. There must be a better way. Perhaps a symbol.
When you start simple the audience can follow along
One symbol to summarize all activity in the home. The problem here is there’s so much device and sensor activity that you may not be confident you fully comprehend everything after glancing at one symbol. Windows may be open, people may be tripping motion sensors while walking around, the security panel may be in a specific arm state, etc. This can be solved by including a few words to summarize the state of the home.
Still simple!
You can see this concept coming together after a few slides. It’s important to note that the audience has still not seen high fidelity mockups. First I dedicated time to establish context by explaining the problem, and now I’m walking you through how we solved it. By now the audience should have a clear idea of the interface’s structure and purpose. It’s time to add fidelity.
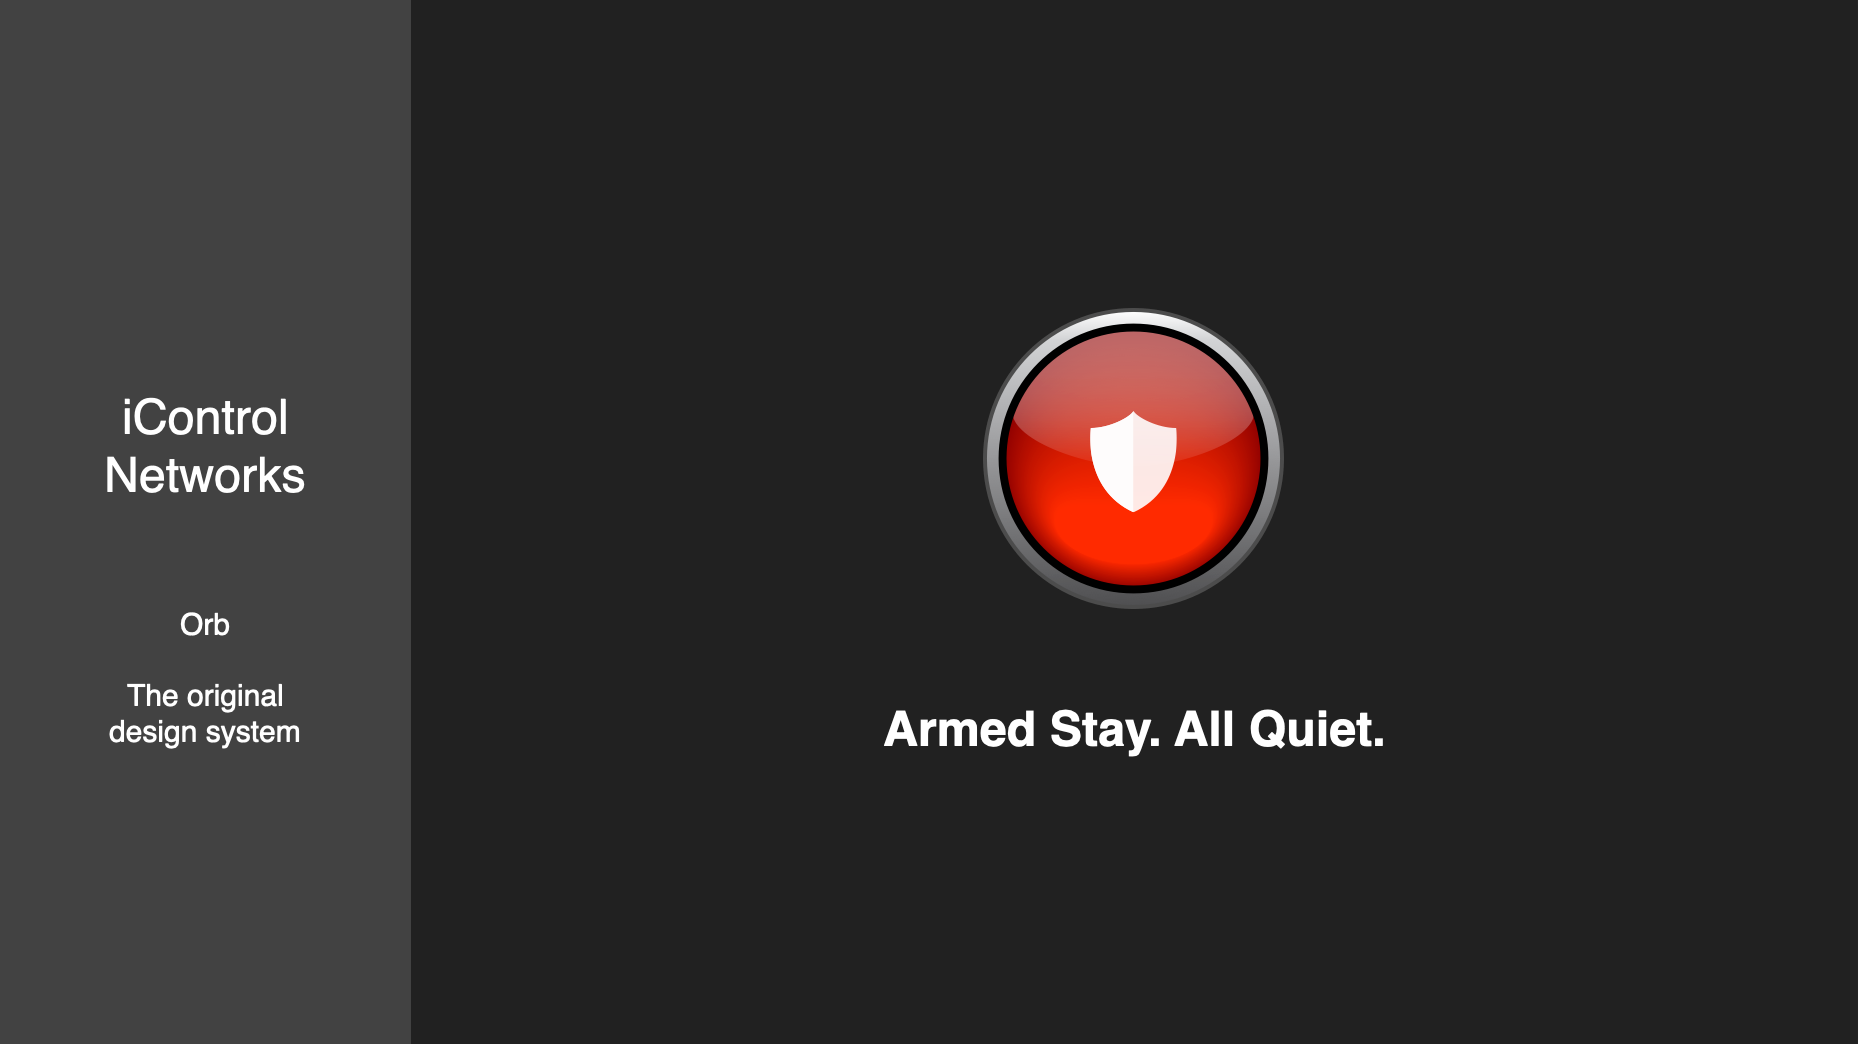
High fidelity time. Check out that gradient.
We arrived. The symbol plus a couple text snippets like “Armed Stay. All Quiet.” tells the user that the security panel is armed, no sensors are tripped, and all devices are online. Here is where you remind the audience what the problem is and explain why this solution is ideal. There’s a lot of data produced by sensors and devices. This interface allows the user to launch the app, glance at the interface, and feel confident that their family and home are safe. We started with a list of devices and their individual states, and ended with a symbol paired with a few words.
Without context mockups are just pictures. They may be beautiful or innovative, but context is what enables the hiring manager to understand what they are looking at and why. A problem/solution pair connects your mockups to a complete user experience. At the end of your presentation the hiring manager should be confident that you can solve her problems.
After speaking with many designers through Out of Office Hours and, as a new design leader, interviewing many candidates for a position on my team, I detected a theme with portfolio presentations.
First, the candidate provides a link to a portfolio website, and the hiring manager is intrigued by both its content and aesthetics. The portfolio includes long-form posts that the manager can leisurely read. The candidate then excels during the initial phone screens with a fun conversation about their experiences and a summary of a recent project or two. Then comes the most exciting part: the group presentation.
A common mistake I witness is the recycling of materials: the candidate presents their website instead of an artifact that is appropriate for a presentation. A website is an asynchronous presentation. I can click around, read at my own pace, and take the necessary time to understand each detail. Take a look at the complexity of a website and imagine someone speaking to you while you attempt to decipher its content. Navigation, title, paragraphs of text, images, etc.
Some websites are much busier than this…
A presentation is different. People listening to your voice cannot simultaneously digest a detail-rich website. Listeners require something simple to view so they can subconsciously transition between the words you are speaking, and the content on screen. One moment your words are the primary focus and the content is on the periphery. The next moment they are interpreting the content and your voice moves to the periphery. If a website is on the screen it is highly unlikely that listeners can both follow your words and paragraphs of text. A PowerPoint, Keynote, or Google Slides presentation is crucial for focus. The applicant is forced to reduce and simplify. Take a look at a simple slide.
All of my slides look like this.
With only a title, a few words, and an image I can quickly ascertain the information the applicant is conveying. Within a couple seconds my primary focus transitions from your voice to the slide and back to your voice. Listeners will miss less of the nuances of your speaking style, personality, and information.
I highly recommend preparing both a portfolio and a presentation when applying for a product design role. Please reach out on Twitter if you have questions. I’d be delighted to review your portfolio and presentation.
Normally I ignore Apple rumors, but it’s rare to read about one that indicates a reversal in design. MG Siegler writes about Apple laptop speculation:
Mainly, since Apple is clearly feeling nostalgic, I want them to bring back the glowing Apple logos on the back of MacBooks — something they seem to want to do themselves if you just look at all their recent marketing!
Nostalgic for the sake of nostalgia? Or is Apple considering returning to an era of prioritizing function over form?
Previously Apple’s PowerBook and original MacBook laptops had a number of features that provided reassurance. The MagSafe connector had a small light with two colors: orange to indicate charging, and green to indicate a full battery. Those tiny lights weren’t crucial features, but they helped reassure me that the computer was working properly. Do computers mostly work properly? Of course! But it’s nice to be reassured.
Older Apple laptops had a button on the battery (when batteries were visible and detachable). One tap of the button lit up 1, 2, 3, or 4 lights to indicate if the battery was 25%, 50%, 75%, or 100% charged. This saved me from opening the laptop and entering my password just to learn the battery’s charge state. Again, not crucial but reassuring.
There was also a white light that glowed when the laptop was in its sleep state. It increased and decreased in brightness like a person breathes in and out of their lungs. That subtle glow told me that there were no problems entering the sleep state. Once every couple of years my laptop (even the 2016 MacBook Pro) will be stubborn and not want to actually go to sleep. Is this problem that only occurs every few years worth building a feature to remedy? Of course not. But the light was there and I appreciated it.
Apple’s modern laptops are svelte, minimalist, and vague similar to the iPhone. One could argue that the iPhone exterior could be more beneficial to the user with lights to indicate power, cellular strength, WiFi strength, and battery availability like the Status Bar. That would be more consistent with Apple’s older laptops. Each of those indicators are solved with software on the iPhone, and I assume Apple’s industrial design team arrived at the same conclusion for laptops: users can learn the state of the laptop by looking at the screen. The problem is laptops and phones are not used or perceived the same way. Phones are much closer to us in the sense that they are always one second away from use. They never go to sleep. They are never shut. Compare this to laptops which We walk away from for hours or days at a time. Laptops remain mysterious with more potential for problems.
Perhaps it’s time to reconsider the laptop’s sleek but helpless aesthetic and provide users with bits of information that build trust and confidence. A bunch of lights surrounding the surface may sound tacky, but there is a balance between reassuring and unattractive.
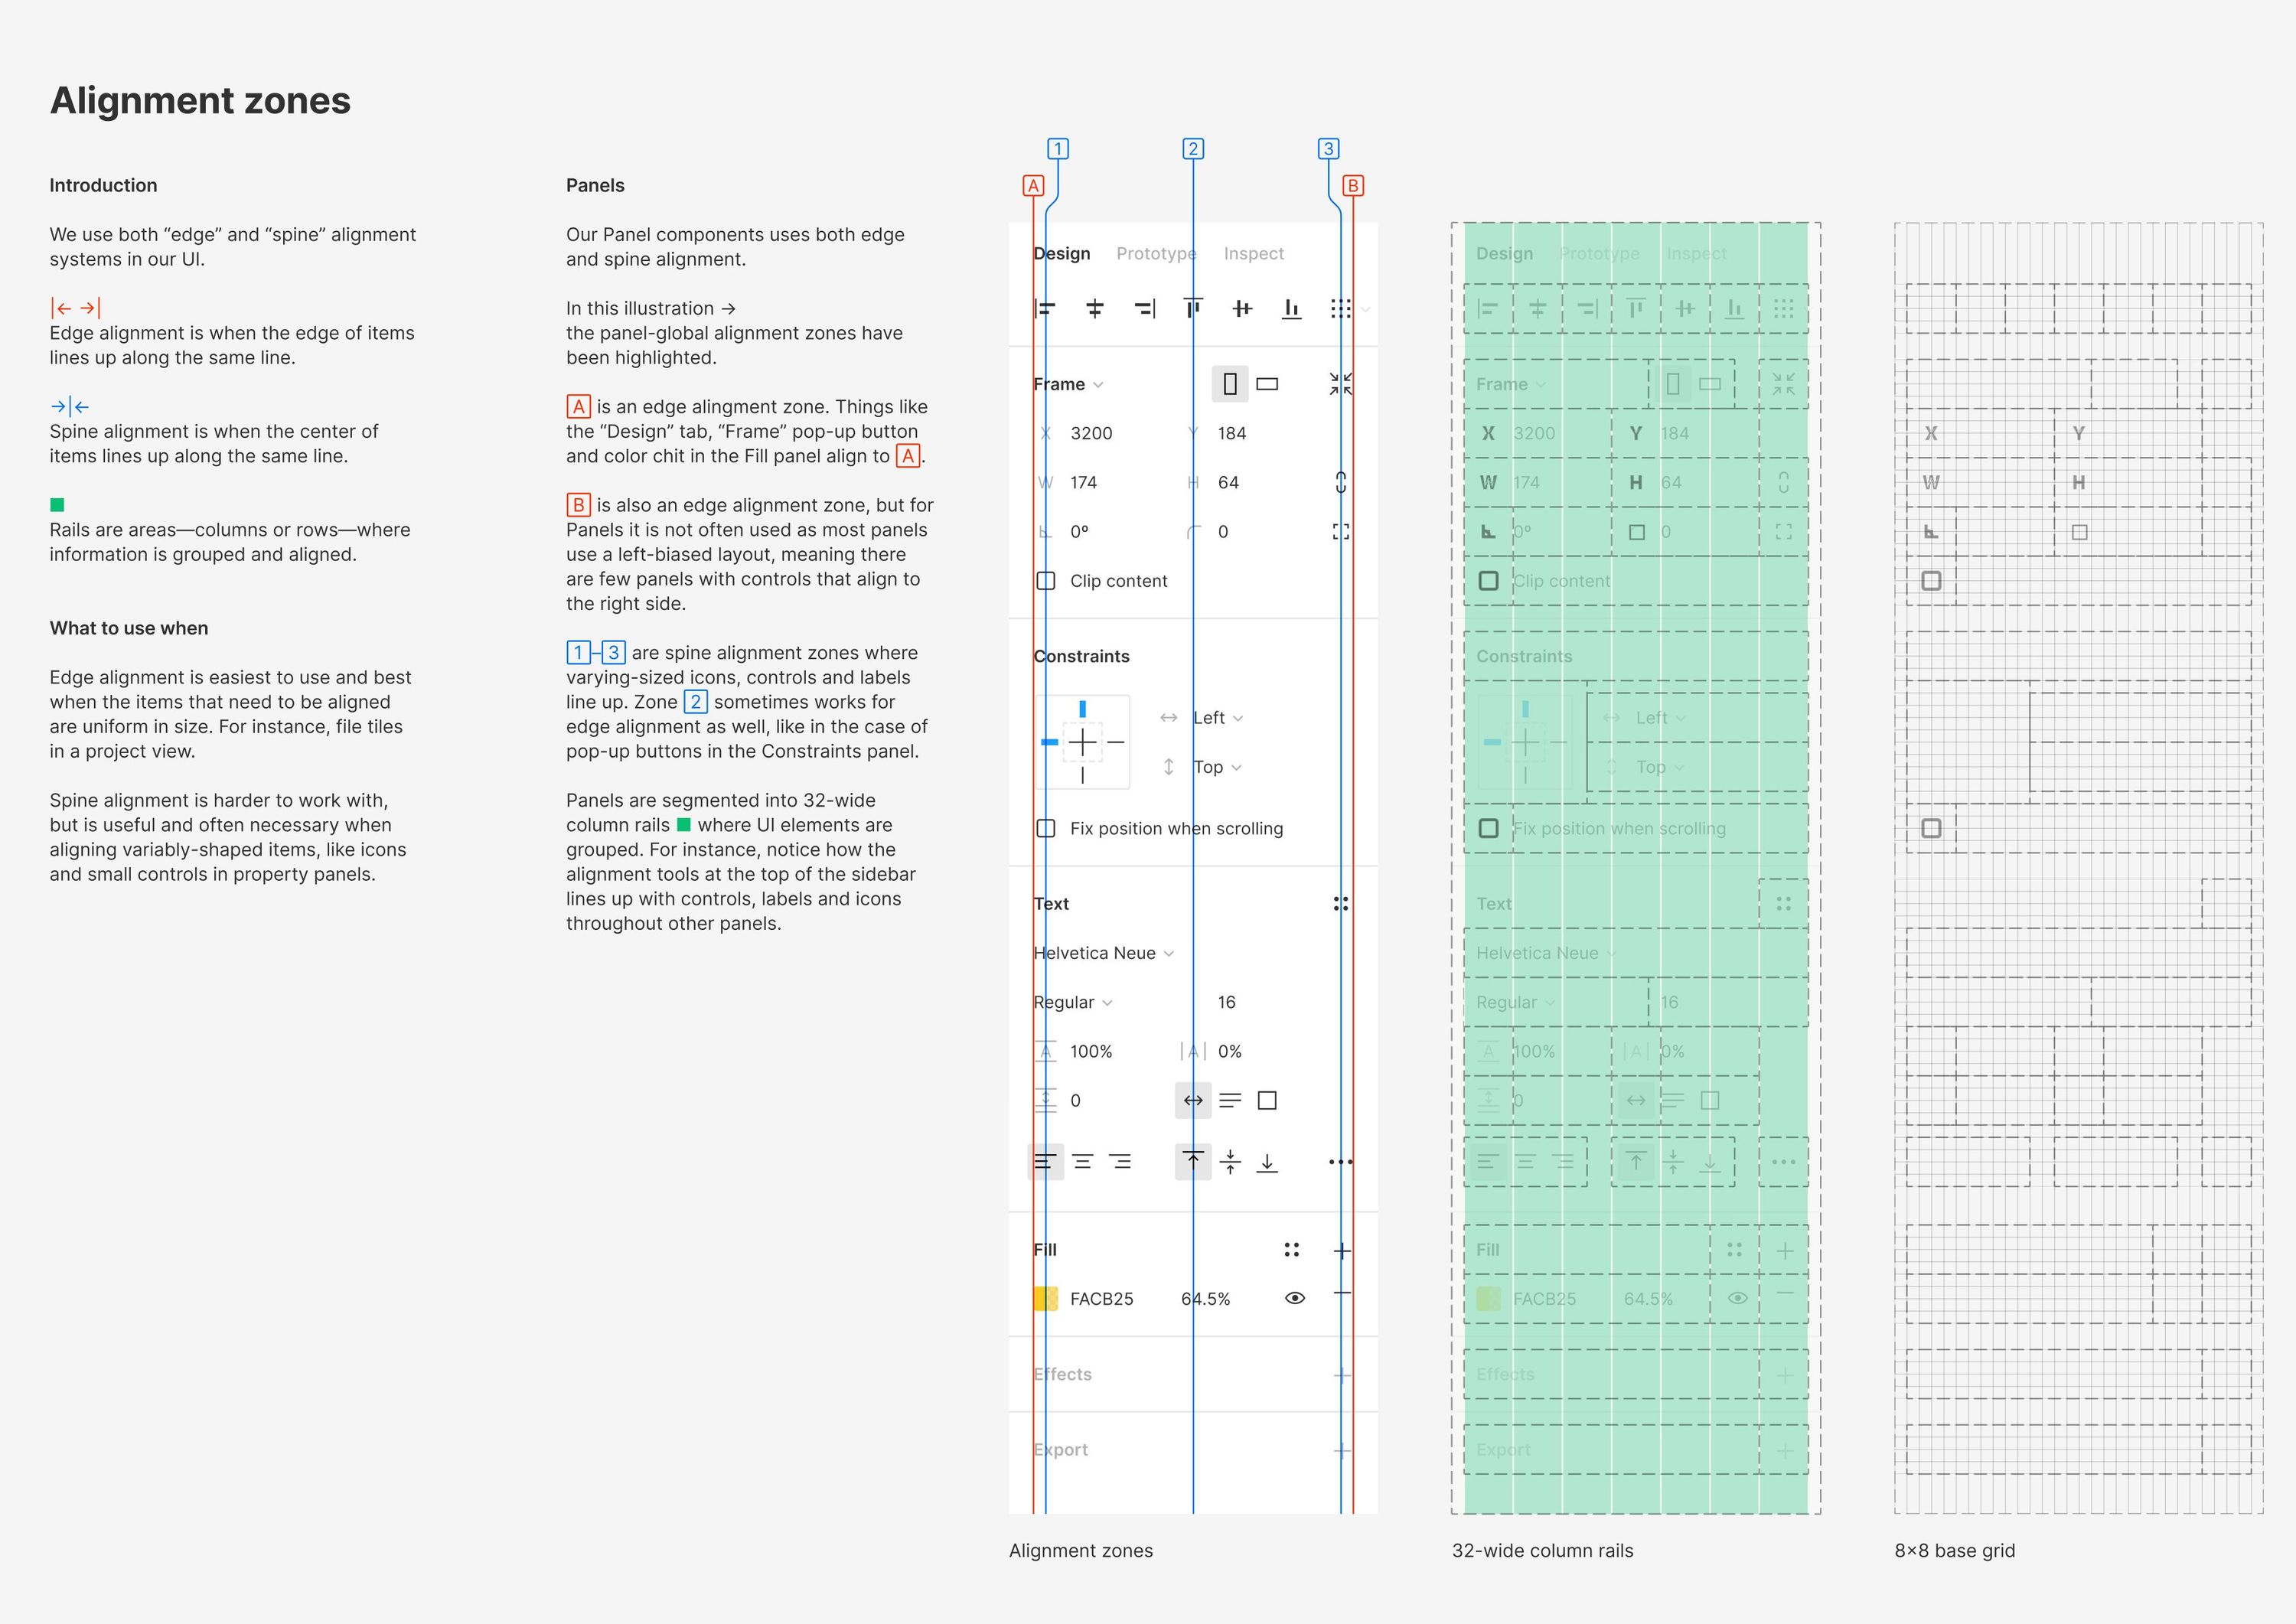
Throughout my career in user interface design I have sought to create balance and harmony through a combination of whitespace, typography, color, and content. One tool I have never fully embraced is the grid. I first began trying in approximately 2010 using GuideGuide, an early Photoshop plugin. With GuideGuide you can enter a few values and a perfect grid appears on your artboard. However, whenever I try to enforce a rigid grid I end up breaking it more often than allowing it to lead.
Elements on the page beg to be placed a few pixels away from a gutter. Text boxes become constrained. It’s frustrating as a designer to ignore something you carefully configured.
The above example from Figma and UI2, their updated design system, is a masterful example of both grid design and implementation. I plan on encouraging my team to think about how new designs can embrace a simple grid.
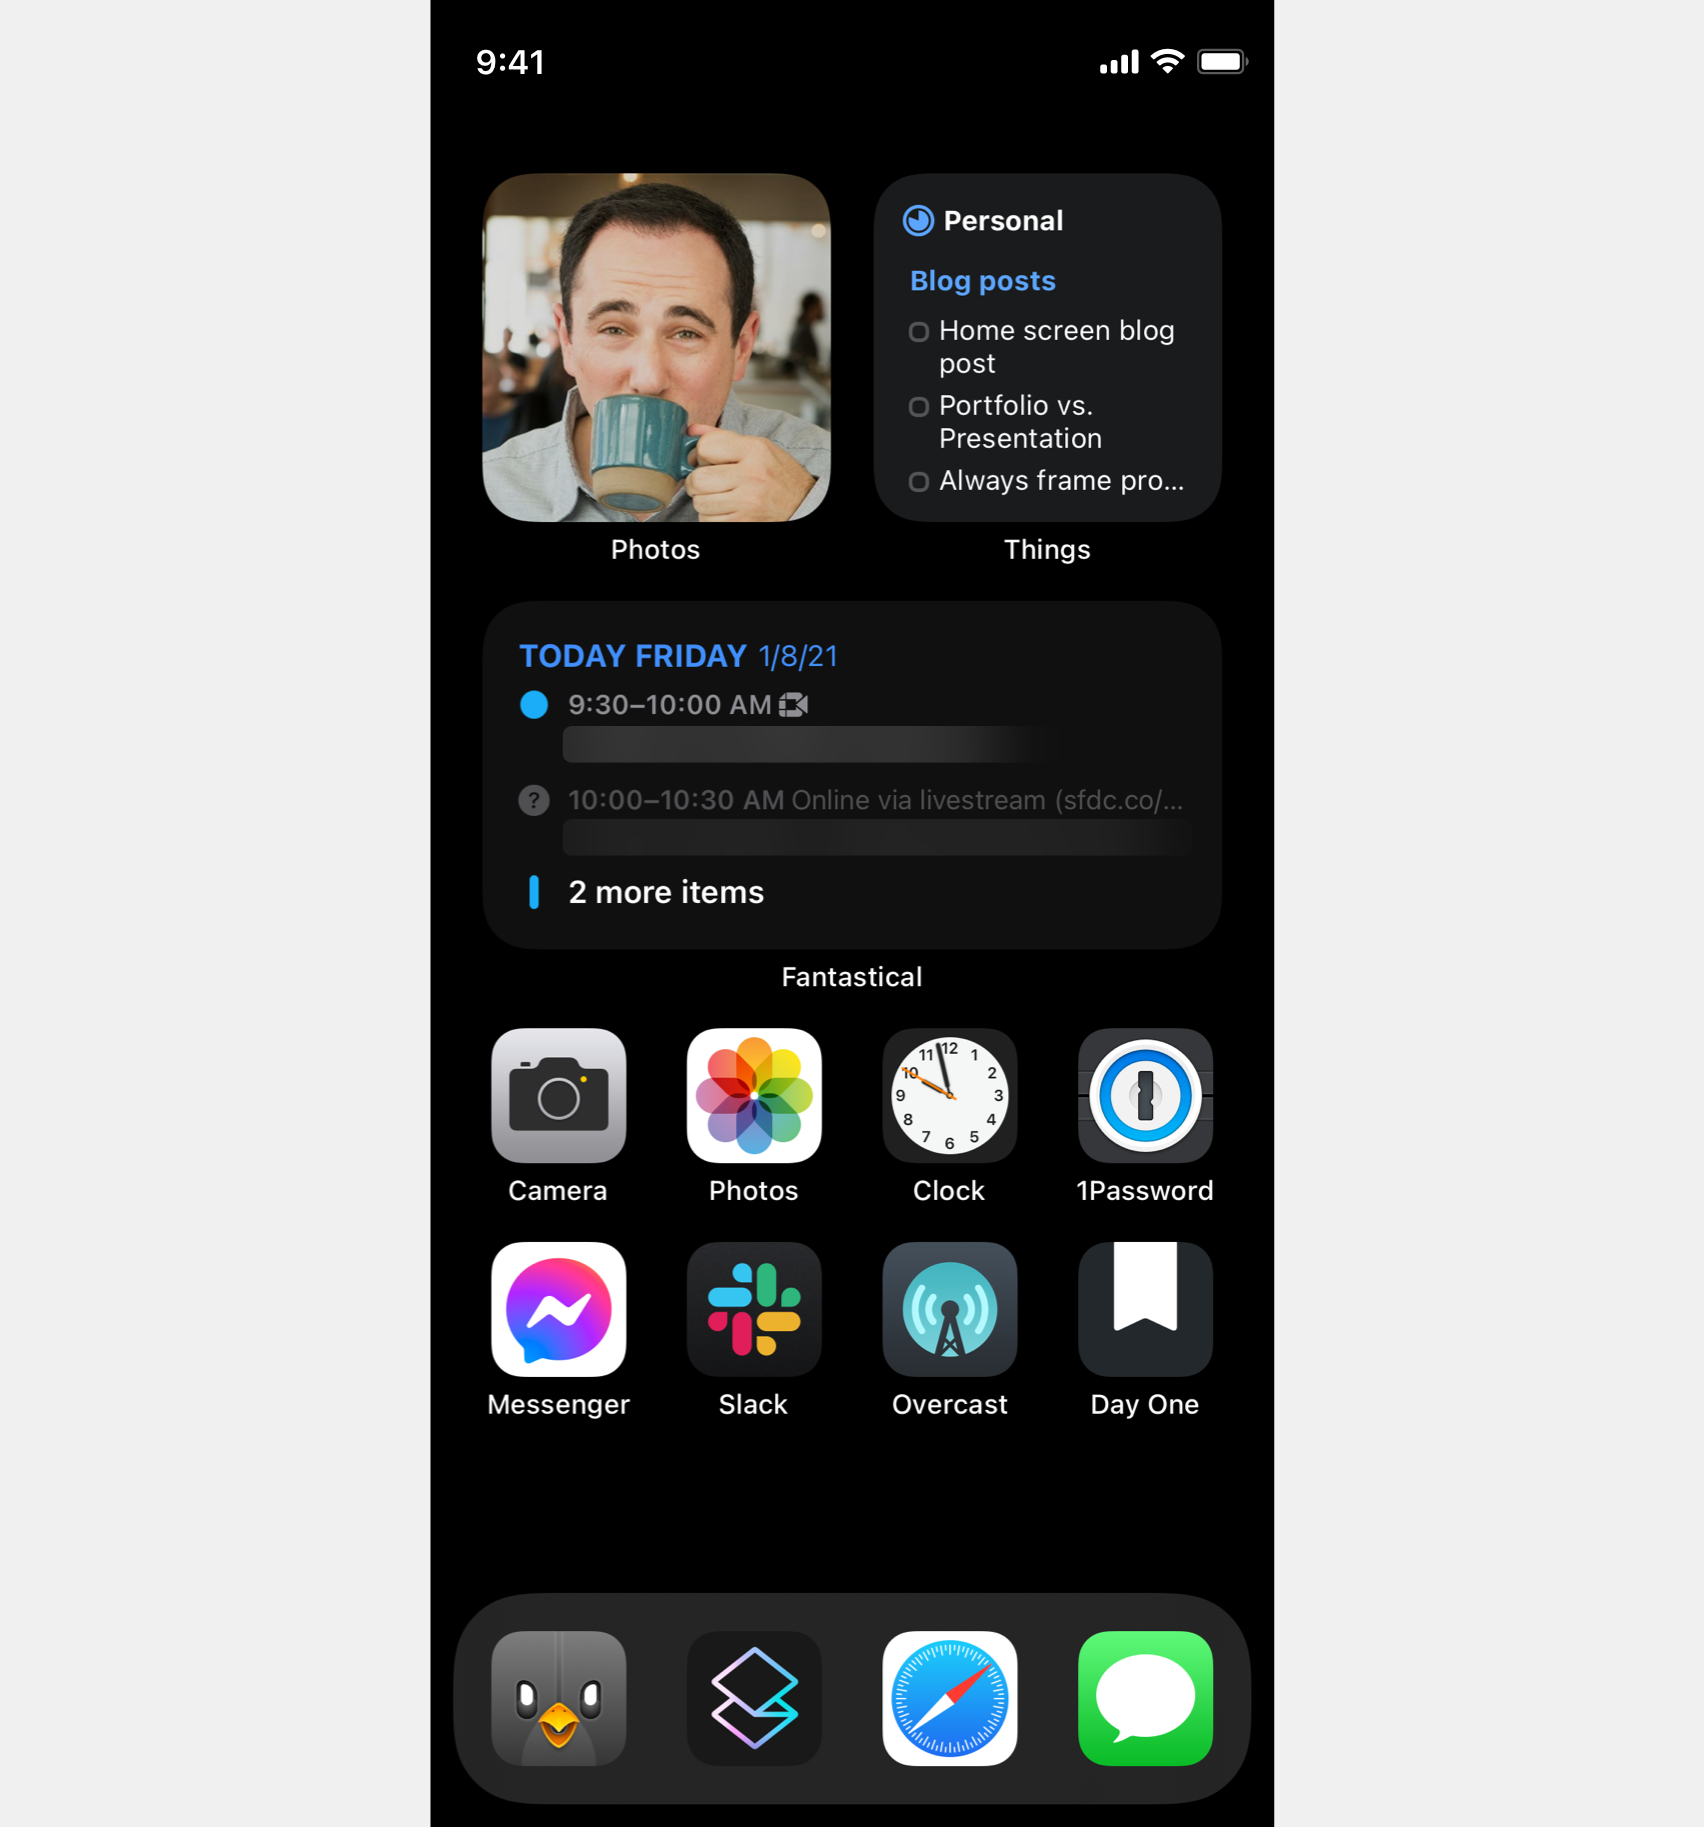
No, I do not normally show a photo of myself on my home screen
I was inspired by MG Siegler to share my homescreen at the start of this new year. According to Screen Time I look at my home screen around 80 times each day. It should be carefully curated and arranged to ensure I can quickly access the apps and content I’m seeking.
I’ve always strived to minimize the number of apps on my devices. If I stop using an app I delete it. This leads to a strictly simple home screen with just a few apps and folders. Also iOS 14 introduced a couple new features that can help reduce the number of visible app icons:
You can now remove apps from your home screen(s) and access them either by search or the App Library.
Widgets can launch their corresponding apps so you do not need their app icons on the home screen.
Let’s begin.
Widgets
I love experimenting with widgets, and I can’t wait to see what developers build in 2021. Yes, I am aware that Android has had widgets for several years. Android is ugly and buggy. Move on.
Widgets force me to be even pickier about which apps are placed on the home screen. Now I’m down to just 12 (8 if you do not include the dock).
Photos
Seeing random photos from my collection that begins in 2002 when I purchased my first digital camera, a Canon S200, brings me so much joy. Occasionally there will be a photo with a friend I haven’t spoken to in a while, and I’ll immediately send it to them.
Things
Things is my to do list app on iOS, macOS, and iPadOS. I’ve used it on and off for several years with the occasional break to try something new. The widget provides a glimpse of what I need to accomplish soon. I often switch to my work list when I know work-related tasks are piling up.
Fantastical
Fantastical is my calendar app on iOS, macOS, and iPadOS. It provides much more functionality and customization compared to the built-in Calendars app. Seeing what meetings are coming up helps me subconsciously prepare throughout the day.
Apps
Camera
I use the built-in Camera app for taking casual photos of objects and people. When I want to take a serious photo in RAW that I will curate, edit, and share later I launch Halide.
Photos
I use Photos to organize photos as part of a four step process: shot, approved, edited, shared on Instagram, and shared on Unsplash. Photos move from album to album throughout this process.
Clock
Clock isn’t the most exciting app, but I oscillate between a few different alarm times during the week.
1Password
1Password is my password manager on iOS, macOS, and iPadOS. Passwords and online security will be its own post someday. The summary is my passwords are usually 20 characters of letters, numbers, and symbols. Any service that offers two-factor authentication is also configured using 1Password. It is crucial to have quick access to this app to copy and paste passwords and one time codes.
Messenger
Sadly I have an important friend group that includes a few Android phones. They are not interested in Signal, Telegram, etc. Hopefully I can remove this someday and be free of Facebook. Oh wait I still use Instagram. Uh oh.
Slack
Slack is crucial for informal communication. I don’t even check work email on my phone (mostly because of security restrictions).
Overcast
Overcast is my podcast player on iOS (and on macOS using the web app). Someday when I have an M1-powered Mac I’ll be able to run the iOS app on my desk. I prefer Overcast over Apple’s built-in Podcasts app because of its simple design, and features like Smart Speed and Voice Boost which save time and enhance voices. According to Overcast Smart Speed has saved me 391 hours of listening time.
Day One
One of my goals for 2021 is to get my thoughts, concerns, ideas, etc. out of my head. Day One is feature-rich journaling app on iOS, macOS, and iPadOS, and for me it’s perfect for quickly launching and typing whatever is on my mind.
Dock
Tweetbot
Tweetbot is my favorite third party Twitter client, and, most importantly, it has a feature I can’t live without: timeline sync. I’m a Twitter completionist, so it’s important to not lose track of where I am in my timeline. If I read a few Tweets on my iPhone and then open my Mac, I want to keep reading from where I left off. You cannot do this with Twitter’s own apps.
Superhuman
Superhuman is an email app that sits on top of Gmail. It’s available on iOS, macOS, and iPadOS. I like it because it’s extremely fast, and it has a minimalist aesthetic. I don’t want to see all the cruft and buttons and features and flags and whatever else Google decides to launch. Just text.
Safari
For personal web browsing I use Safari on iOS, macOS, and iPadOS. I like how tab syncing is built in to iCloud, and, anecdotally, Safari is faster and more stable than Chrome.
Messages
Obviously Messages is used on iOS, macOS, and iPadOS all day everyday. iMessage is awesome and I’m delighted to see Apple building new functionality for it like replies.
The most comfortable backpack you’ll ever own. For daily grind and passions. For years to come. This is a collaborative project between Minimalissimo and ODA. This waterproof backpack offers extreme versatility. For work or play, in the city or the countryside, dressed up or dressed down. The minimalist design suits every situation. The approach is simple, the result is utilitarian with a minimalist aesthetic.
This backpack caught my eye as a potential future work bag. It’s simple and thin which is ideal for someone who only carries a laptop to and from work (although I tried a few times to leave my laptop at work in 2019 and it backfired once).
A poor portfolio for product designers is when it only shows the artifacts (e.g. the screen). I’d consider it as a weak portfolio. Because it doesn’t help me to know whether a designer can make a good decision or at least have a good line of thinking. I don’t even know if the outcome help the team achieve the goal or learn something.
It does not matter how beautiful your mockups or screenshots are. I just wonder where they come from, why they exist, what problems they solved, etc.
An okay portfolio describes the problem and the result. I generally encourage people who don’t have enough time to go with this format. I will mostly be interested in this portfolio when I hire a junior-mid level.
This is crucial. Beautiful mockups are a start, but what problem do they solve? Your portfolio and presentation should be a series of problem/solution pairs.
A great portfolio provides context on why this project started. What are the customer problems and business challenges? Then the result of their solution. The approach is a bonus tho, I’m still okay when it doesn’t show a detailed process. Because at this point, I’ll be interested if I see they solve a complex problem before and can articulate it clearly.
Context, context, context. Do not simply give a real estate tour of an interface you designed. Focus on the story. What was the problem, why did you and your team work on this, what did you learn, etc.
After reading reviews of the new M1-based MacBook Air, Mac mini, and 13” MacBook Pro computers, one line stuck out at the very end of John Gruber’s article.
Steve Jobs would have fucking loved these M1 Macs.
I think Gruber is absolutely right.
I recommend listening to 20 Macs for 2020 podcast. There are several audio clips from Apple keynotes with Jobs talking about new products and features on stage. His confidence and enthusiasm are something I think Apple lacks to this day. It’s nice to reminisce about the period when keynotes felt like magic tricks: pulling an iPod nano out of a pocket, sliding a MacBook Air out of a manila envelope, etc.
It’s important to note that the beginning of this years-long process of transitioning from Intel to Apple silicon began with the debut of the Apple-designed A4 processor in the original iPad in 2010. One could argue that bringing the M1 to the Mac is the final Jobs-inspired magic trick.
I need to sell my 2016 MacBook Pro and pick up a new MacBook Air. Immediately.